How To Measure Crochet Hats
(Hat Sizing Template, Sizing Calculators,
& Manual Measurement)
Are you wondering how you can measure crochet hats to make sure you get the proper fit?
In this post, I'll show you 3 easy ways to get your crochet hat sizing measurements perfectly right:
1. Using a Hat Sizing Chart (Free printable)
2. Using Crochet Hat Sizing Calculators
3. Manually measuring and calculating the perfect hat.
Like this post? Save it to Pinterest!

I've also included a list of frequently asked questions at the end of this tutorial. If you have any questions that I haven't answered there, please drop me a comment below.
Disclaimer: This post contains affiliate links, which means I receive a small commission, at no extra cost to you, if you make a purchase using the Start Crochet links. Please see my disclosure for more details.
Are you just learning how to crochet? Have a look at these awesome crochet kits, perfect for beginners! I wrote a complete hands-on review on The Woobles Kits for you 🙂

Why Crochet Hat Sizing Matters
Properly sizing your crochet hats is super important for several reasons. Everyone's head is different, so one size doesn't fit all.

Here are a few reasons why you need to make sure your crochet hat fits properly:
- Comfort: A hat that fits well feels comfy, no headaches or squishing! And it won't leave marks on your forehead.
- Sun Protection: The right size hat keeps your head and face shielded from the sun's rays.
- Functionality: Your hat does its job better when it's the right size, like keeping you cool in hot weather, or warm and cozy when it's cold.
- Style: A good fit makes you look super cool and fashionable.
- Durability: The right fit helps your hat last longer and stay in good shape.
So now that we know about the "why", let's talk about the "how".
Understanding Head Measurements
Before diving into crochet hat sizing, you need to understand how you would go about measuring a head to start with.
Circumference
First, you want to figure out the circumference of the head. The circumference is the distance around the head (from the forehead all the way to the back of the head and back to the forehead in a circle). This is how you can measure it:

- Grab a flexible measuring tape or even just a piece a string.
- Start by putting it right above the eyebrows where the hat sits.
- Wrap it around the widest part of the head (around the temples and the back).
- Just make sure it's snug, but not strangling the poor head.
- Write down the measurement in inches or centimeters.
- Now, consult the crochet hat sizing chart below to find the perfect hat size.
- If you need to, make some tweaks based on personal preferences or head shape.
- If you can, try it on occasionally while crocheting to make sure it fits like a charm.
If you do all this, you'll crochet hats that fit well and keep everyone comfy and stylish.
Negative Ease
If you haven't heard of the term "negative ease", don't worry! It's actually quite simple to understand.
Negative ease means that the hat you make will be a little bit smaller than the actual size of your head (about 2 inches / 5 cm).

Why would we want to make a smaller hat? Well, when we wear a hat, we want it to fit snugly on our head and stay in place.
If the hat is too loose, it might fall off or slide around.
So, by making a hat with negative ease, you can be sure that it will fit just right and stay on our head comfortably. It's like a cozy and secure hug for your head!
Negative ease is especially important when using stretchy yarn or patterns that recommend it.
For example, if you want to crochet a hat for an adult woman who's head circumference is 22", then you should crochet a chain that is 20" long (circumference), therefore allowing for a negative ease of 2" (that's if you're crocheting a hat from the bottom-up... more on this later).
Stitch Count
Now that you know the circumference and understand negative ease, you'll need to find out the target stitch count that you need to make to reach the length you need for your hat.

Stitch count simply means the number of stitches you need to make in each round or row of your hat to match gauge. It's a way of knowing how wide or tall your work is turning out to be.
Gauge tells you how many stitches fit into a certain measurement. In every crochet pattern, you'll see Gauge mentioned before the instructions.
Your tension will also influence the number of stitches you need. So for this, you need to calculate your gauge to know exactly how many stitches you need.
What you need to do is crochet a swatch (4" x 4" sample) using the same hook size and yarn to get the same length as given in the swatch.
Everyone's crochet stitches can be a little different, you might have a different number of stitches than the designer to reach the same length.
This can easily be adjusted by changing your hook size to meet gauge. You'll need a smaller hook size if your swatch turned out to be larger than the designer's, and you could go up a size or two in hook size if your swatch turned out to be too small.
Watch this video tutorial by Sheepishly Sharing to see exactly how this works.
The stitch count determines the size and shape of your hat. Different patterns and designs require specific stitch counts to get the shape you're looking for.
For example, if you're making a top-down hat that starts small and gradually gets bigger to reach the diameter size of the crown of the head, you'll increase the stitch count as you go.
Normally, you'll crochet a flat circle, then once you've reached the head circumference, you stop increasing your stitches and start working in even rounds.
How do you crochet a flat circle, you ask? Check out this blog post on how to crochet a flat circle and you're welcome to download this free printable that shows you the exact stitch counts you need to get your circle to lay flat.

The stitch count is your guiding light as you crochet. It helps you keep track of where you are and ensures your hat turns out just the way you want it.
So, pay attention to that stitch count, follow your pattern, and crochet away to create a fabulous hat that's uniquely yours!
Crocheting Hats / Beanies: 4 Methods
First of all, let's discuss the different methods of crocheting a hat or beanie. Will you be making a hat from the top down or from the bottom up?
There are 2 ways to crochet hats or beanies.
1. Top - down
To crochet a hat or beanie from the crown of the head down towards the ears, you start with a Magic Ring/Circle or alternative to create a flat circle. The size of this circle will depend on the circumference of the head.
This can be done either by joining rounds or by working in continuous rounds to form a spiral.

Top-Down beanies are more snug
Once you've reached the full circumference size by crocheting the appropriate increases in the round, you then continue to crochet down the sides of the head without increases.
The side length of the beanie or hat will depend on whether it'll be used in summer or winter. If you are crocheting a beanie for winter, then you'll want to cover the ears and the side length of the beanie will be from the crown of the head to the bottom of the ear.
If you are crocheting a summer hat, then the side length of your hat will be measured from the crown of the head to the top of the ear only. You will probable then add a brim to the hat with some increases for the brim to protrude outwards.
2. Bottom - Up
The bottom-up method means you start with the ribbing/brim or bottom of the hat and work into the side edges of the brim to gradually crochet your way upwards towards the top of the head (crown).

A. Worked Flat
There are several ways to start your hat in this way, either with a beginning foundation chain that's the length of the head circumference and then crocheting a flat rectangle in rows (side-to-side).
In this case, the height would be the length of the head from the crown to below the ear (for a beanie) or from the crown to above the ear (for a summer hat with a brim).

B. Worked in the Round
You could also start this bottom-up type of hat with a foundation chain and then connect your last stitch to your first stitch to create a circle. This circle would be the size of the head circumference. From here, you would then crochet in the round (either joined rounds or spiral) to reach the top of your beanie. In the spiral technique, you will have no visible seam in your beanie.

In either case, you will want to have a narrower end at the top of the head. Sometime, you would do a few decreases towards the top of the head to start narrowing your hat, or some patterns simply call for scrunching up the top of the beanie (in the case of rectangular flat beanies).
For these types of beanies, you'll mostly find a pom-pom added to the top. This is not just an embellishment, but also hides that unsightly hole at the top of the hat which happens when using the bottom-up method.

3. Flat Rectangle in Rows (side-to-side)
To crochet a hat from side-to-side you would work from one end of the brim to the other. Yes, that means you'll be crocheting a rectangle, and then turning it into a beanie by stitching the sides together and scrunching up the top. This technique gives you the possibility to create cute designs, like cat hats, slouchy beanies or fishermen's hats.
4. Panel construction
Some summer hats are crocheted by creating individual panels or sections and then seaming them together. This method allows for more intricate stitch patterns, colorwork, and the addition of decorative details. An example of this would be Granny Square Hats, like this Grannies & Stripes Bucket Hat I designed for my daughter.

There are even more ways you could crochet a hat like cables or swirls and other types of construction, but I won't get into these in this blog post. The ones I mentioned above are the most popular types of crochet hats.
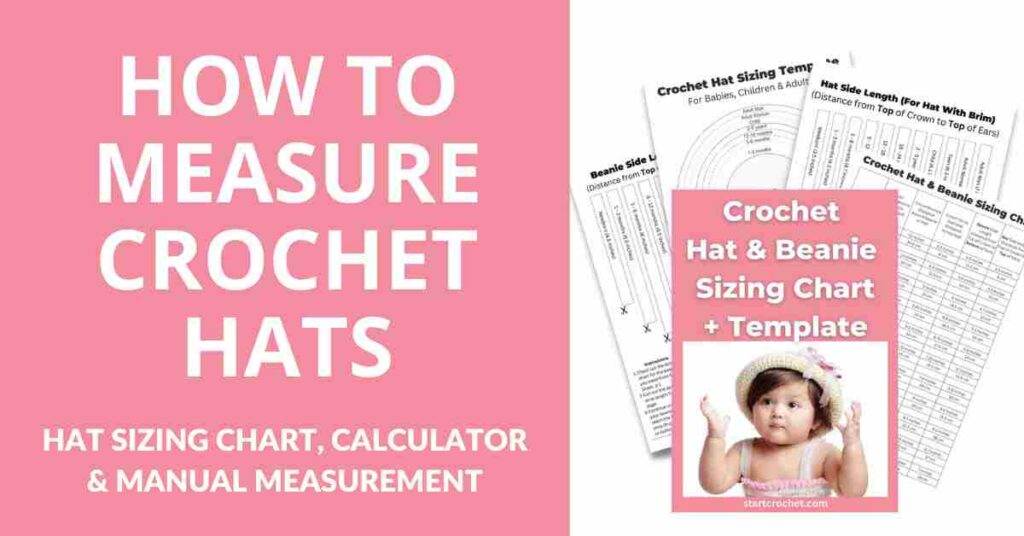
Crochet Hat Sizing Chart & Template (PDF Printable)
If you're looking for the simplest, most straight-forward way to measure your crochet hat without having to use any math, you can download this Free Crochet Hat & Beanie Sizing Chart & Template.
All you need to do is measure the diameter of your beginning circle on the template by placing it on top of the paper and checking the circle size you're aiming for and you're good to go.
If you want to understand how to size a crochet hat using a calculator or manual measurement, then keep scrolling.
I designed this chart after several failed attempts at crocheting hats & beanies as gifts and getting their measurements all wrong!
I wanted to simplify the process as much as possible to make it ideal for beginners especially. All you need to do is print out the Crochet Hat Sizing Template below and use it as a guide to measure the dimensions of your hat.
It doesn't matter what type of stitch you're using for your hat. Whether you're using single crochet, double crochet or whatnot, this hat sizing template uses measurements in inches and centimeters to measure the diameter of your flat circle. It also includes a template to measure the length of your hat from the crown of your head to the ear (either the top of the ear for summer hats with brims or the bottom of the ear for winter hats/beanies).
But before you go ahead and download the printable, have a read through this rest of this post to better understand head measurements in crochet, why crochet hat sizing matters and some tips about measuring crochet hats.
Like this post? Save it to Pinterest!

Note: It's important to understand that the measurements mentioned in this chart are approximate and that babies, children & adults have very differently sized heads even if they're the same age. Ideally, you'd measure the person's head with a tape measure, but if this is not possible, or you are making some crochet hats to gift or sell, then using this easy to print crochet hat sizing template is your next best bet.
Crochet Hat & Beanie Sizing Chart + Template
Free Download

Calculating Stitch Count on a Top-Down Hat/Beanie
Now that we know there are several different methods to construct a crochet hat or beanie, let's look at how we can go about measuring their sizes correctly.
Calculate Diameter With A Calculator
If you're not a math whizz and want a simple calculator to give you the dimensions you need, feel free to use this nifty little tool down below. All you need to do is measure the head circumference of the person you're crocheting the hat for or use the hat sizing template to figure out the circumference.
Type that number into the calculator, and it'll give you the diameter of the circle you need to crochet for the top of the head.
Click on the image below to use the Free Crochet Hat Size Calculator now.

How to Calculate Hat Diameter Manually
There's a simple formula you can follow to find out exactly what stitch count you need for a top-down beanie. It involves a little bit of math, but don't worry! It's really quite simple.
What you need to do is divide your desired circumference by Pi (3.14). This will give you the diameter you need for your hat.
Divide the head circumference by π (pi), which is approximately 3.14.
Hat diameter = head circumference / π (pi) (3.14).
Let's look at an example:
So if we know that the hat we want to crochet should be 22 inches in circumference, then we need to find out the diameter of the circle we need to crochet for the top of the head before we can stop increasing and working the rest of the hat in even rounds.
For example, if the head circumference is 22 inches, the calculation would be:
Diameter = 22 inches / 3.14 ≈ 7 inches
So, the estimated hat diameter in this case would be approximately 7 inches.
This means, that you crochet a flat circle of 7 inches in diameter, then stop increasing and simply crochet rounds until you reach the desired side length of your hat or beanie.
Keep in mind that this formula gives you an approximate diameter. The actual size may vary based on the stitch pattern, yarn thickness, and personal preference. It's always a good idea to try on the hat during the crocheting process to make sure it fits well.
Now that you know the diameter you need, it's time to figure out the stitch count. Have a look at the stitch pattern you'll be using and the gauge or number of stitches per inch in that pattern. Try to match that gauge and you'll be good to go.
Calculate Stitch Count With A Calculator
If you want an easy peasy way to figure out your stitch count, then go ahead and use the calculator below. Click on the image and it will take you straight to the calculator tool.

How To Calculate Stitch Count Manually
If the pattern you're following says the gauge is 14 sc stitches per 4"/10cm, then you need to figure out how many sc stitches you need for the 21" you need to get the circumference measurement.
In this case, you can use this formula: multiply 21 * 14 / 4 = 73.5 stitches.
If Gauge is 14 sc = 4"
Then hat circumference would be 21 (desired circumference) * 14 (gauge stitches) / 4 (Gauge length).
Like this post? Save it to Pinterest!
Calculating Stitch Count on a Bottom-Up Hat/Beanie
Bottom-up hats are usually started with the ribbing, but often start with a simple chain or foundation chain. If you want to learn how to crochet ribbing, this tutorial shows different options for how stretchy you want your beanie ribbing to be.
You could also make the entire hat with ribbing, which gives it a really nice texture and can feel really cozy because of its stretchy nature.

How to crochet easy ribbing for hats, cuffs and cardigans
What you do with the ribbing or beginning chain is check how long you need it to be. You'll find this length by checking the circumference of the head (which you can either measure with a tape measure, as shown above or you can get the circumference size from the Hat Sizing Template Printable.)
Once you get the length of the circumference, you'll count the number of stitches you have to know your stitch count.
You then crochet up the length of the head from the bottom of the ear to the top of the head. You'll also find this measurement in the Hat Sizing Template or you could measure this length with a tape measure.
Now if you're starting off your hat with ribbing, then you'll want to know how wide you want your ribbing to be. This is a personal preference. Some people like it wider than others, but in any case, once you're done working your ribbing in short rows, you'll then start crocheting the body of your hat into one side of the ribbing upwards, to reach the crown of the head.

Tips for Crocheting Hats in the Right Size
Now that you have the measurements from the Crochet Hat Sizing Chart, let's see how you can crochet hats that fit perfectly. Here are some essential tips to keep in mind:
1. Negative Ease:
Crochet hats and beanies often have stretch, so it's important to take negative ease into account when determining the hat size.
This means that the finished hat circumference should be slightly smaller (1"-3"/2.5cm-7.5cm) than the head circumference of the person who will wear the hat. Negative ease ensures a snug fit that won't slip down over the eyes.
2. Yarn Fiber:
What type of yarn are you using for your crochet hat? Different fibers have different levels of stretch. Acrylic or wool yarns usually have more stretch, while cotton yarns have less stretch. Adjust your hat size accordingly to accommodate the yarn's characteristics.
3. Stitch Pattern:
The stitch pattern you choose for your crochet hat also affects its size. Tightly-woven stitch patterns with little stretch (like single crochet) will end up in a hat closer to the head measurement.
But if you're using super stretchy ribbing, this can make the hat several inches smaller than the head measurement. Keep this in mind and adjust your stitch pattern to make sure your hat fits properly.
4. Crocheting from the Bottom-Up or Top-Down:
As you've learned above, crochet hats can be worked from the bottom-up or top-down. But which method is better? Bottom-up hats, often starting with ribbing, tend to be looser fitting as it can be challenging to close up the gap completely at the top. Top-down hats, shaped around the top of the head, usually have a more fitted look. Both approaches have their advantages, so choose the method that you feel more comfortable with.
Frequently Asked Questions About Measuring Crochet Hats
How do I measure my head for a crochet hat?
Use a soft tape measure to measure the widest part of your head, typically around the ears and forehead. You could also use a piece of string and mark how long the circumference length and then use that to see how long your beginning chain or ribbing length should be. Remember to account for "Negative Ease".
Can I customize a crochet hat size?
For sure! You can customize crochet hat sizes by adjusting the stitch count, changing the size of your crochet hook, and following the measurements provided in the Crochet Hat Sizing Chart & Template.
Are there different templates for different hat sizes?
Yes, you can use the Crochet Hat Sizing Chart & Template that covers different hat sizes, including those for babies, children, and adults. You can use these measurements as a reference for different hat sizes.
How can I ensure the hat fits well?
Make sure you take negative ease into account when crocheting hats, making them slightly smaller than the head circumference to ensure a snug fit. Keep in mind the yarn fiber and stitch pattern you'll use and adjust your hat so you get the fit you're looking for.
Where can I find a free crochet hat sizing template?
Here's a free crochet hat sizing chart & template for you:
Crochet Hat & Beanie Sizing Chart + Template
Free Download


Conclusion
Mastering crochet hat sizing is an essential skill for any crocheter. With this comprehensive guide and crochet hat sizing chart & template, you can create hats that fit perfectly every time.
Remember to factor in the head measurements, apply negative ease, and choose the right yarn and stitch pattern for a perfect fit.
Let me know if you have any questions and...
Happy crocheting!

Let's Keep in Touch :)
You May Also Like

About the Author
May
Follow me on socials here: