
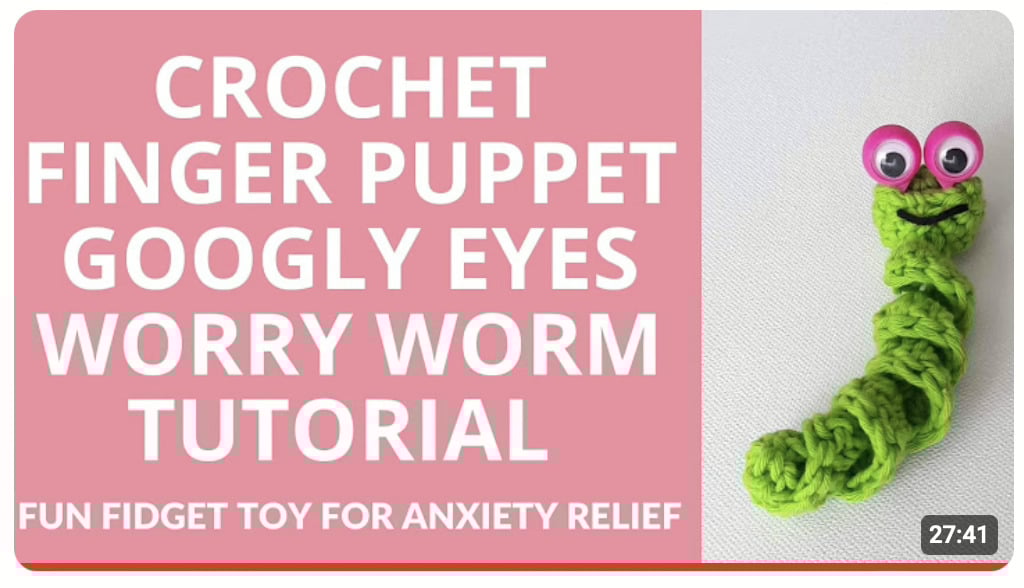
Finger Puppet Googly Eyes
Worry Worm
Crochet Pattern
Using Finger Puppet Eyes in crochet projects is the latest craze in many FB groups at the moment!
A lot people are using them for Random Acts of Kindness making small projects with these funny little Finger Puppet Googly Eyes to leave out & about for some lucky people to find.

Most people who’ve made worry worms with these kinds of eyes tend to crochet around the ‘nose’ section of the Finger Puppet Eyes.
That’s one way of doing it, but I thought I’d show you another way you could use these Finger Puppet Eyes on Worry Worms with Amigurumi-style heads where you hide the ‘nose’ section altogether and all you see is those funny large eyes popping out of the worry worm’s head!
")
Meet Wiggly Wilbur (Your New Fidget Friend)! You can use him as gifts for children in classrooms, therapy centers, or hospitals, for instance. You could also leave your wiggly worry worms out & about in playgrounds, in the forest or any place really for people to find & make their day!
Just follow the step-by-step photo instructions below and if you have any questions, you can ask them in the Start Crochet FB Group where you will surely get the help you’re looking for.
And if you'd like to check out a little experiment I made about crocheting Corkscrew Spirals using different stitches & stitch counts, you can have a look at this post here.

Special Offer!
6 Themed Worry Worm Patterns
Bundle Sale

6 Themed Worry Worm Patterns Bundle
Special Offer!
15 Worry Worm Patterns
Mega Bundle Sale

The Finger Puppet Googly Eyes Worry Worm is featured today in the ScrapTastic Blog Hop! Scroll down to the bottom of the page to find out how to get this pattern for FREE today!
Finger Puppet Googly Eyes Worry Worm Crochet Pattern Video Tutorial on YouTube
Disclaimer: This post contains affiliate links, which means I receive a small commission, at no extra cost to you, if you make a purchase using the Start Crochet links. Please see my disclosure for more details.
")
Finger Puppet Googly Eyes Worry Worm with glow-in-the-dark yarn
AD-FREE PDF PRINTABLE OFFERS
PDF Crochet Pattern
$3.99
Ad-Free Printable PDF Finger Puppet Googly Eyes Worry Worm Crochet Pattern

Printable Poem Tags
$4.99
Printable PDF Worry Worm Poem Tags (Non-editable)

PDF Crochet Pattern + Printable Poem Tags
$9.98
$7.99
BUNDLE: Ad-Free Printable PDF Finger Puppet Googly Eyes Worry Worm Pattern + Editable Poem Tags

6 PDF Worry Worm Crochet Patterns
$26.94
$19.99
BUNDLE: 6 Ad-Free Printable PDF Worry Worm Crochet Patterns for Every Occasion

15 PDF Worry Worm Crochet Patterns MEGA Bundle
$79.84
$39.99
MEGA BUNDLE: 15 Ad-Free Printable PDF Worry Worm Crochet Patterns + 1 Set of Poem Tags
Keep scrolling for the Free Written Pattern & Photo Tutorial.
Materials Needed
- Finger Puppet Eyes size 1.37” * 1.26” (3.5 cm * 3.2 cm) (available at Amazon and eBay or Temu - see link below)
- Yarn - in color of choice. I used Lang Handarbeitsgarn (DK) 100% cotton.
- Crochet hook that fits your yarnI used a G/6 (4 mm) hook.
- A stitch marker, hairpin or a strand of yarn in contrasting color.
- A darning needle
- A pair of scissors
- Small amount of fiberfill stuffing
- For the mouth, a strand of black yarn.
- Glue (to glue on the mouth)
️TEMU LINK: Click the link https://temu.to/m/u3ls4x2kv19 to get CHF100 coupon bundle or ️ Search acj021775 on the Temu App to get 30% off discount !!

Subscribe To My Newsletter
Would you like to stay updated with new free patterns, crochet tips & tricks, and delightful crochet inspiration sent straight to your inbox? Please enter your Name & Email below 🙂
Abbreviations
- mc = magic circle
- ch = chain
- sc = single crochet
- dc = double crochet
- sl st = slip stitch
- st = stitch
- sts = stitches
- Sc2tog = single crochet 2 together (decrease)
- fo = fasten off

Skill Level
- Intermediate (knowledge of how to work a Magic Circle or alternative required).

- It’s also a bit tricky to work through the ‘nose’ section of the finger puppet eyes to hold it in place, so it could be a little challenging if you're an absolute beginner.
Gauge
16 stitches and 8 rows = 4" (10 cm) in double crochet (US).
Gauge is not really that crucial for this project. Just try experimenting with different hook sizes & different weight yarns to get a gauge you are happy with for the project you are working on.
If your Worry Worm looks narrow or not as full as you anticipated, try a heavier weight yarn. If you want your Worry Worm to be longer, just increase the number of stitches in your body chain.

Size
This Finger Puppet Eyes Worry Worm measures about 4.7 “ (12 cm) in height.
Yardage
Weight: 10 gm (including Finger Puppet Eyes), 8 gm (without eyes)
Yardage: Approximately 14.6 yards (13.4 meters)

Notes
- You can use any type of yarn as long as you have a corresponding crochet hook size (check yarn label for recommendations). Best results are with bulkier weight yarns.
- You can make the pattern larger or smaller by changing the type of yarn and/or hook size.
- Numbers at the end of each row (in brackets) indicate the number of final stitches in that row.
- Head is worked in continuous rounds (stitch marker use advised).
- Please note that I use US crochet terms.
US vs. UK Crochet Terms & Symbols
Free Printable

Your info is 100% secure and will never be shared.

Finger Puppet Googly Eyes Worry Worms
Like this pattern, but not ready to work it yet? Save it to Pinterest!

AD-FREE PDF PRINTABLE OFFERS
PDF Crochet Pattern
$3.99
Ad-Free Printable PDF Finger Puppet Googly Eyes Worry Worm Crochet Pattern
Printable Poem Tags
$4.99
Printable PDF Worry Worm Poem Tags (Non-editable)
PDF Crochet Pattern + Printable Poem Tags
$9.98
$7.99
BUNDLE: Ad-Free Printable PDF Finger Puppet Googly Eyes Worry Worm Pattern + Editable Poem Tags
6 PDF Worry Worm Crochet Patterns
$26.94
$19.99
BUNDLE: 6 Ad-Free Printable PDF Worry Worm Crochet Patterns for Every Occasion
15 PDF Worry Worm Crochet Patterns MEGA Bundle
$79.84
$39.99
MEGA BUNDLE: 15 Ad-Free Printable PDF Worry Worm Crochet Patterns + 1 Set of Poem Tags
Finger Puppet Googly Eyes Worry Worm Pattern Instructions
Head
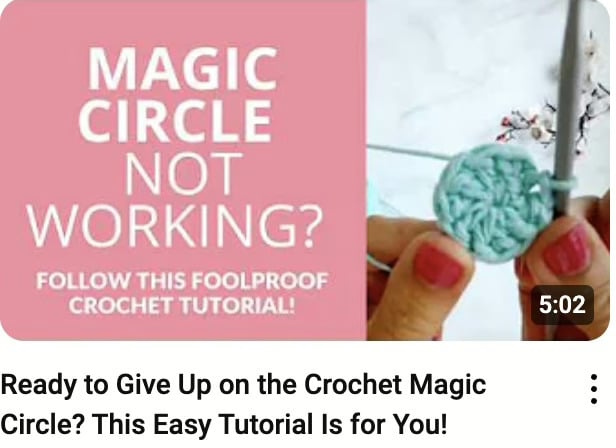
Start your worry worm’s head with a Magic Circle (MC), ch 1.
Note: If you don't know how to work a MC, you can check out these videos to learn, or start with a ch 2, then crochet 6 sc into the second ch from your hook.

Round 1: 6 sc into the MC (6).

- Pull your MC closed tight.

Round 2:
Note: Place your stitch marker in the first sc st of each round from now on.
2 sc into each st around (12).
Round 3: Move stitch marker into the first upcoming st.

Insert stitch marker into this first st

2 sc into each st around (12).
- [sc into the first st, 2 sc into the next], repeat [ ] one more time.

- sc into the next st, ch 2, skip 1 st, [sc into the next st, 2 sc into the next],
repeat [ ] 2 more times (18).

Here you can see the ch 2 that will create the gap to insert the finger puppet eyes into later.

End of Round 3 (18 sts)
Round 4: Move stitch marker into the first upcoming st.
- sc into each st around, making sure you work 2 sc into the ch 2 gap of R 3 (18).

Round 5: Move stitch marker into the first upcoming st.
- [sc into the first st, sc2tog in the next], repeat 5 more times (12).

This is an invisible decrease, but you may work a regular sc2tog if you prefer.

Your worry worm's head should start to become narrower at the bottom now.
- Insert the nose section of the finger puppet eyes into the ch 2 gap.

- With the loop of Round 5 still on your hook, insert your hook through the nose part of the finger puppet eyes and work 4 sc through the nose to attach and hold in place. (work loosely here).

Insert your hook through the ring to work your sc sts/

Numbers show your 4 sc sts.
- Tuck the beginning yarn tail into the head and stuff head with a small amount of fiberfill or scrap yarn (do not overstuff).
- Pull working yarn tail tightly to secure.

- Sc into the next st (the st directly to the left of your stitch marker from Round 5).
- Move your stitch marker to this new st.

Round 6: sc2tog 6 times (6).

Invisible decrease.

End of round 6 (6 sts left)
Remove your stitch marker & set aside.
Round 7: sc2tog 3 times (3).
Body
Row 1: ch 21 (This is the center of your worry worm’s body).

Row 2: 3 dc into the second ch from your hook. 3 dc into each st across towards the worry worm's head (60).


- Sl st into the next st from where you started the body ch to join body to head. There were 3 sts in Round 7.
Note: You started your body chain from the fist st, so now you sl st into the next st to attach the body to the head.

- Leaving a 4” tail, cut your yarn and fo.

- Curl your worry worm’s body by twisting it into shape (you could use your finger or a pencil and twist around it).

- Thread the end tail onto your darning needle, insert your needle through the ‘neck’ of your worm toward the back of the head. Weave it in and out a few times to secure. (If there’s a hole at the top of your worry worm’s head from Round 1, this is where you can stitch that hole together to tighten the gap.

- Insert the needle from the top of the head back down towards the neck.
- Remove your needle and cut excess yarn.

Mouth
Option 1: Stitch Yarn
- You may stitch the mouth on with a darning needle. To do this, cut about 10” of black yarn and thread onto your darning needle.
- Insert your needle from the back of the worry worm’s head to the right edge of the mouth.

- Insert your needle from the left edge of the mouth back to toward the back of the head in the same place from where you inserted your needle in the beginning.
- Shape the mouth into a nice smile 🙂

- Remove your darning needle and tie a double knot to secure the two strands.
- Cute excess.
- With your hook or needle, push the knot into the head so that it’s no longer visible.


Option 2: Glue Yarn
Cut about an inch length of black yarn & glue it onto your worry worm’s face.

Here you can see the Green one's mouth is glued, and the red one's is stitched on.
Like this pattern, but not ready to work it yet? Save it to Pinterest!

Have you started several crochet projects and are worried you won't remember your hook size, the yarn you used or which pattern you were following? Download this Free Crochet Project Tracker and keep it in your projects folder.
Crochet Project Tracker
Free Printable
Keep track of your crochet projects with these printable sheets.
And if you're interested in making more fun crochet characters using these finger puppet googly eyes, check out this post below.

I hope you enjoyed making this cute little Finger Puppet Eyes Worry Worm! What will you be using it for?
I’d love to hear from you in the comments below!
Happy hooking!
May 🙂
Special Offer!
15 Worry Worm Patterns
Mega Bundle Sale
Disclaimer: Information in this crochet pattern is given for reference only. Even though I do my best to ensure all patterns have no mistakes, occasional errors may slip through.
No liability is accepted for variations in finished projects. Please get in touch with me at admin@startcrochet.com if you think there might be a mistake in the pattern or if you are unsure about how to interpret the instructions.
This free pattern is provided for personal use only. You may not copy, redistribute, or sell the pattern (in whole or in part) in any form. You are, however, welcome to sell finished items made from this pattern – credit to Start Crochet as the designer is always appreciated.
I’d love to see your finished item, so please tag me using @startcrochet.
Please follow my accounts to see what else I’m up to and to keep in touch:
YouTube: https://www.youtube.com/@StartCrochet
Facebook https://www.facebook.com/startcrochet
Instagram https://www.instagram.com/startcrochet
Pinterest https://www.pinterest.ch/startcrochet
Ravelry: https://www.ravelry.com/people/StartCrochet
LoveCrafts: https://www.lovecrafts.com/en-gb/user/Start-Crochet
Yarnsea https://yarnsea.com/collections/start-crochet
Thank you!
© All rights for this pattern are reserved to Start Crochet. Copies and/or reproduction, translation or reselling of this pattern is a violation of the law.
Let's Keep in Touch :)
You May Also Like

About the Author
May
Follow me on socials here:
Love the finger puppet worry worm pattern. Works up quickly. Fun thing for students to fidget with that is not noisy:) and they are just cute!
@starcrochet.com
Thank you for letting me test this cute little pattern. Whether you make just one, or a dozen, it is quick and easy and there is a tag to attach if you use them for random acts of kindness. Don’t worry, this little Worm has eyes for you
A lovely and Addictive Pattern! What a unique way to add the eyes. I like to pull my eyes thru a bit so the 4scs come out the hole slightly. I did find stuffing and crocheting the circle after adding the eyes a bit tricky, however the secret is to keep your scs very loose (just as the pattern says.) Each one i did got easier and it was so much fun!