Crocheting Corkscrew Spirals:
A Whimsical Technique for Unique Designs
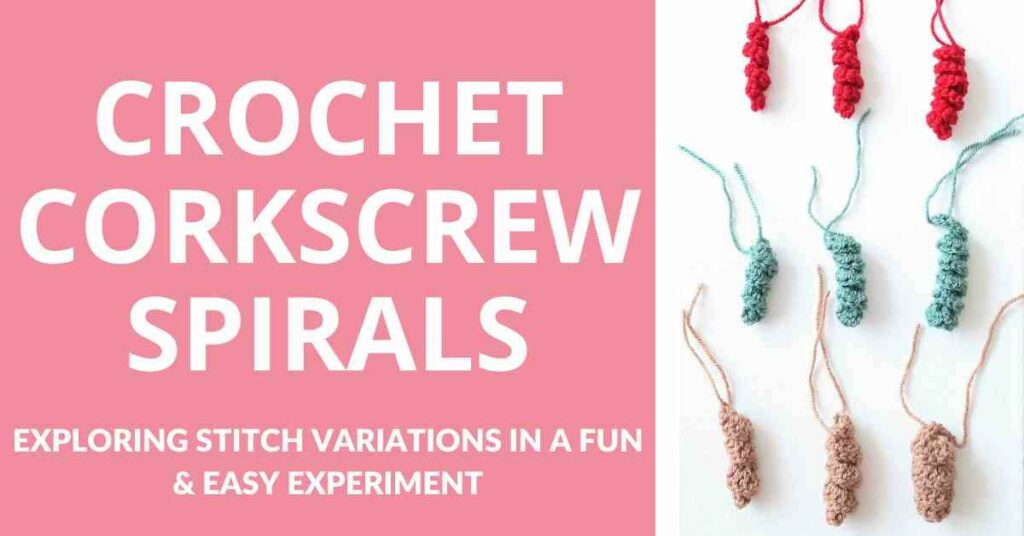
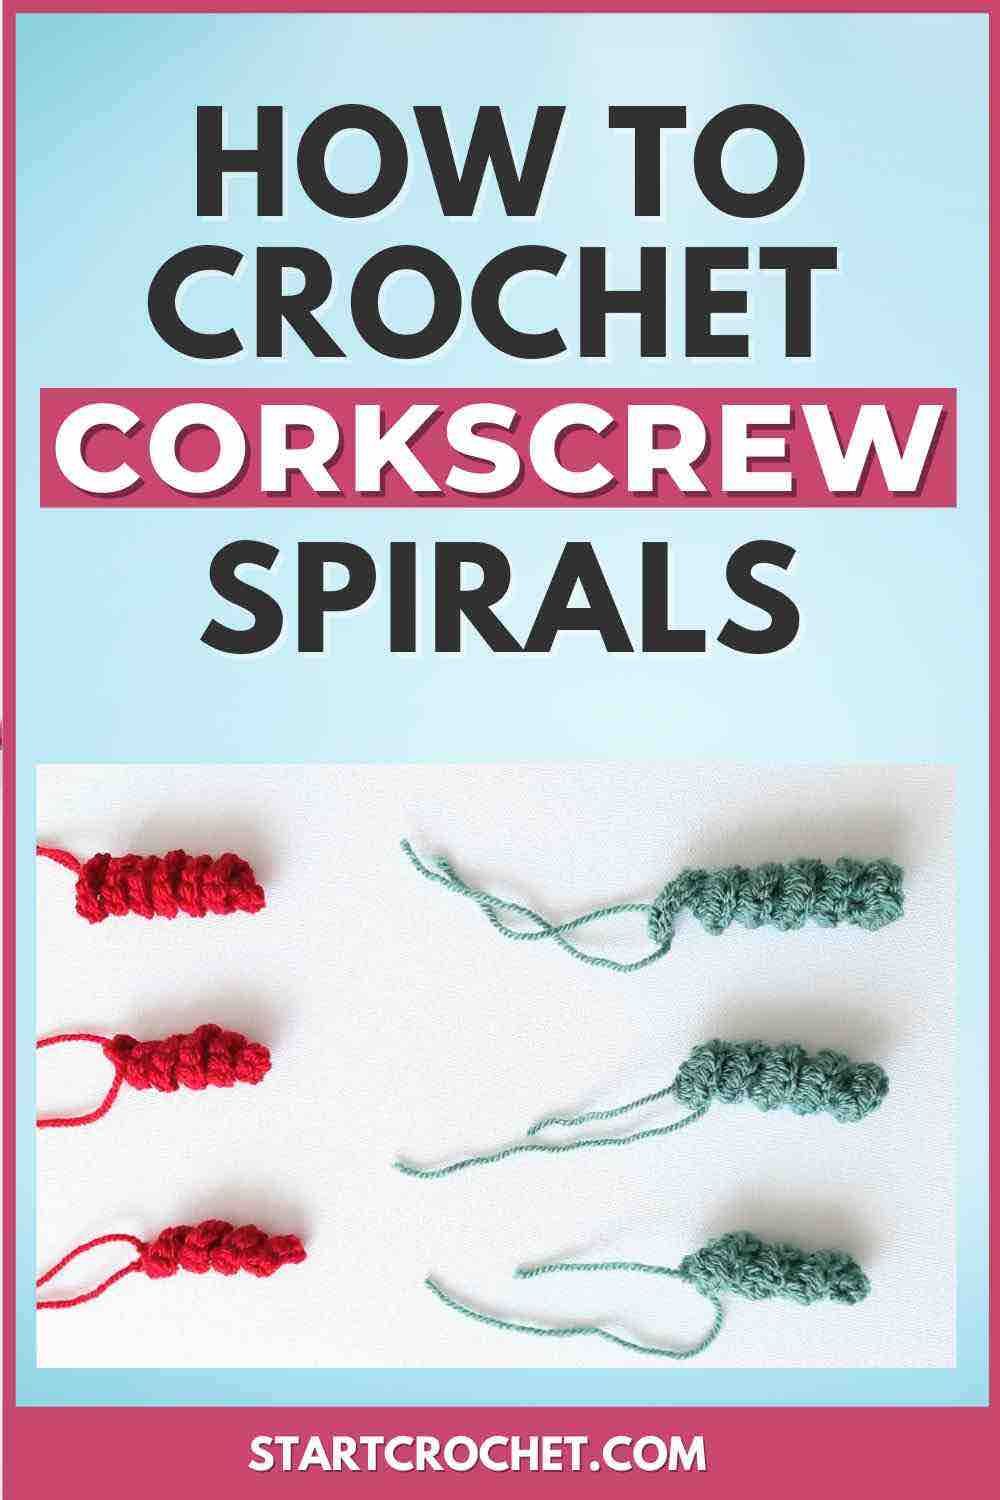
Crochet corkscrew spirals are an exciting technique that can add a whimsical touch to your crochet projects. I've been experimenting with these spiral for some time now and thought I'd show you how to crochet a corkscrew spiral in various ways.
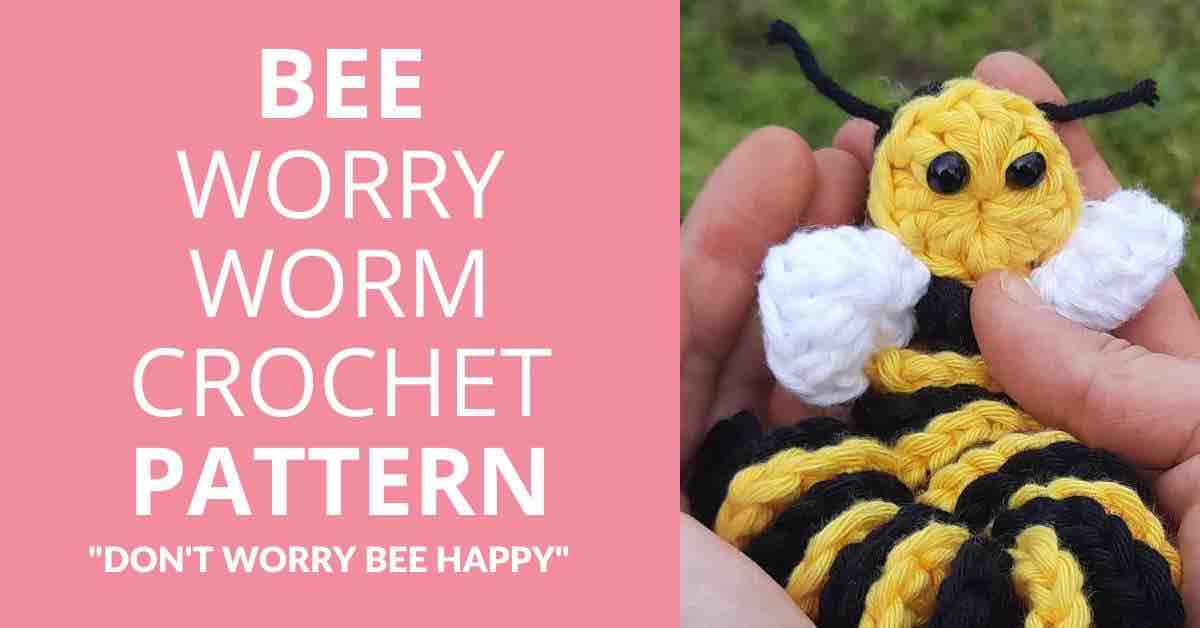
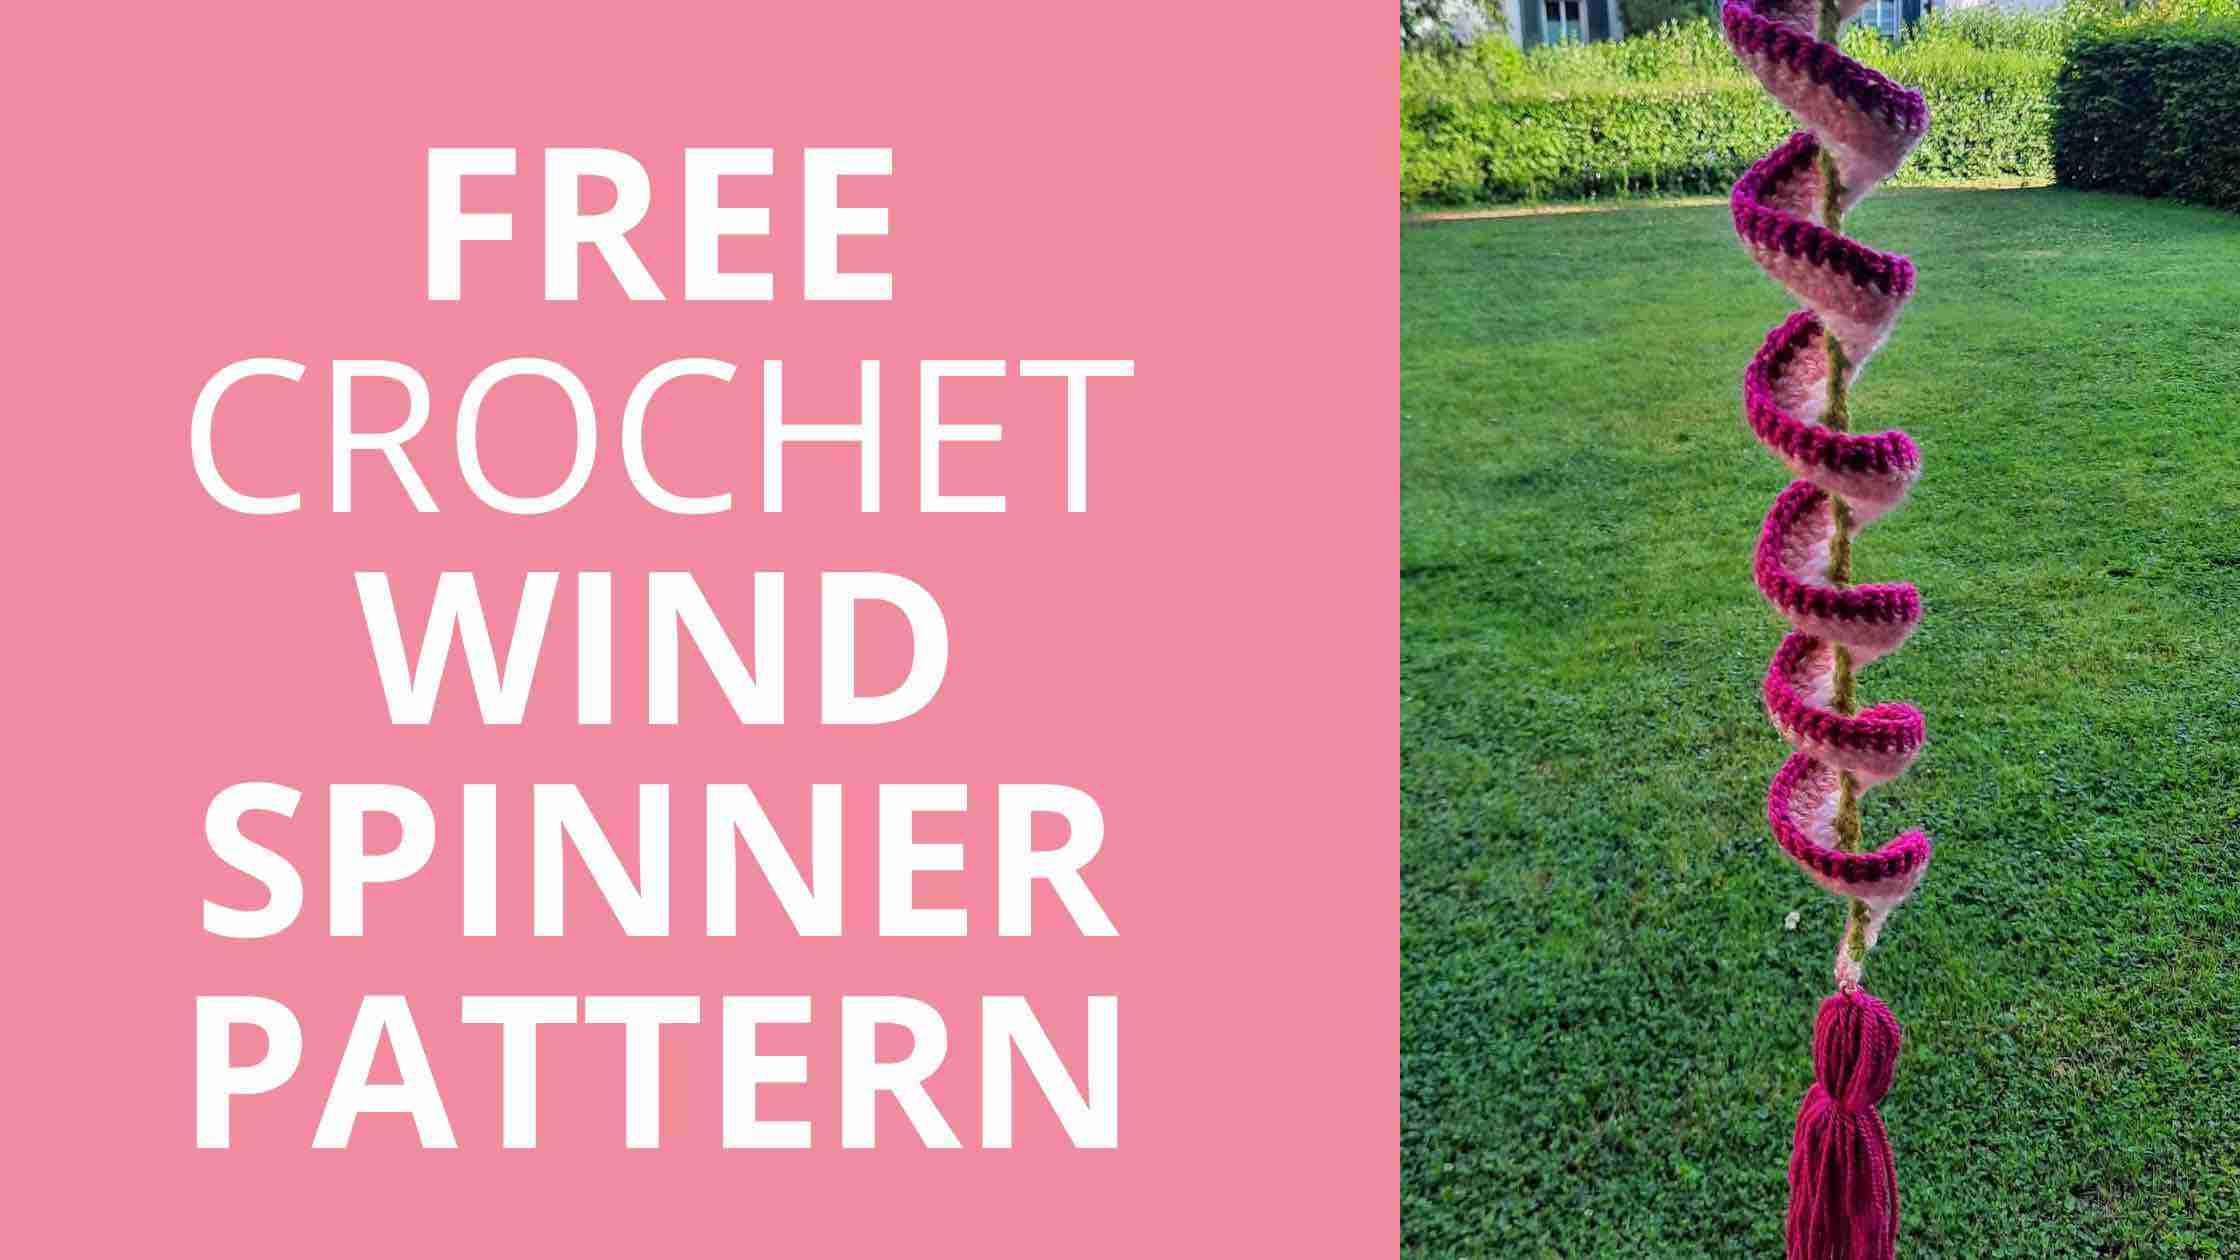
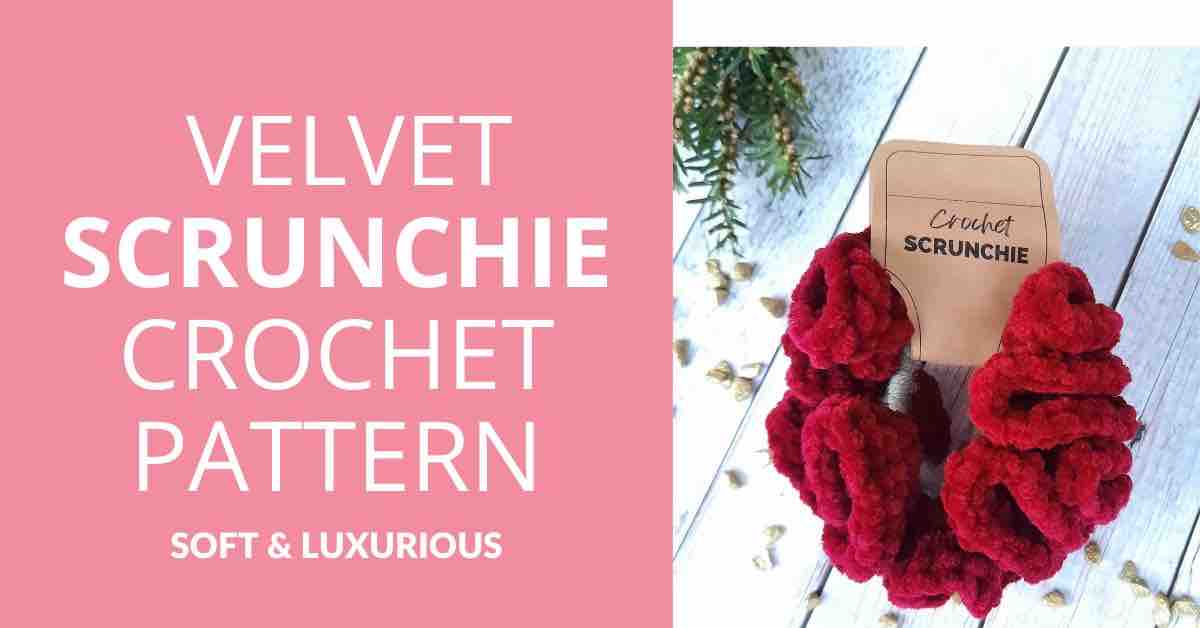
This past year, I designed a few worry worms, wind spinners, scrunchies and frilly bucket hat. These all used the same technique of hyperbolic crochet.
I decided to do a little experiment with different stitches to see the difference in stitch variation and stitch counts and thought I'd share my findings with you.
Since I've crocheted many projects using this twirly technique and I wanted to see exactly what kind of effect adding more stitches to each chain or using a different stitch would have on the outcome of the project.
But first, let me give you a little background info about twirly corkscrew spirals. I find it a very interesting concept. It's called "Hyperbolic Crochet".
Hyperbolic Crochet
I came across the term Hyperbolic Crochet a few years ago, and discovered that this is a fascinating discovery made by a mathematician, Dr. Daina Taimiņa, who wanted to find a tangible way to illustrate hyperbolic geometry, which is often difficult to visualize.
Hyperbolic crochet is a fascinating form of crochet that creates intricate, curved shapes resembling the mathematical concept of hyperbolic geometry.
In hyperbolic crochet, stitches are increased in each row or round, causing the fabric to expand outward exponentially. This is called "negative curvature".
This technique allows you to create mesmerizing and intricate forms in crochet, such as ruffles and undulating surfaces.
Think of the types of curvature you see in coral reefs or lettuce leaves. These organic shapes can be replicated in crochet by adding stitches at a constant rate to each row of crochet.
The more frequently you add stitches, the curlier (and more negatively curved) your crochet project gets. Isn't that awesome?! You can watch a video about hyperbolic crochet here.
There's also a mathematical formula for hyperbolic crochet, which is:
x = n + 1 (where n is any number you choose)
You can simply use basic crochet stitches, such as single crochet (sc), half double (hdc) or double crochet (dc), and increasing the number of stitches in each row or round. Pick a number and repeat these increases throughout your project. You'll see how the fabric gradually takes on a hyperbolic shape. Quite organic!
You'll soon realize that hyperbolic crochet offers endless possibilities for artistic expression and experimentation. You can create really special organic forms by varying the rate of stitch increases, yarn types, yarn weights and color combinations.
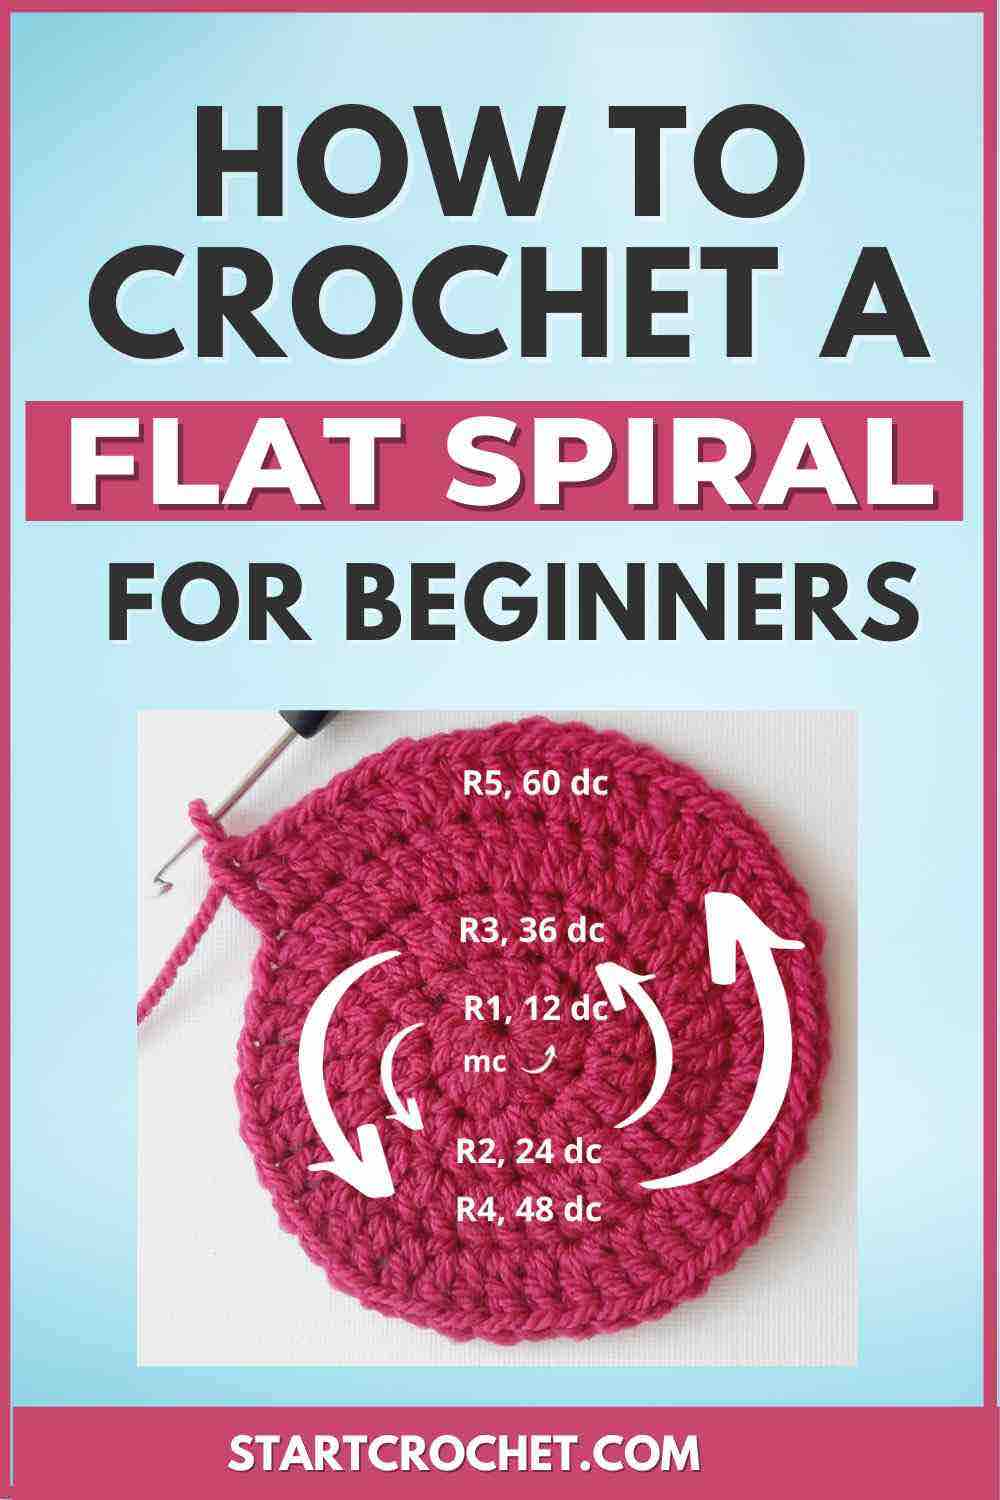
In a previous post, I showed you how to crochet a flat spiral, but now, we're going for a 3D design.
These 3D corkscrew spirals create beautiful embellishments and unique designs that can be used for lots of crochet projects. You can use this to crochet corkscrew spirals in for amigurumi dolls' hair, jellyfish and octopus tentacles, for example.
In this step-by-step guide, I will walk you through the process of crocheting corkscrew spirals, from making a foundation chain to finishing the spiral.
I will also show you variations of corkscrew spirals in size and density depending on which stitch you use and different stitch counts. There would be more variations if you use different hook sizes of yarn weights, but for this blog post, I won't really delve into that much detail.
For this blog post, I will only examine the single crochet (sc), half double crochet (hdc), double crochet (dc) when used in 2, 3, or 4 stitch increases in each one row.
Disclaimer: This post contains affiliate links, which means I receive a small commission, at no extra cost to you, if you make a purchase using the Start Crochet links. Please see my disclosure for more details.
Crochet A Spiral For Beginners: Tutorial
What You’ll Learn
- The step-by-step process of crocheting corkscrew spirals, a unique and whimsical technique to enhance your crochet projects or to use as stand-alone crochet projects.
- Discover the materials you'll need and how to choose the right yarn and crochet hook for creating stunning corkscrew spirals.
- Learn how to make a foundation chain and create the corkscrew curl, the essential elements for crafting beautiful spirals.
- Learn the difference between using shorter vs. longer stitches - from single crochet (sc) to double crochet (dc).
- See the difference between adding fewer or more increases to the type of curl produced.
- Explore tips and tricks for achieving different levels of tightness, experimenting with color combinations, and perfecting your crochet skills.
- I will also answer some Frequently Asked Questions about crochet spirals
Materials Needed
- For this tutorial, I used some classic DK weight yarn (Paintbox Yarns Simply DK) in Slate Green, Red Wine & Vanilla Cream. Pick any yarn you like, but keep in mind that different yarn weights will give different results. Thicker yarns will create more substantial spirals, while finer yarns will give you delicate spirals. Any yarn would do really, just make sure it's not hairy or fuzzy and that you will use an appropriate crochet hook size. .
- Crochet hook that fits your yarn. For this experiment I used a size G/4mm hook.
- A tapestry needle
- A pair of scissors
Abbreviations Used in Pattern
- ch = chain
- mc = magic circle
- sc = single crochet
- hdc = half double crochet
- dc = double crochet
- sl st = slip stitch
- st = stitch
- sts = stitches
Skill Level
Beginner
Notes
- You can use any type of yarn as long as you have a corresponding crochet hook size (check yarn label for recommendations)
- I use US crochet terms. Here's a US/UK Conversion Chart
US vs. UK Crochet Terms & Symbols
Free Printable


Your info is 100% secure and will never be shared.
Gauge
Note: Gauge is not really that crucial for this tutorial. Just try experimenting with different hook sizes to get a gauge you are happy with for the project you are working on.
Crochet Corkscrew Spiral Patterns - 3 Stitch Options
1. Crochet Corkscrew Spiral Pattern - Single Crochet (sc)
If you're looking to crochet a corkscrew spiral using single crochet (sc), you'll get a nice tight spiral that is relatively narrow.
You will start by measuring how long you want your spiral to be (let's say 4" or 10 cm). Then chain a length that's a little longer than you want your final spiral length to be (about 2" or 5 cm" longer).
The reason we work our starting chain longer is because once we start working our curls into the foundation chain stitches, they'll shrink a little. You'll see what I mean when you try it.
Pattern Instructions:
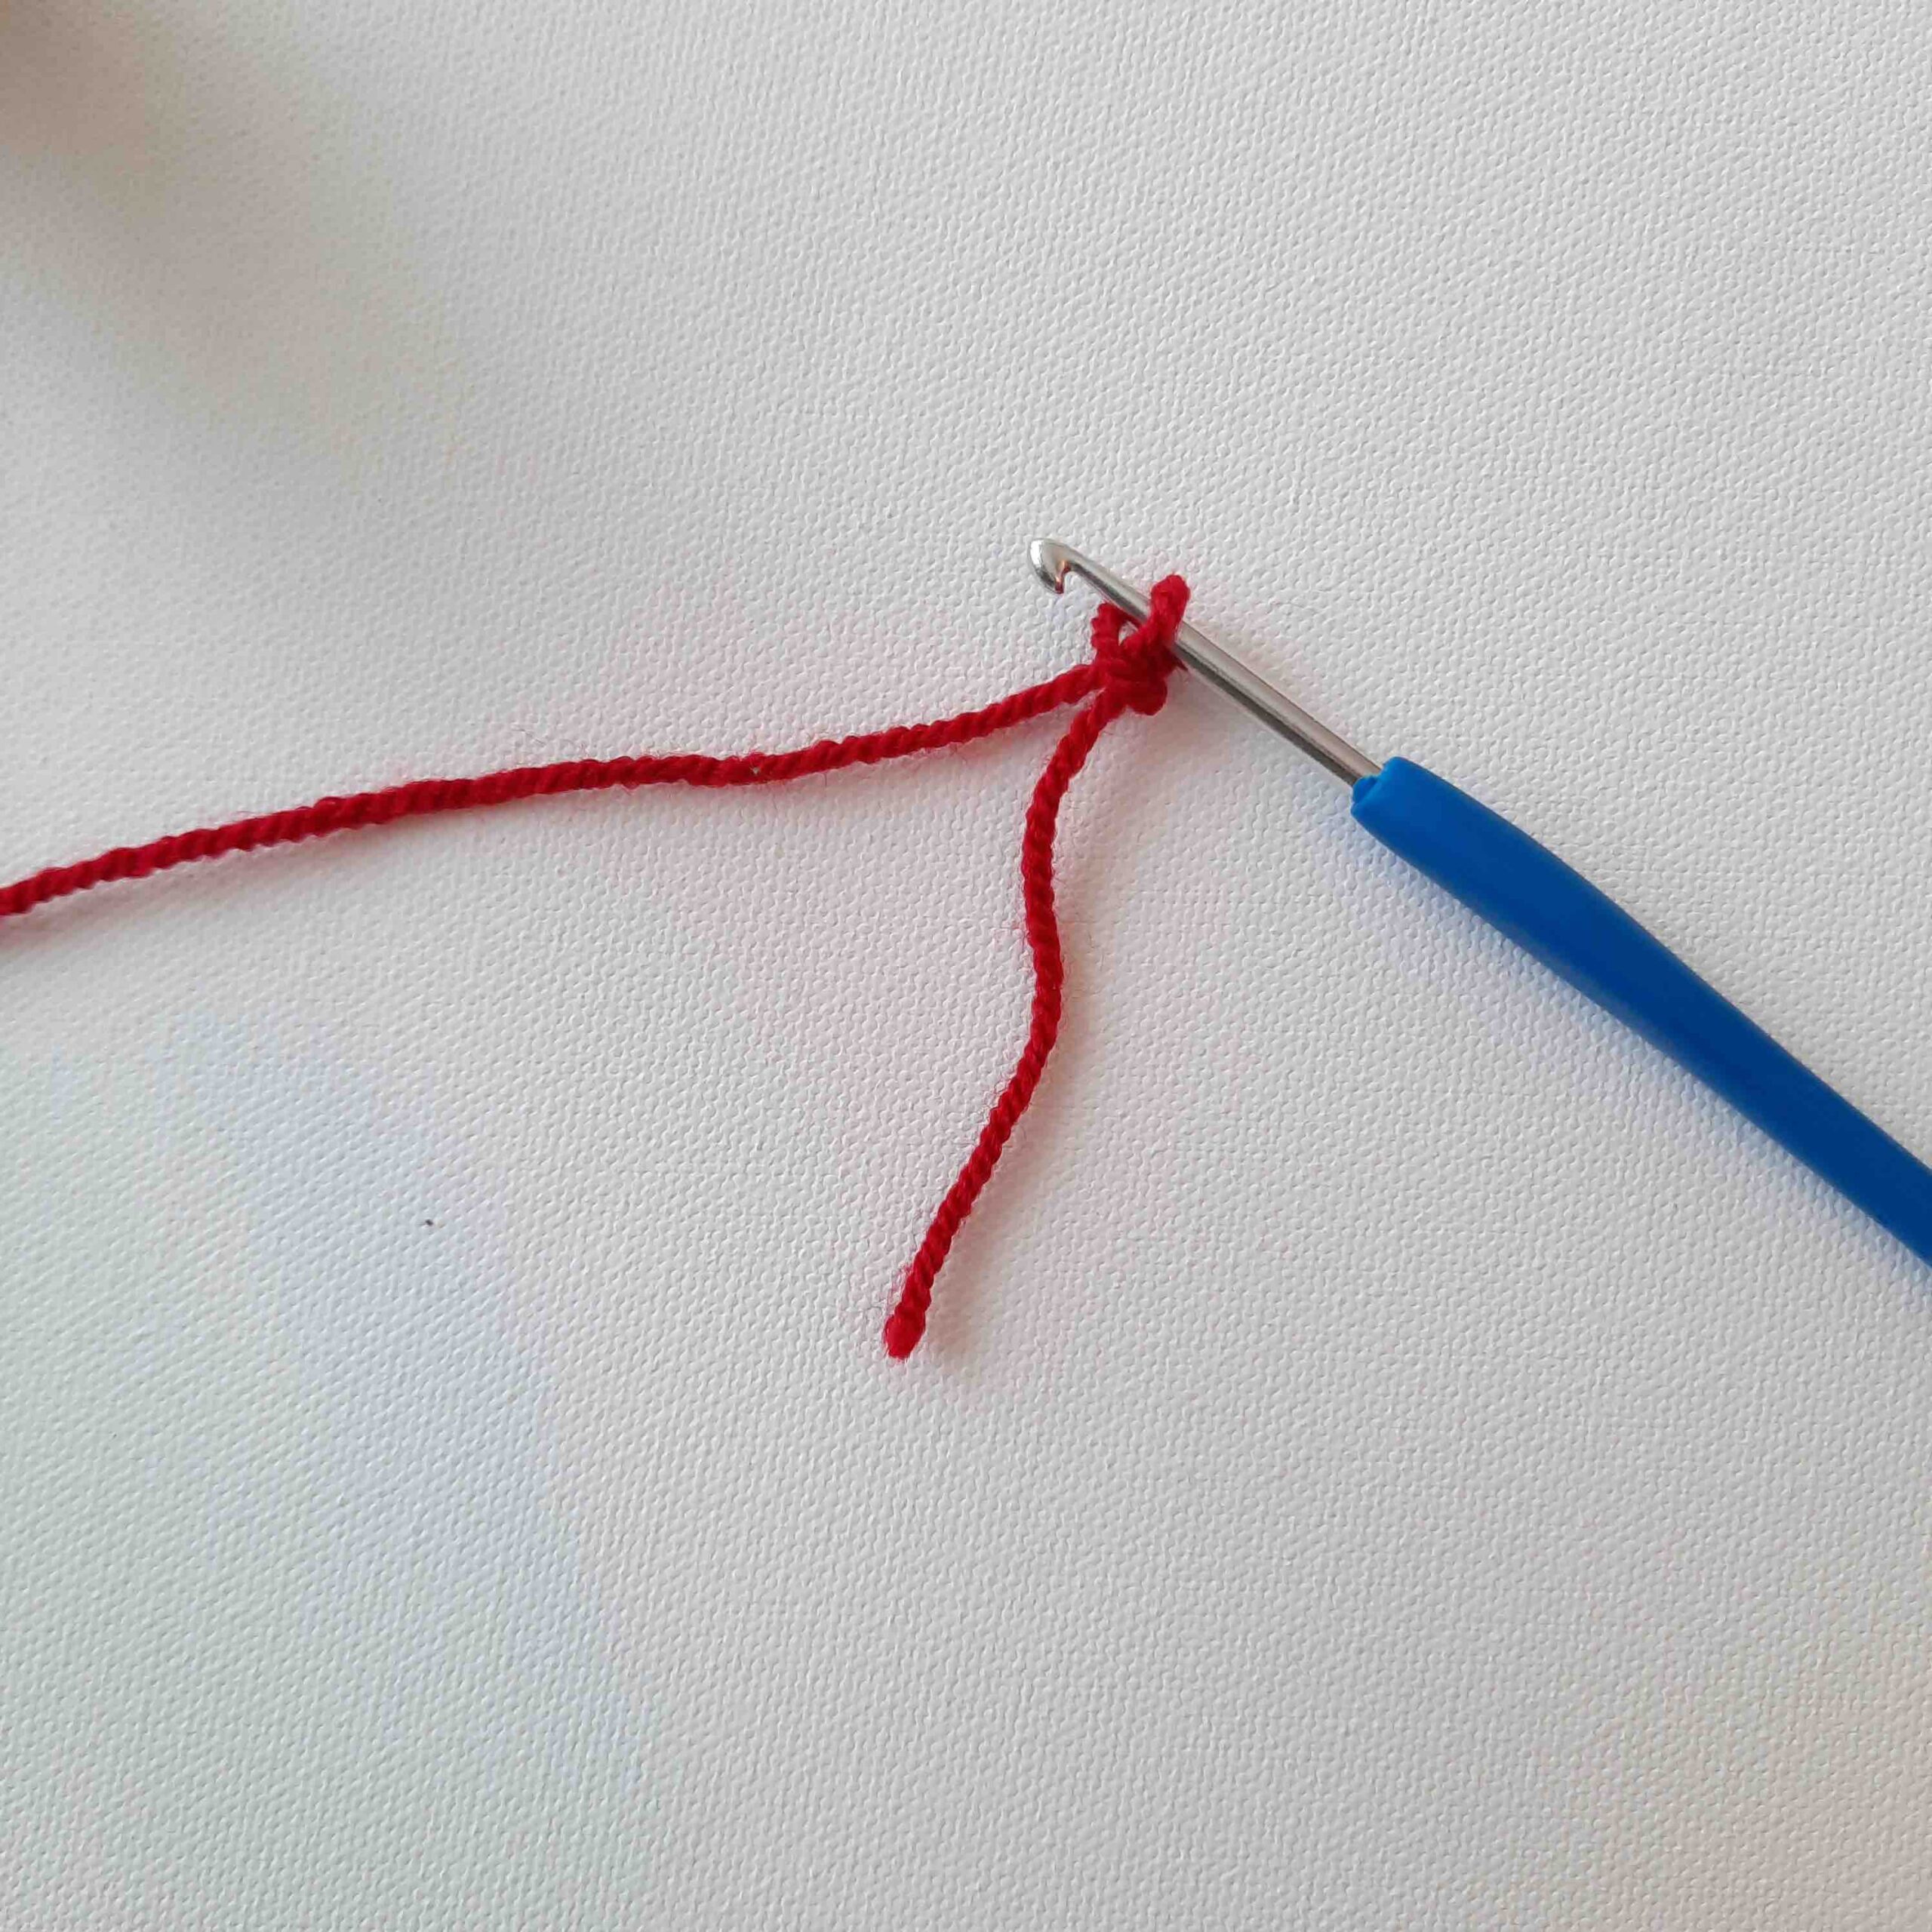
Step 1: Tie a Slip Knot
- To begin, create a slip knot by making a loop with your yarn, pulling the working end through the loop, and tightening it onto your crochet hook.
Step 2: Make a Foundation Chain
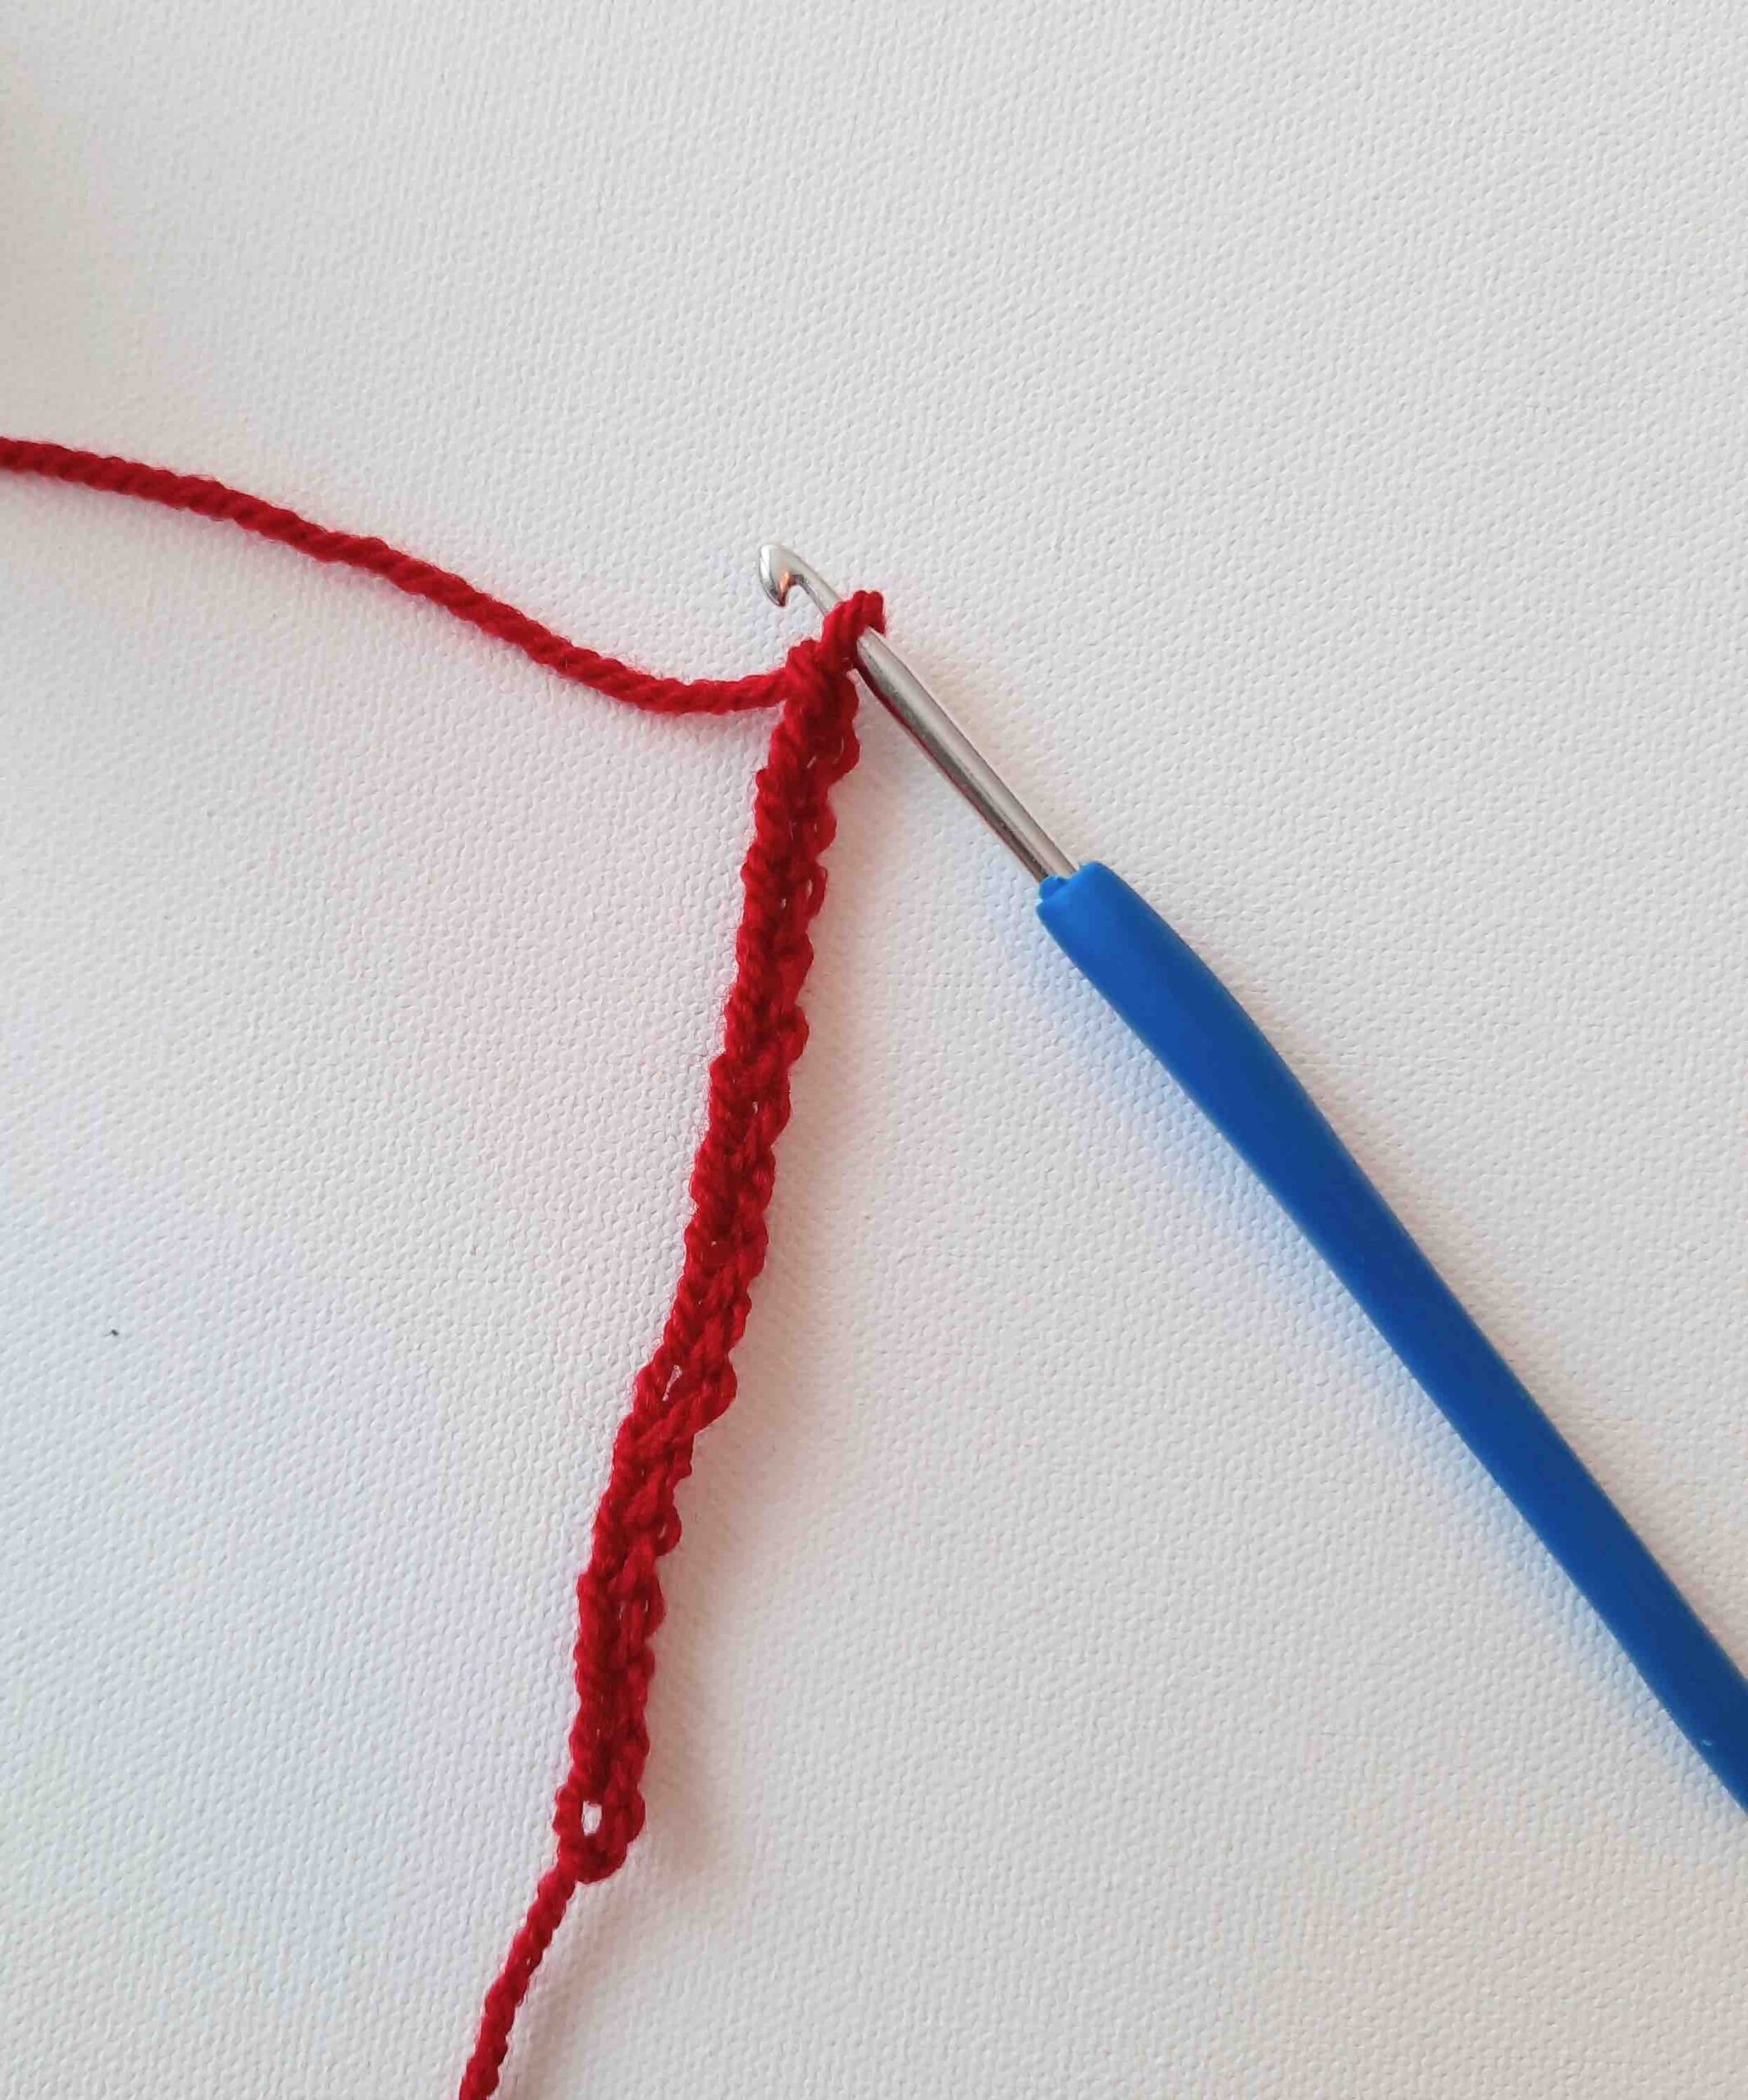
- Make a foundation chain a little longer than you want your spiral to be. For these examples, I chained 16 stitches.
- This will serve as the base for your spiral. Remember to keep your chain relatively loose to allow for easy stitching.
- Make sure to leave a long tail at the beginning for later finishing.
Step 3: Create the Corkscrew Curl (single crochet)
- To create the corkscrew curl, crochet either 2, 3 or 4 stitches into the foundation chain. You can see in the images below the difference between crocheting 2, 3, or 4 sc into each stitch.
Note: The number of stitches can vary depending on how tight and wide you want your spiral to be. A single crochet will give you a narrow spiral. The higher crochet stitches like double crochet or treble crochet, will give you a wider spiral, as you will see in the next 2 sections.
Step 4: Repeat Step 3
- For each subsequent row, make the same number of single crochet increases into each stitch of the chain. Continue this pattern until you reach the end of your chain.
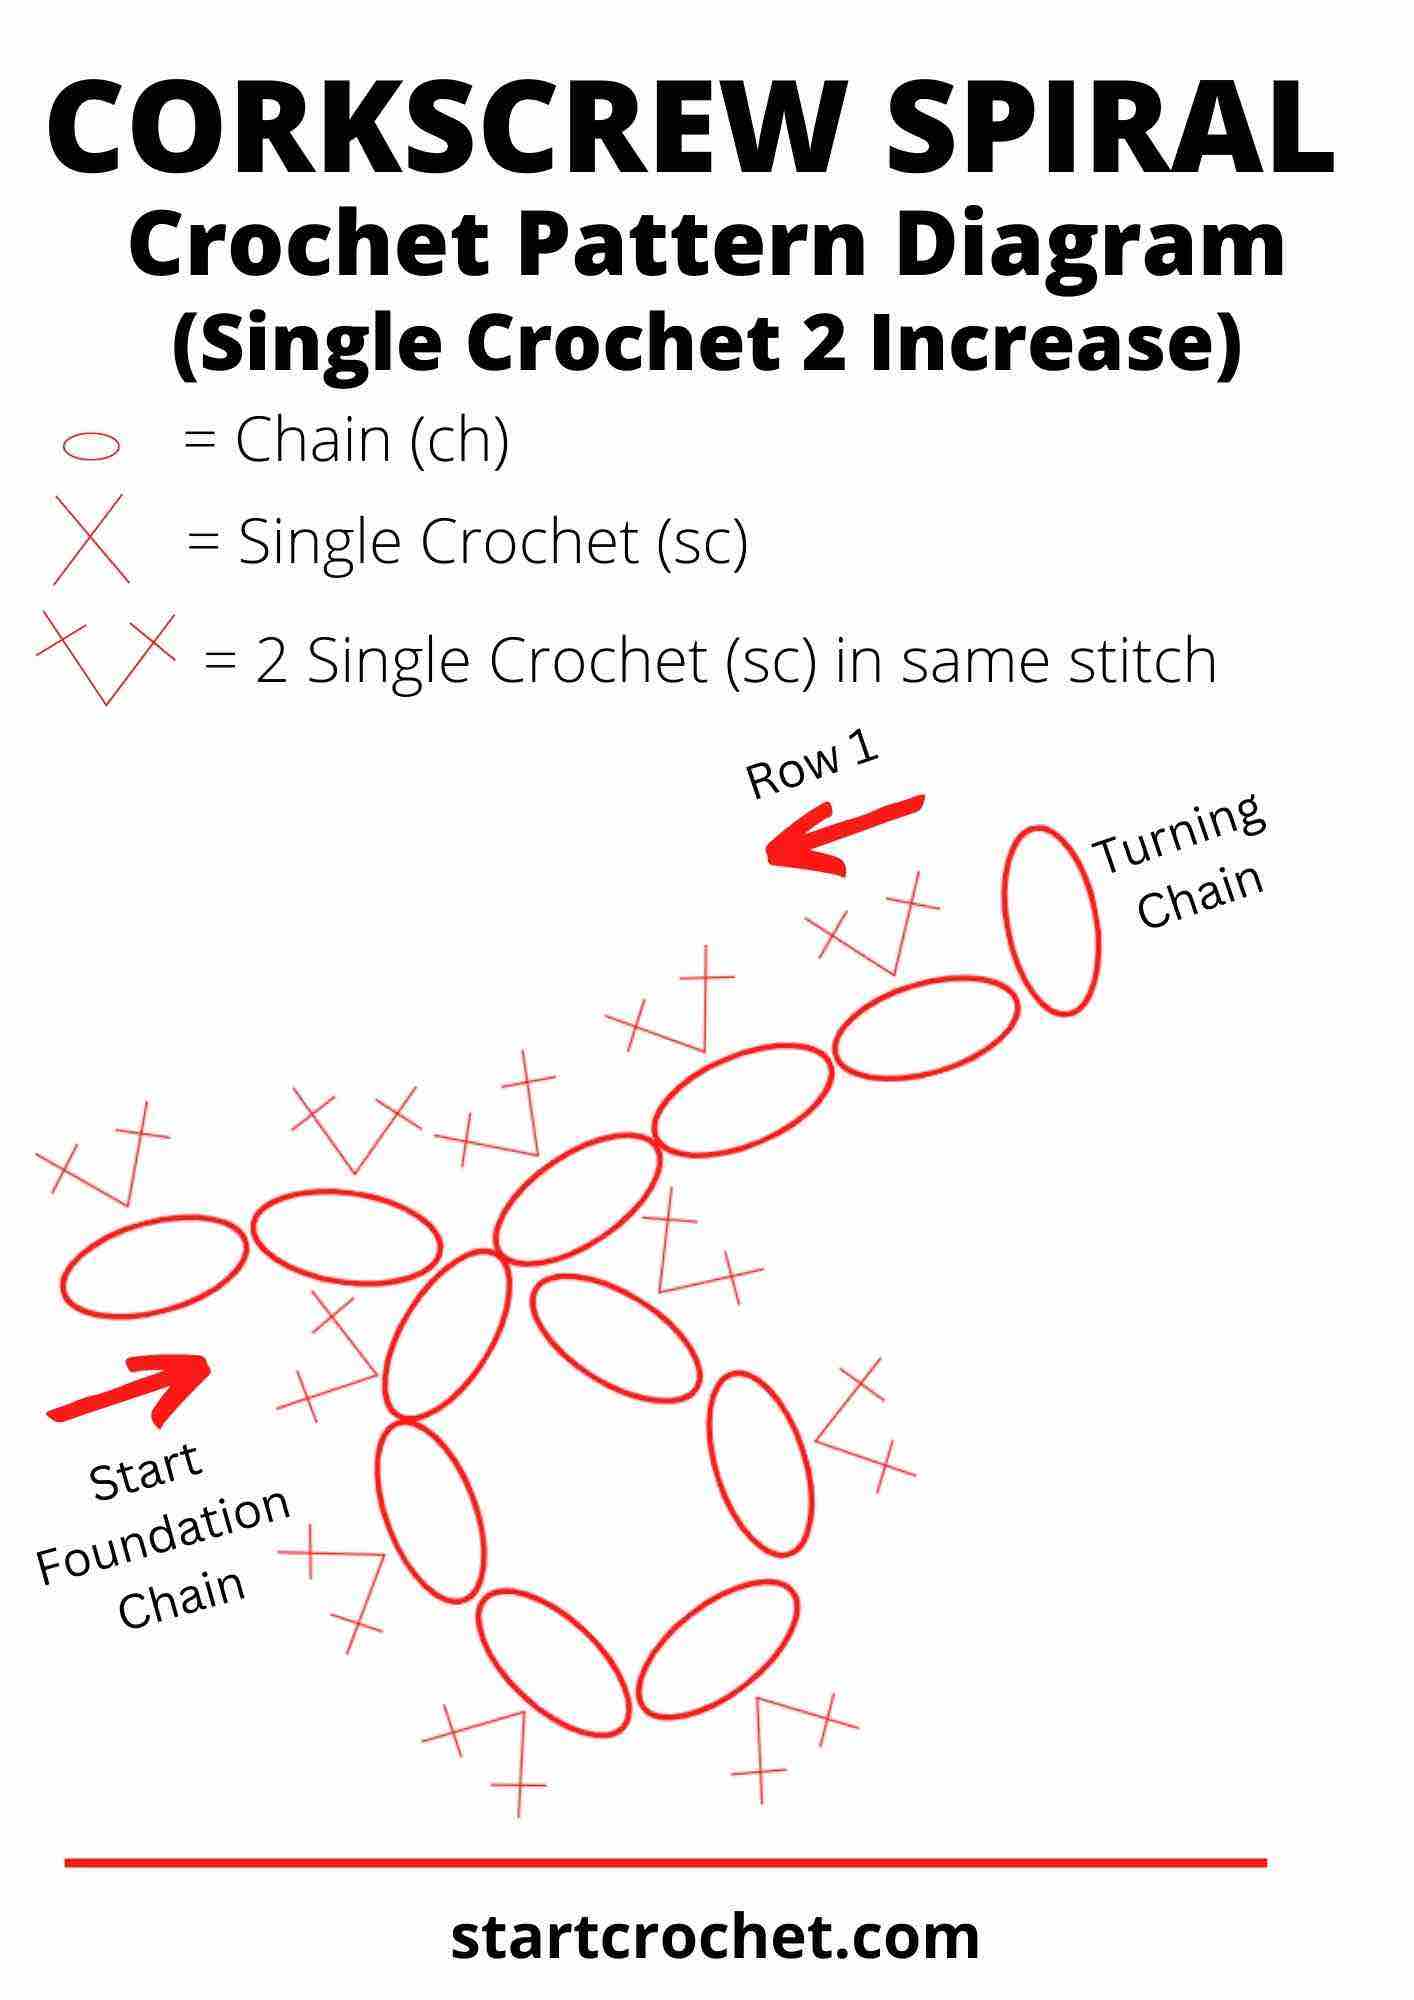
Corkscrew Spiral Pattern in Single Crochet with 2 sc stitches in each chain stitch.
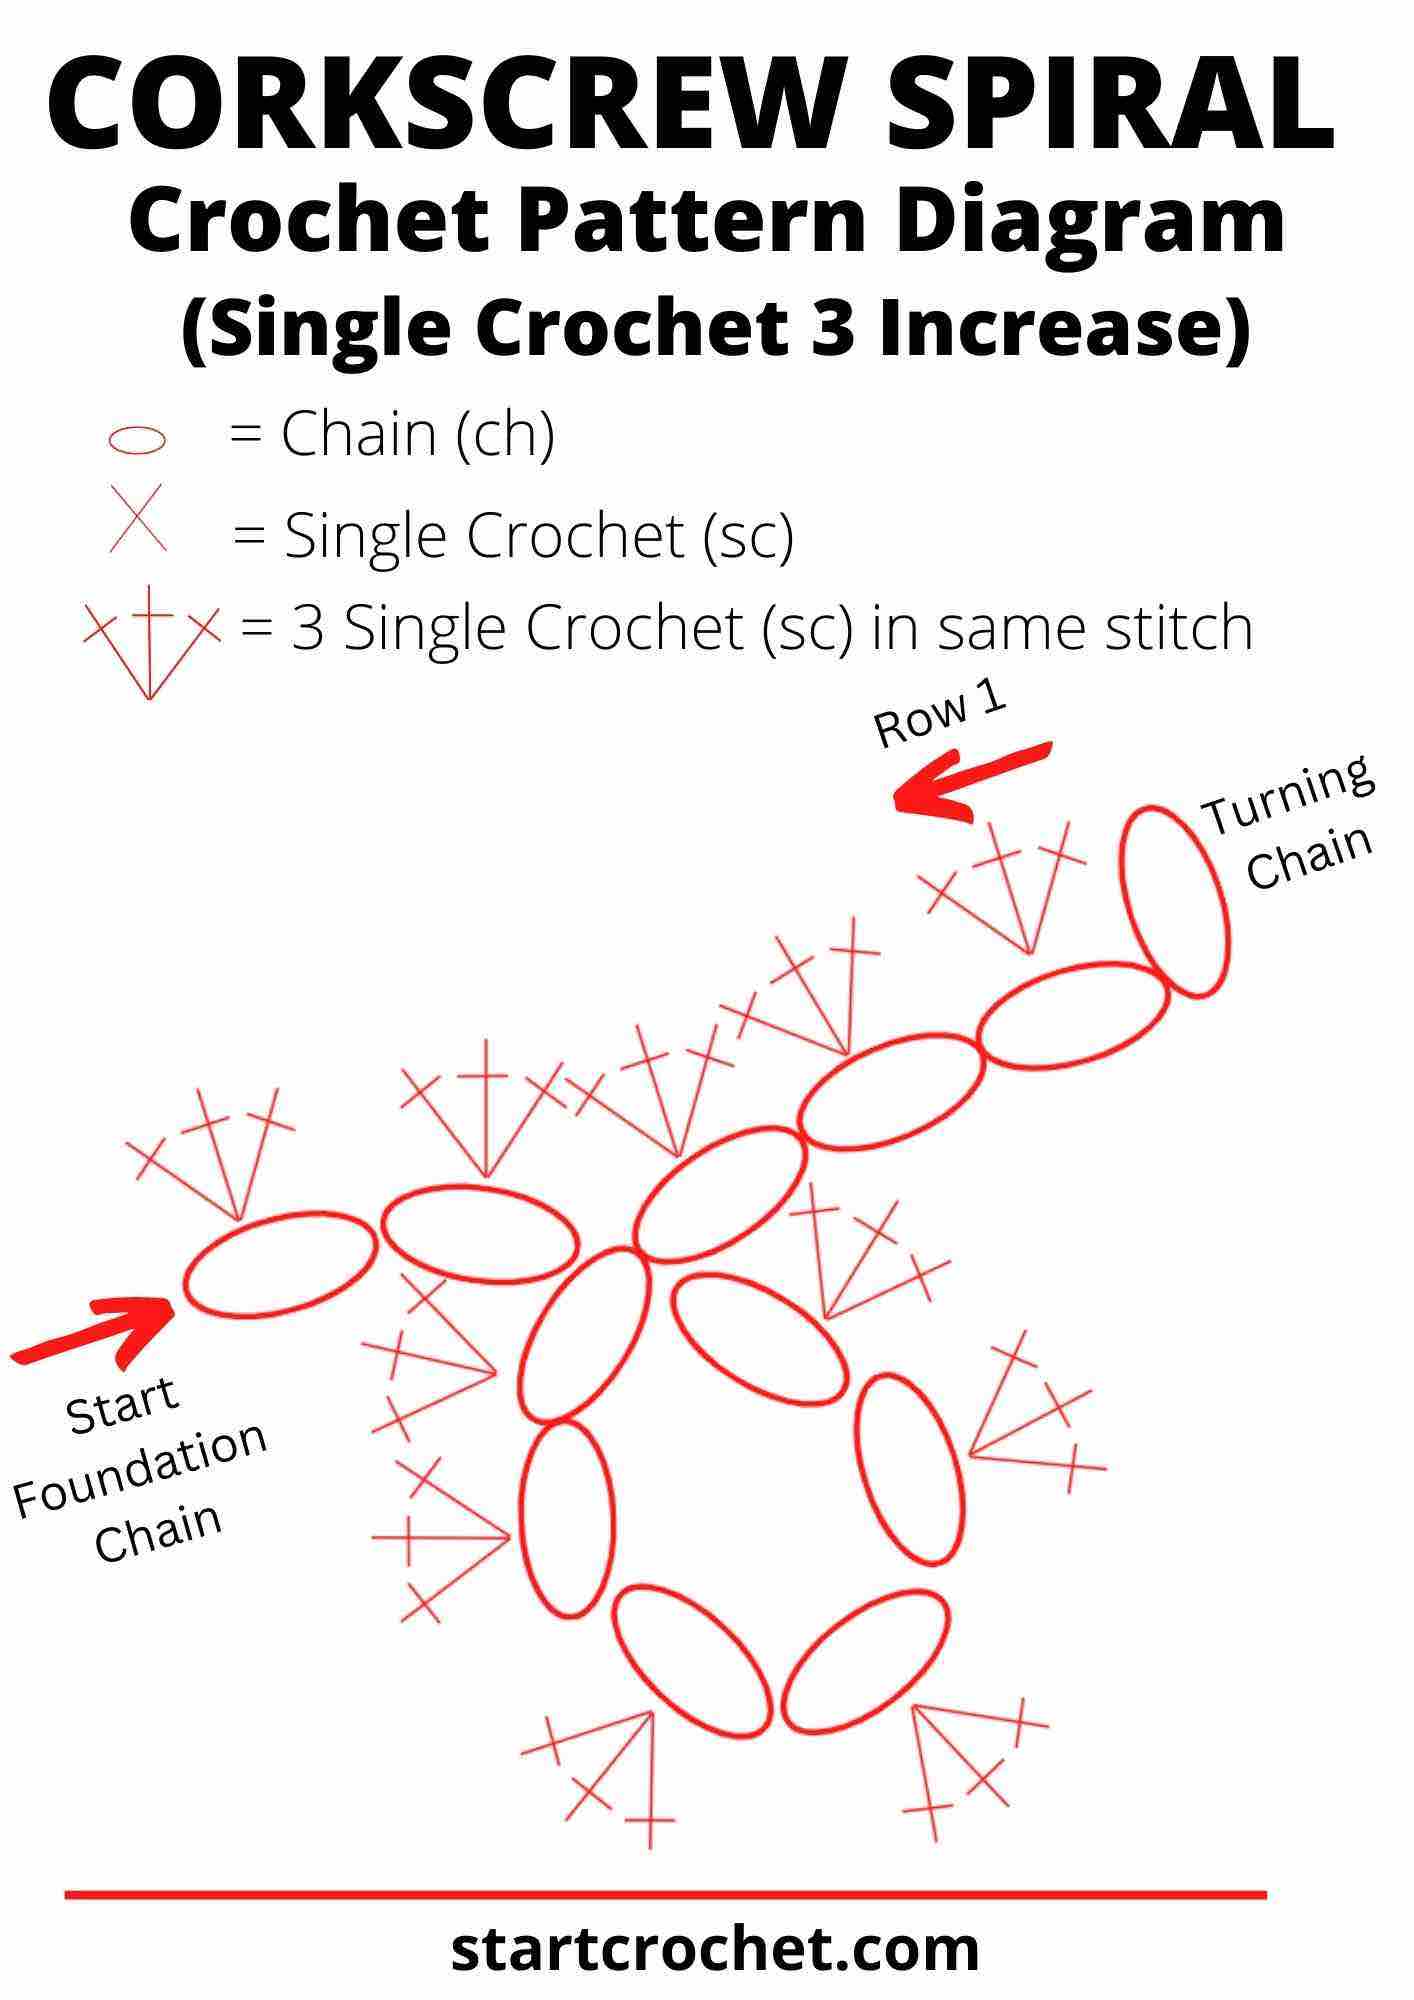
Corkscrew Spiral Pattern in Single Crochet with 3 sc stitches in each chain stitch.
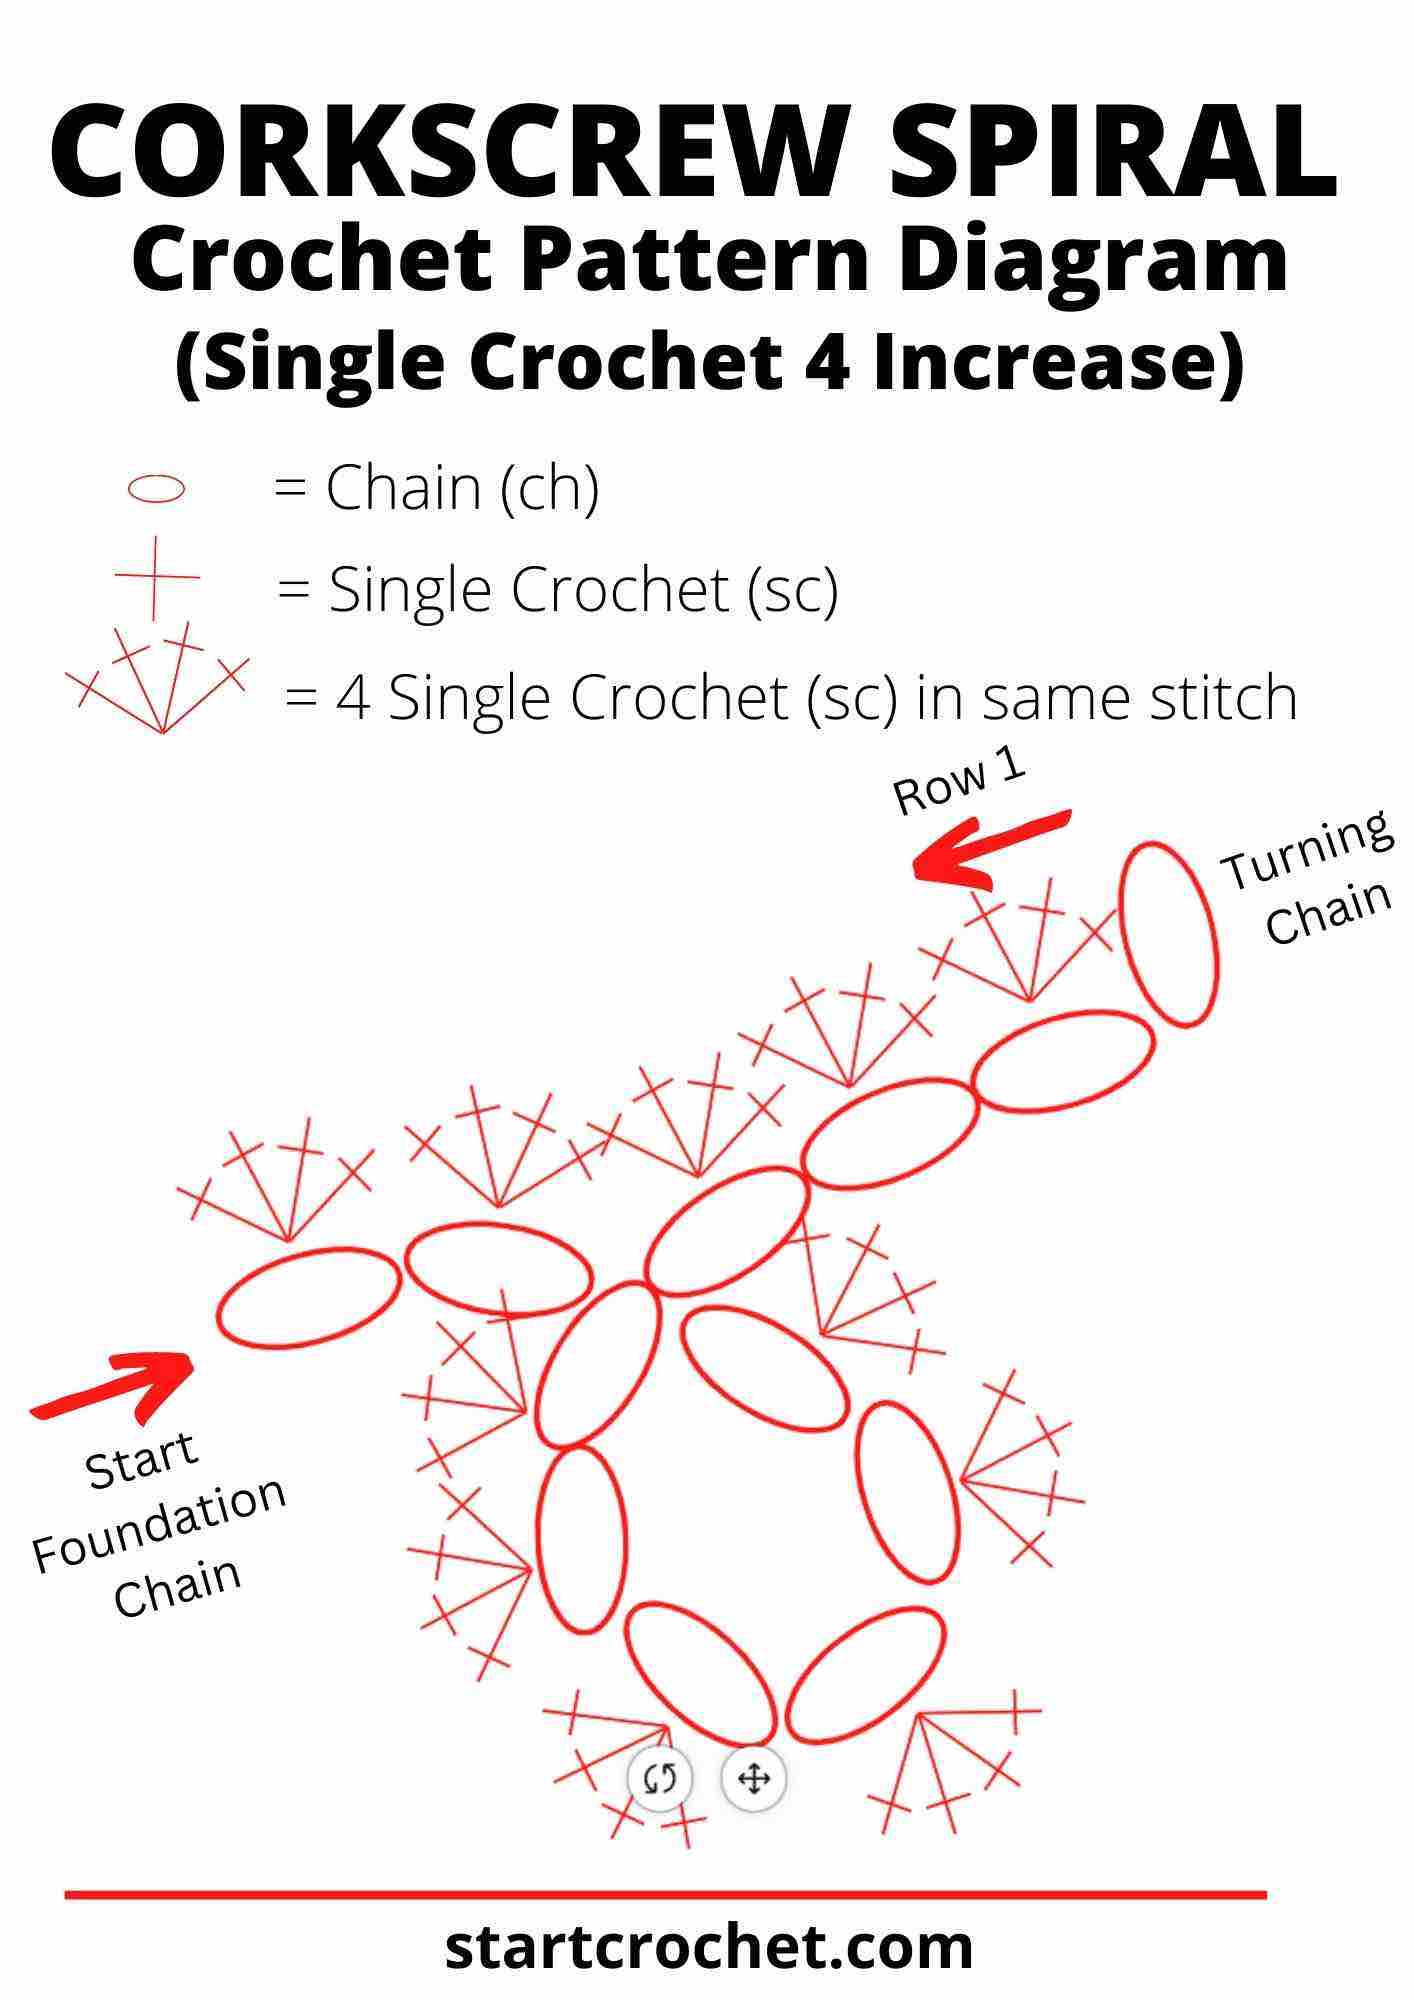
Corkscrew Spiral Pattern in Single Crochet with 4 sc stitches in each chain stitch.
Step 5: Finish the Corkscrew Spiral
- Once you've reached the end of your chain, finish off by cutting the yarn, leaving a 4" tail.
- Secure the tail by weaving it back and forth through the last few stitches or you could tie a knot to prevent unraveling (knots are not recommended though).
- Shape your spiral by gently twisting it around itself (like you'd be twirling our hair round your finger). This should make all your curls fall nicely into place. Hold the crocheted spiral at one end and twist it clockwise or counterclockwise. The more you twist, the tighter the corkscrew effect will be. Once you're happy with the twist, secure the end of the spiral by fastening off the yarn and weaving in the loose ends.
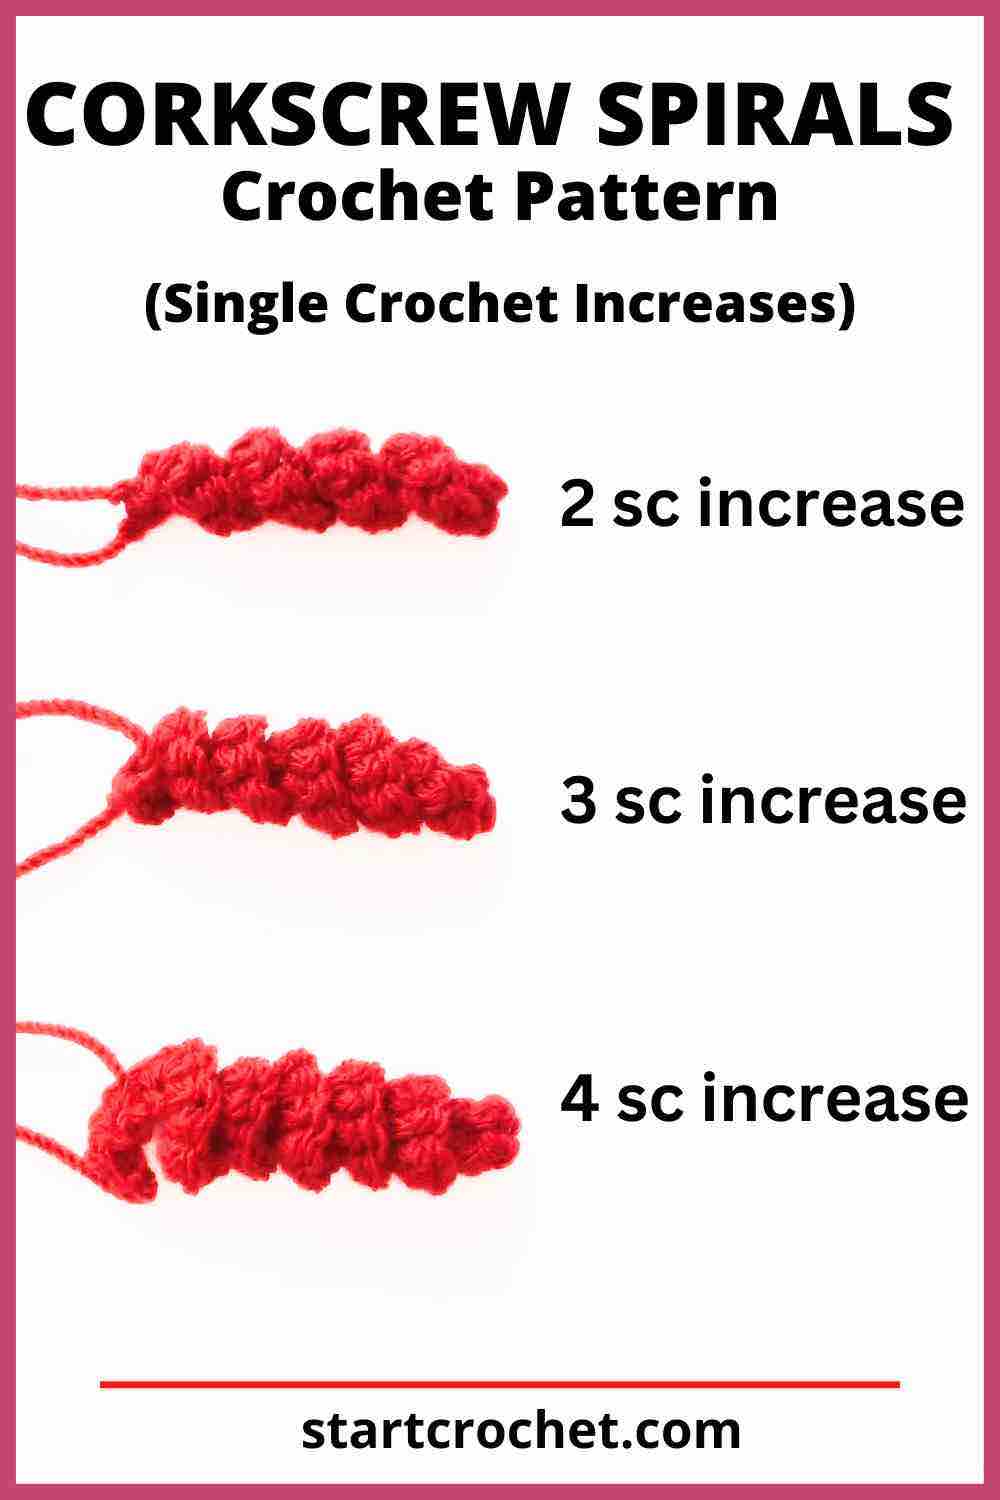
Here you can see the difference between adding 2, 3 or 4 sc into each chain stitch.
2. Crochet Corkscrew Spiral Pattern - Half Double Crochet (hdc)
If you're looking to crochet a corkscrew spiral using half double crochet (hdc), you'll get a slightly wider spiral that is medium-sized.
You will start by measuring how long you want your spiral to be (let's say 4" or 10 cm). Then chain a length that's a little longer than you want your final spiral length to be (about 2" or 5 cm" longer).
Pattern Instructions:
Step 1: Tie a Slip Knot
- To begin, create a slip knot by making a loop with your yarn, pulling the working end through the loop, and tightening it onto your crochet hook.
Step 2: Make a Foundation Chain
- Same as before, make a foundation chain a little longer than you want your spiral to be. I chained 16 sttiches.
- This will serve as the base for your spiral. Remember to keep your chain loose to allow for easy stitching.
- Make sure to leave a long tail at the beginning for later finishing.
Step 3: Create the Corkscrew Curl (half double crochet)
- To create the corkscrew curl, crochet a specific number of stitches into the foundation chain. In the examples below, I show you how to crochet 2, 3, or 4 half double crochet stitches into each chain. You could experiment with crocheting more stitches per chain as well.
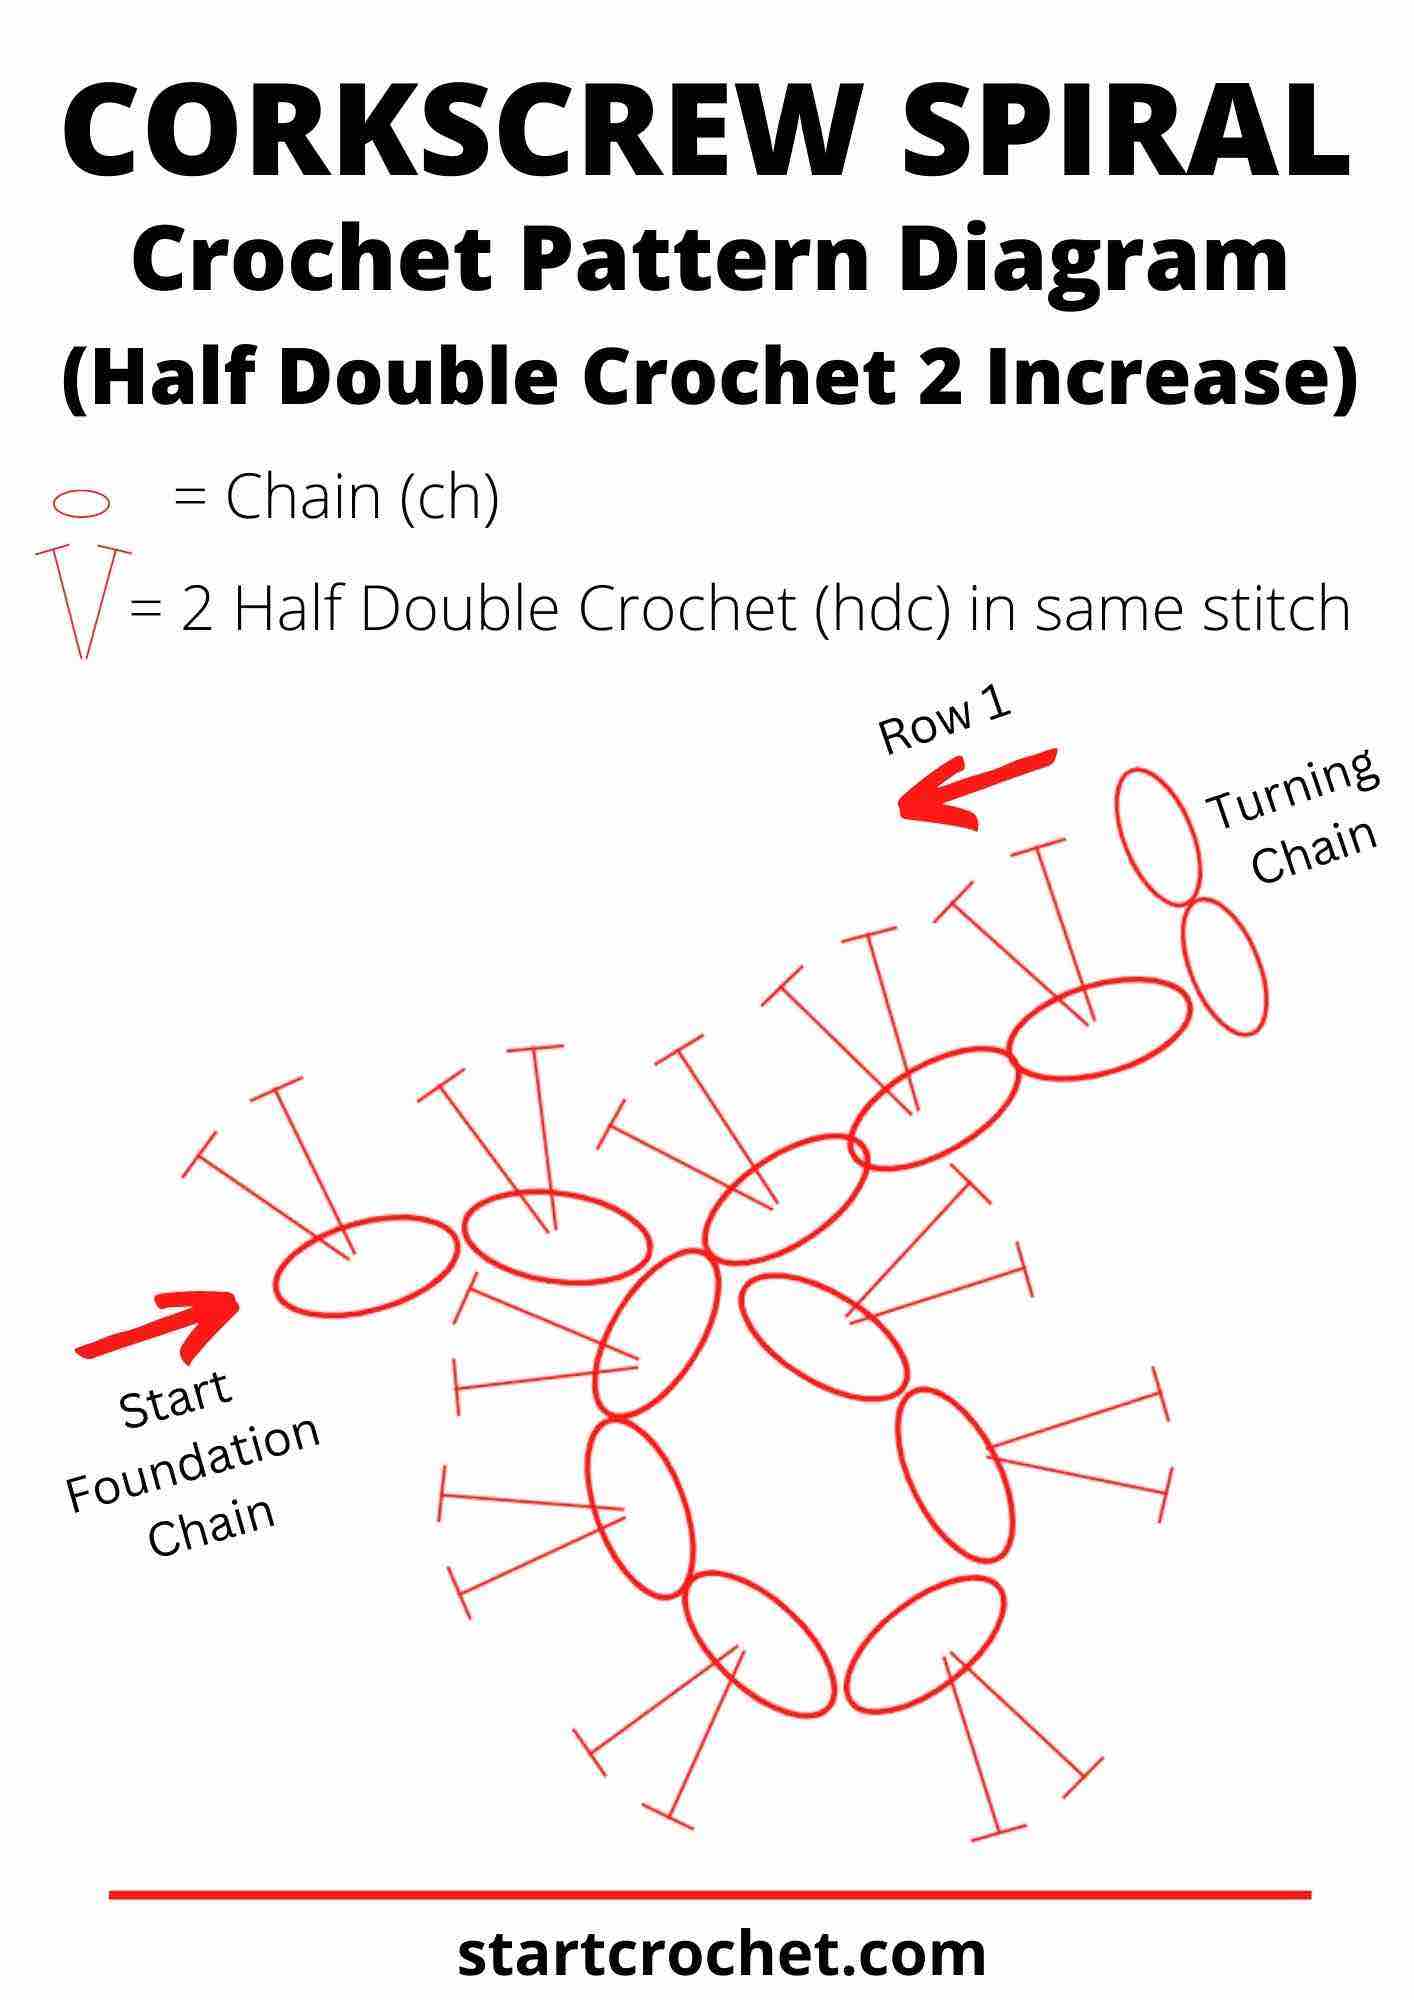
Corkscrew Spiral Pattern in Half Double Crochet with 2 dc stitches in each chain stitch.
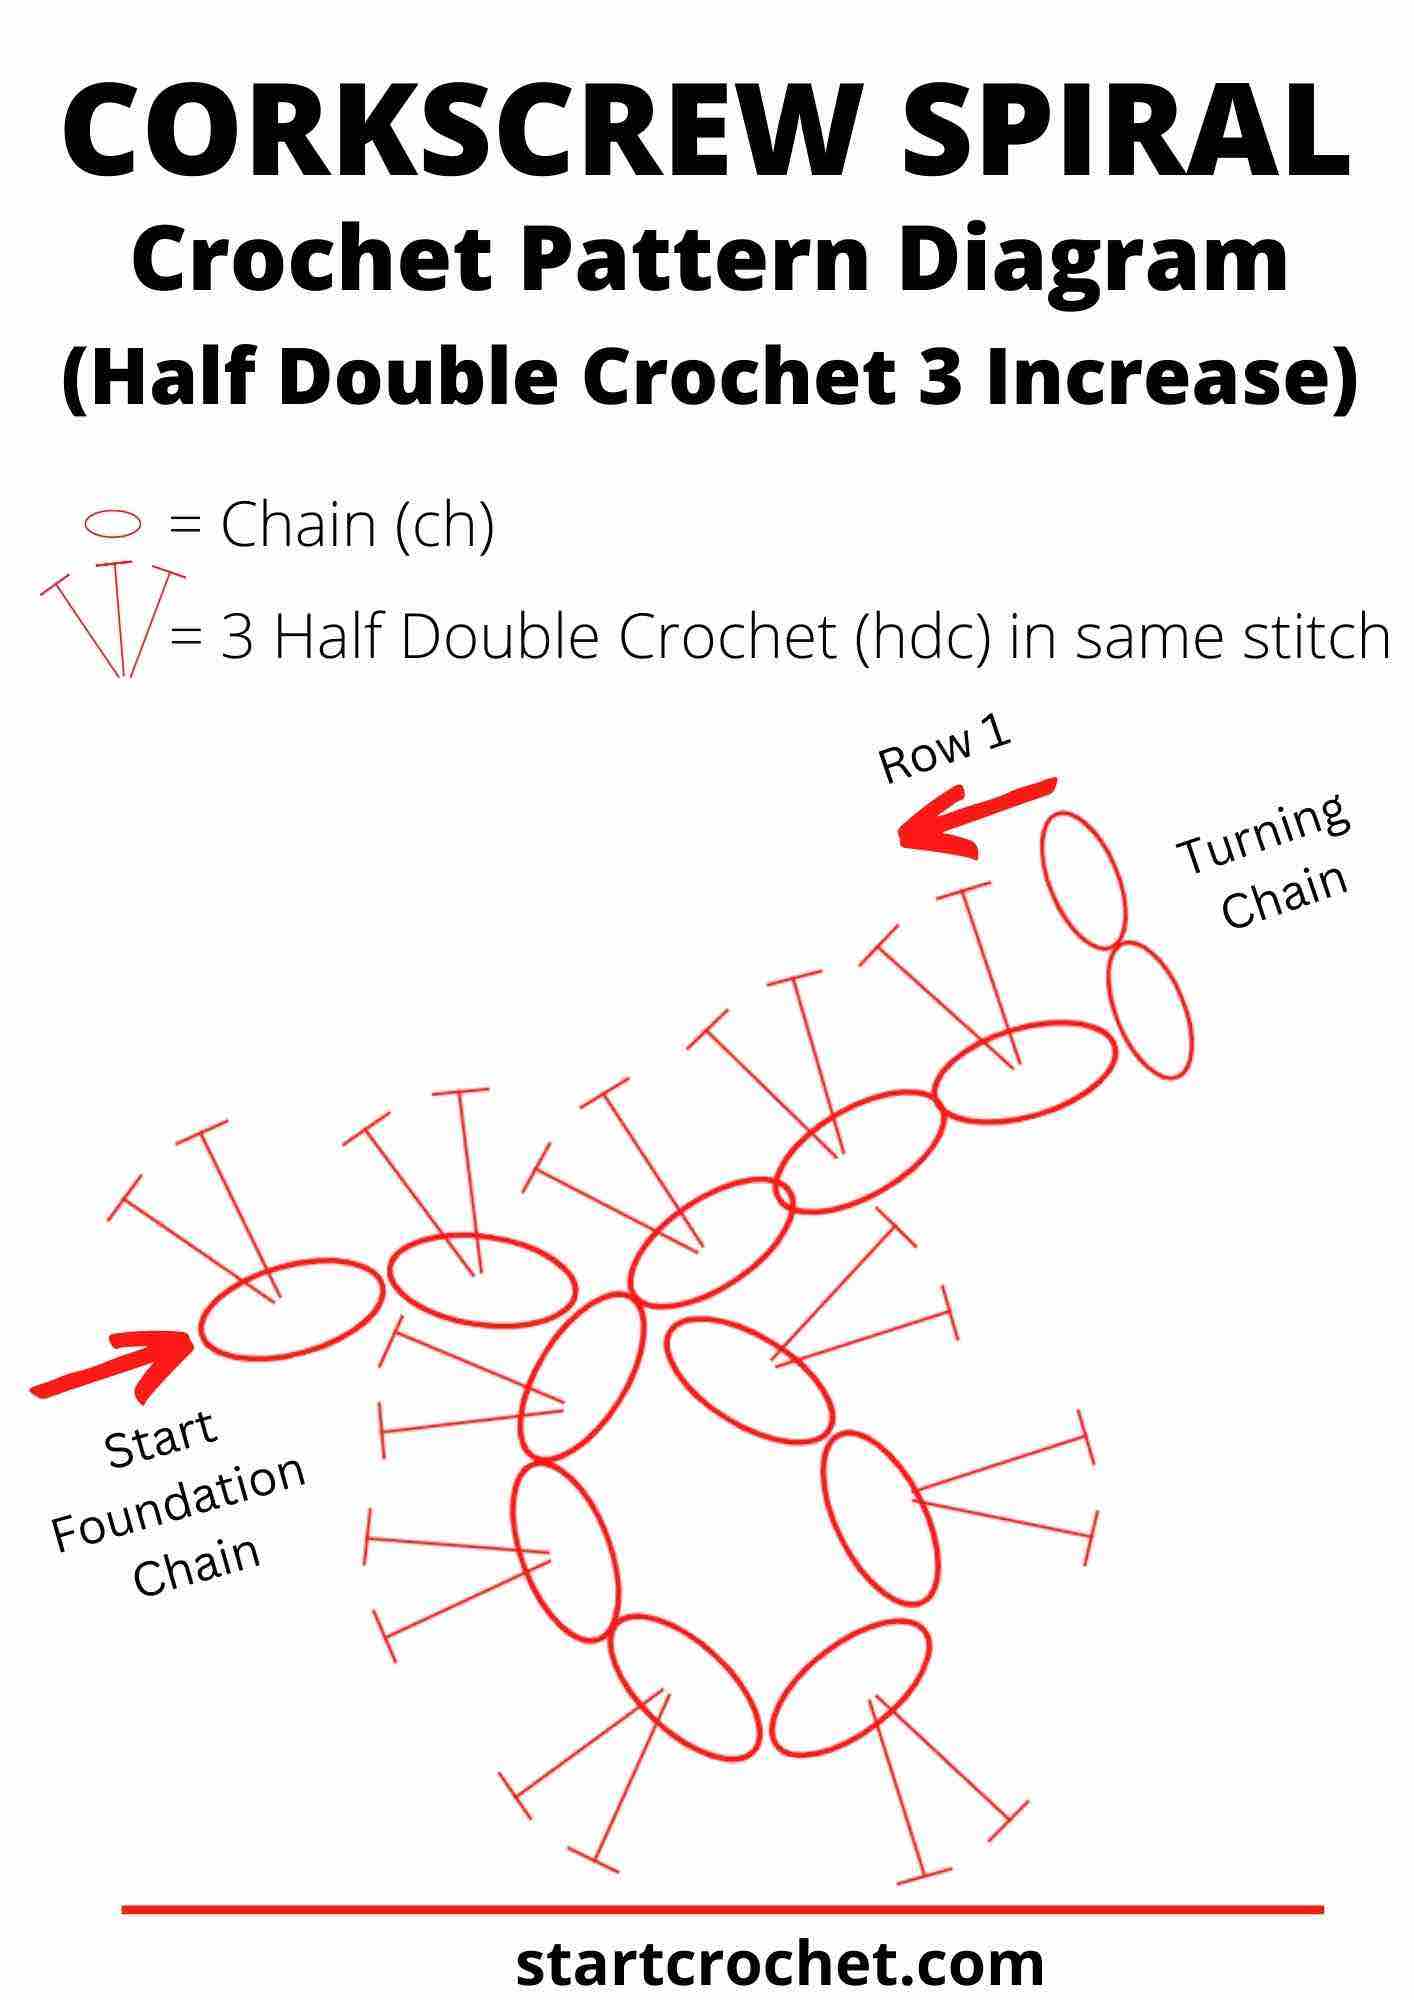
Corkscrew Spiral Pattern in Half Double Crochet with 3 dc stitches in each chain stitch.
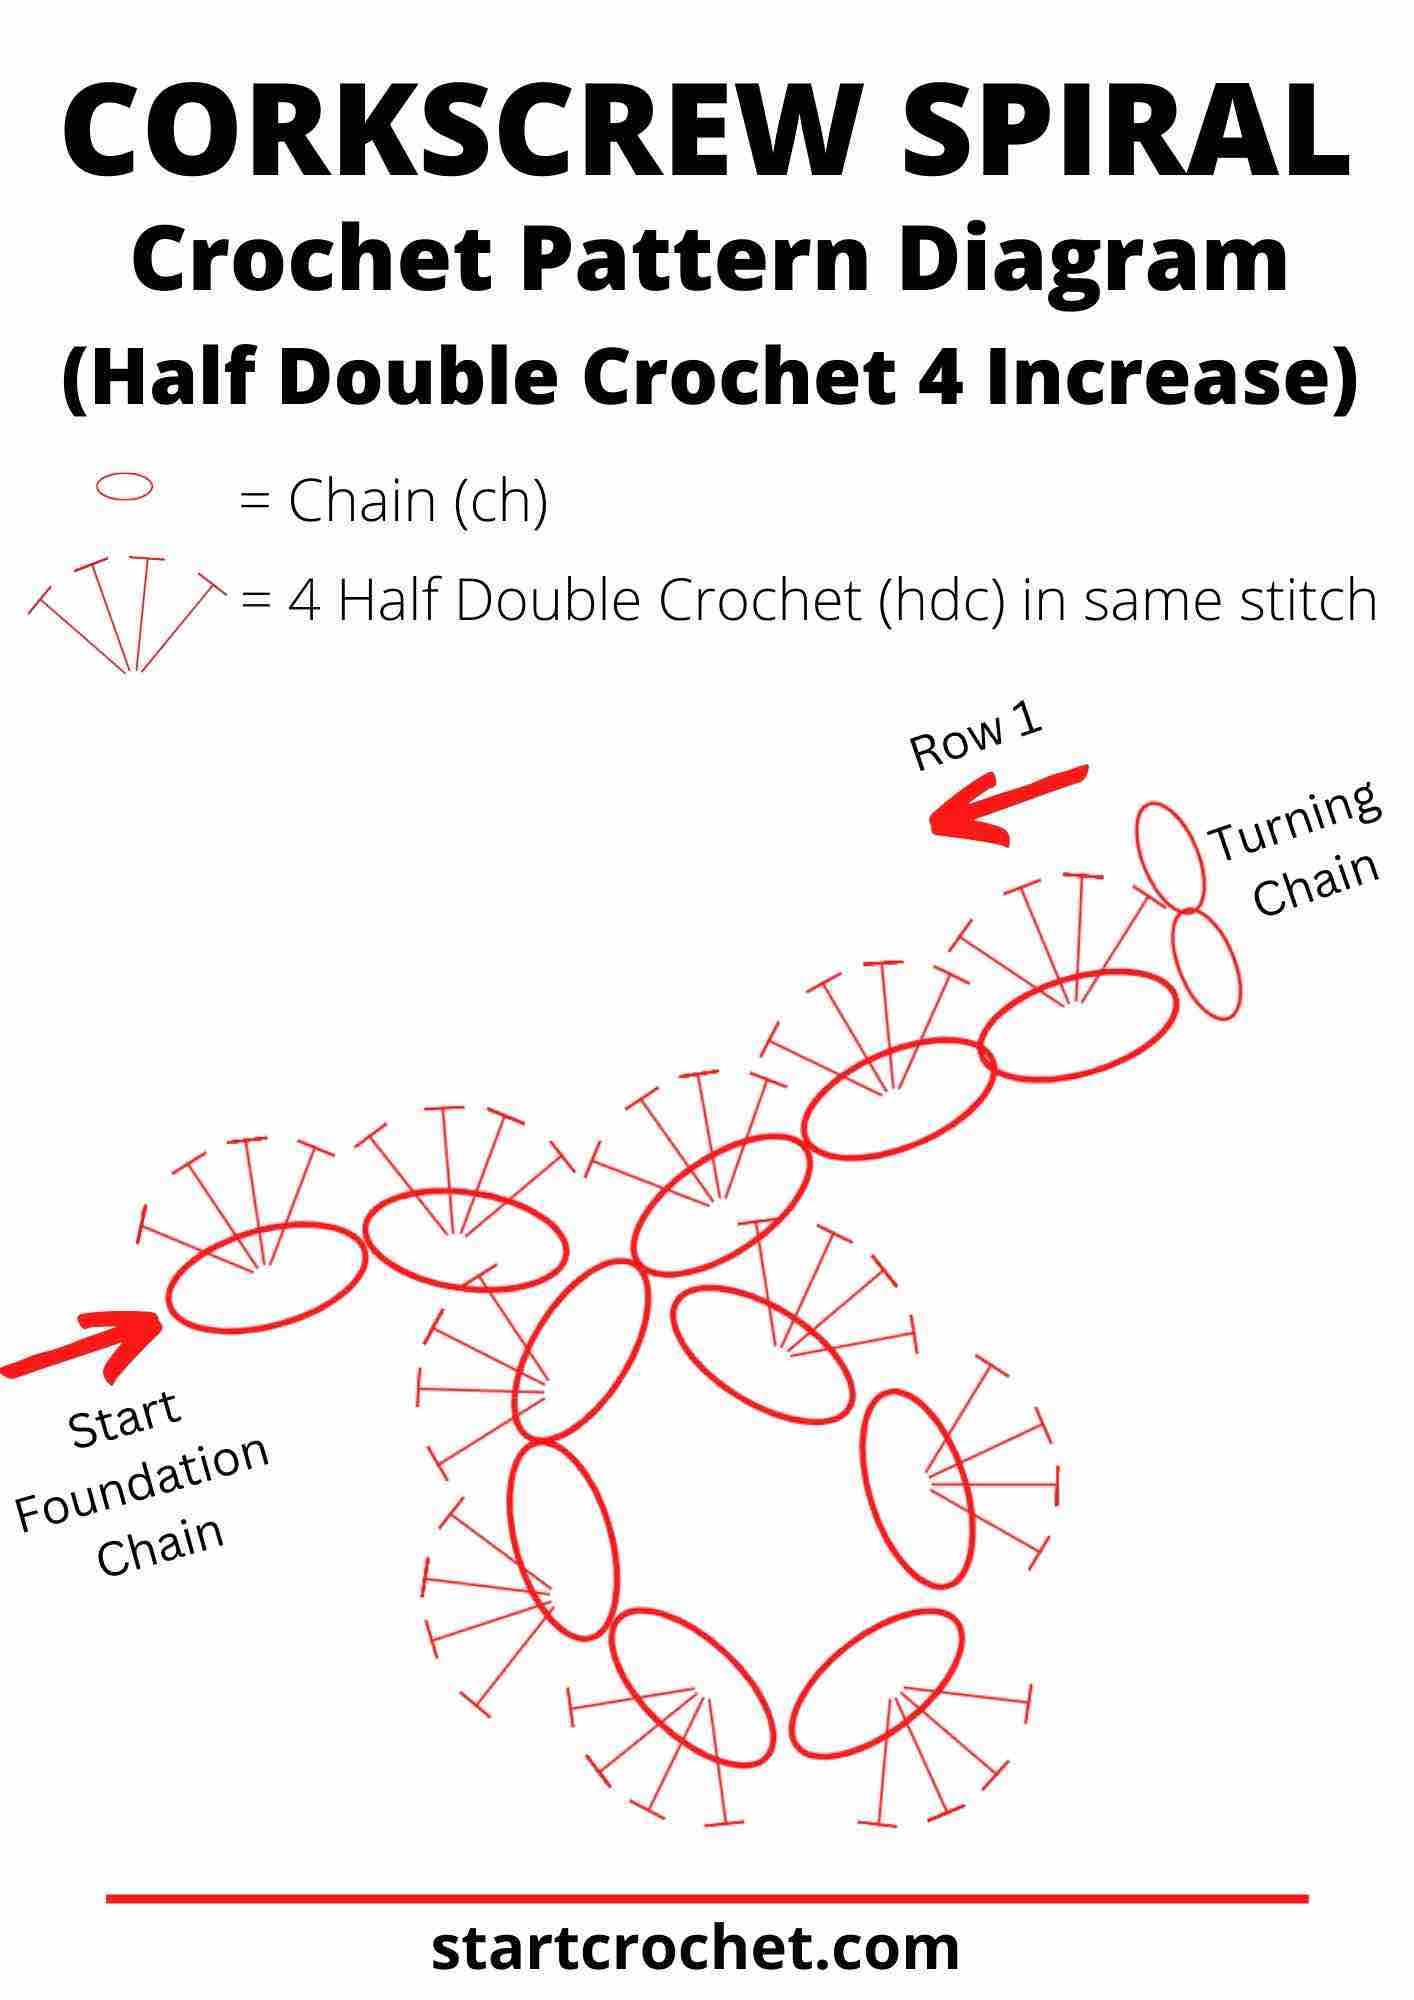
Corkscrew Spiral Pattern in Half Double Crochet with 4 dc stitches in each chain stitch.
Step 4: Repeat Step 3
- For each subsequent row, make the same number of half double crochet increases into each stitch of the chain. Continue this pattern until you reach the end of your chain.
Step 5: Finish the Corkscrew Spiral
- Once you've reached the end of your chain, finish off by cutting the yarn, leaving a 4" tail.
- Secure the tail by weaving it back and forth through the last few stitches or you could tie a knot to prevent unraveling (knots are not recommended though).
- Just like before, shape your spiral by gently twisting it around itself (like you'd be twirling our hair round your finger). This should make all your curls fall nicely into place. Hold the crocheted spiral at one end and twist it clockwise or counterclockwise. The more you twist, the tighter the corkscrew effect will be. Once you're happy with the twist, secure the end of the spiral by fastening off the yarn and weaving in the loose ends.
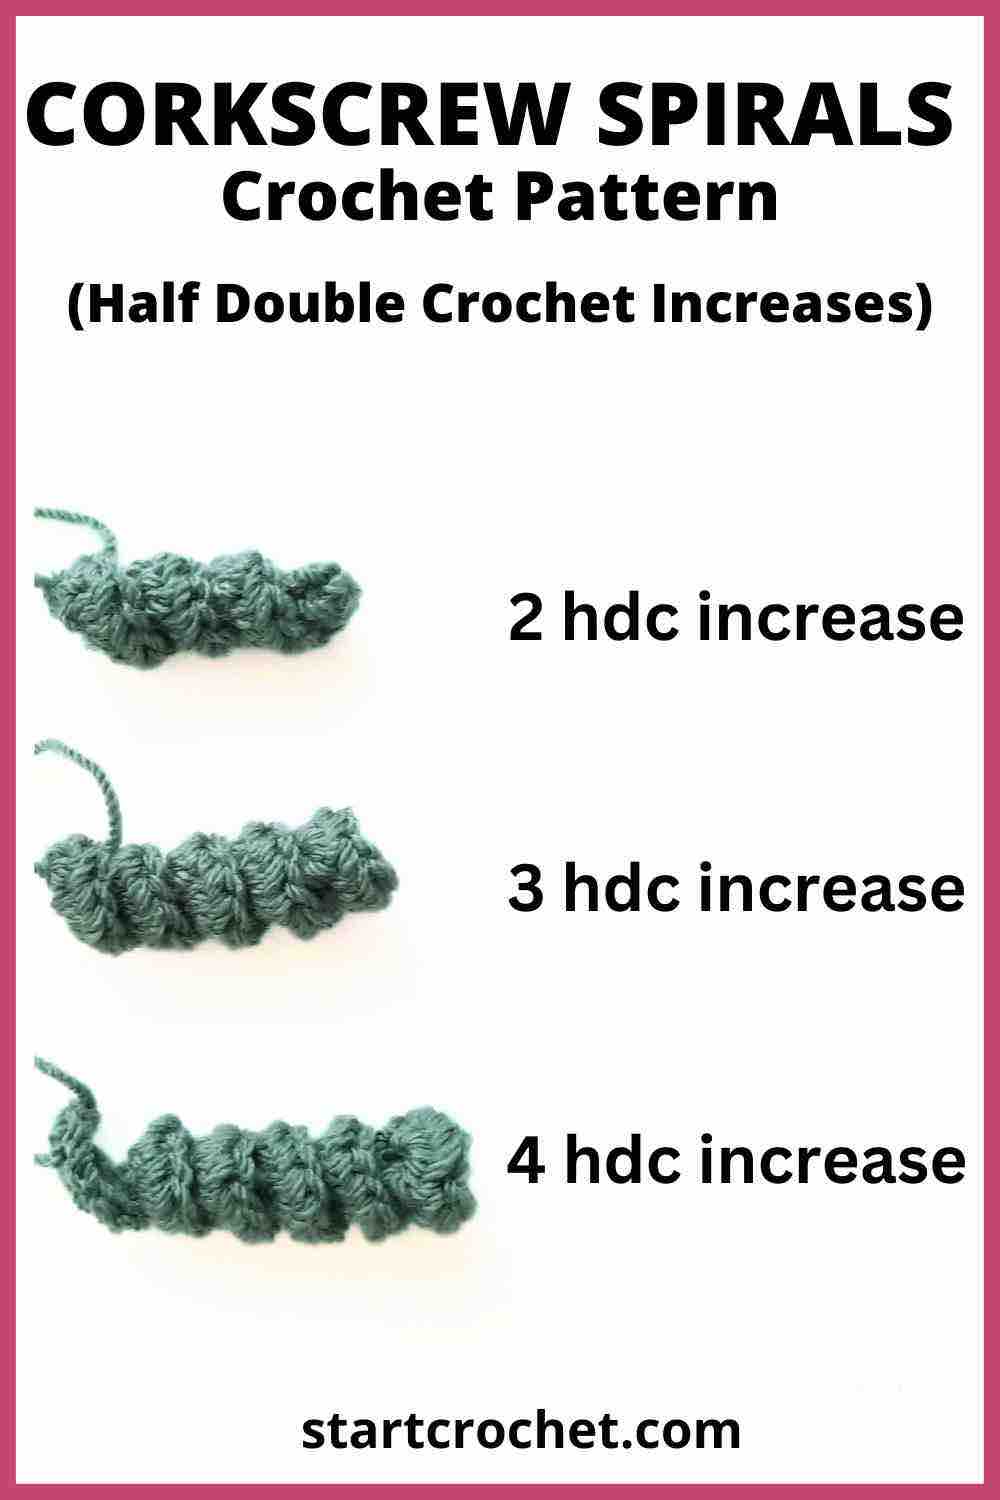
Here you can see the difference between adding 2, 3 or 4 hdc into each chain stitch.
3. Crochet Corkscrew Spiral Pattern - Double Crochet (dc)
If you're looking to crochet a corkscrew spiral using double crochet (dc), you'll get a nice wide spiral. I find this to be a good stitch if you want to crochet a simple rose, for example.
Same as before, you will start by measuring how long you want your spiral to be (let's say 4" or 10 cm). Then chain a length that's a little longer than you want your final spiral length to be (about 2" or 5 cm" longer).
Pattern Instructions (Double Crochet):
Step 1: Tie a Slip Knot
- To begin, create a slip knot by making a loop with your yarn, pulling the working end through the loop, and tightening it onto your crochet hook.
Step 2: Make a Foundation Chain
- Make a foundation chain a little longer than you want your spiral to be. I chained 16 stitches.
- This will serve as the base for your spiral. Remember to keep your chain loose to allow for easy stitching.
- Make sure to leave a long tail at the beginning for later finishing.
Step 3: Create the Corkscrew Curl (double crochet)
- To create the corkscrew curl, crochet a either 2, 3 or 4 double crochet stitches (dc) into the foundation chain. You can see in the images below the difference between crocheting 2, 3, or 4 double crochet into each stitch.
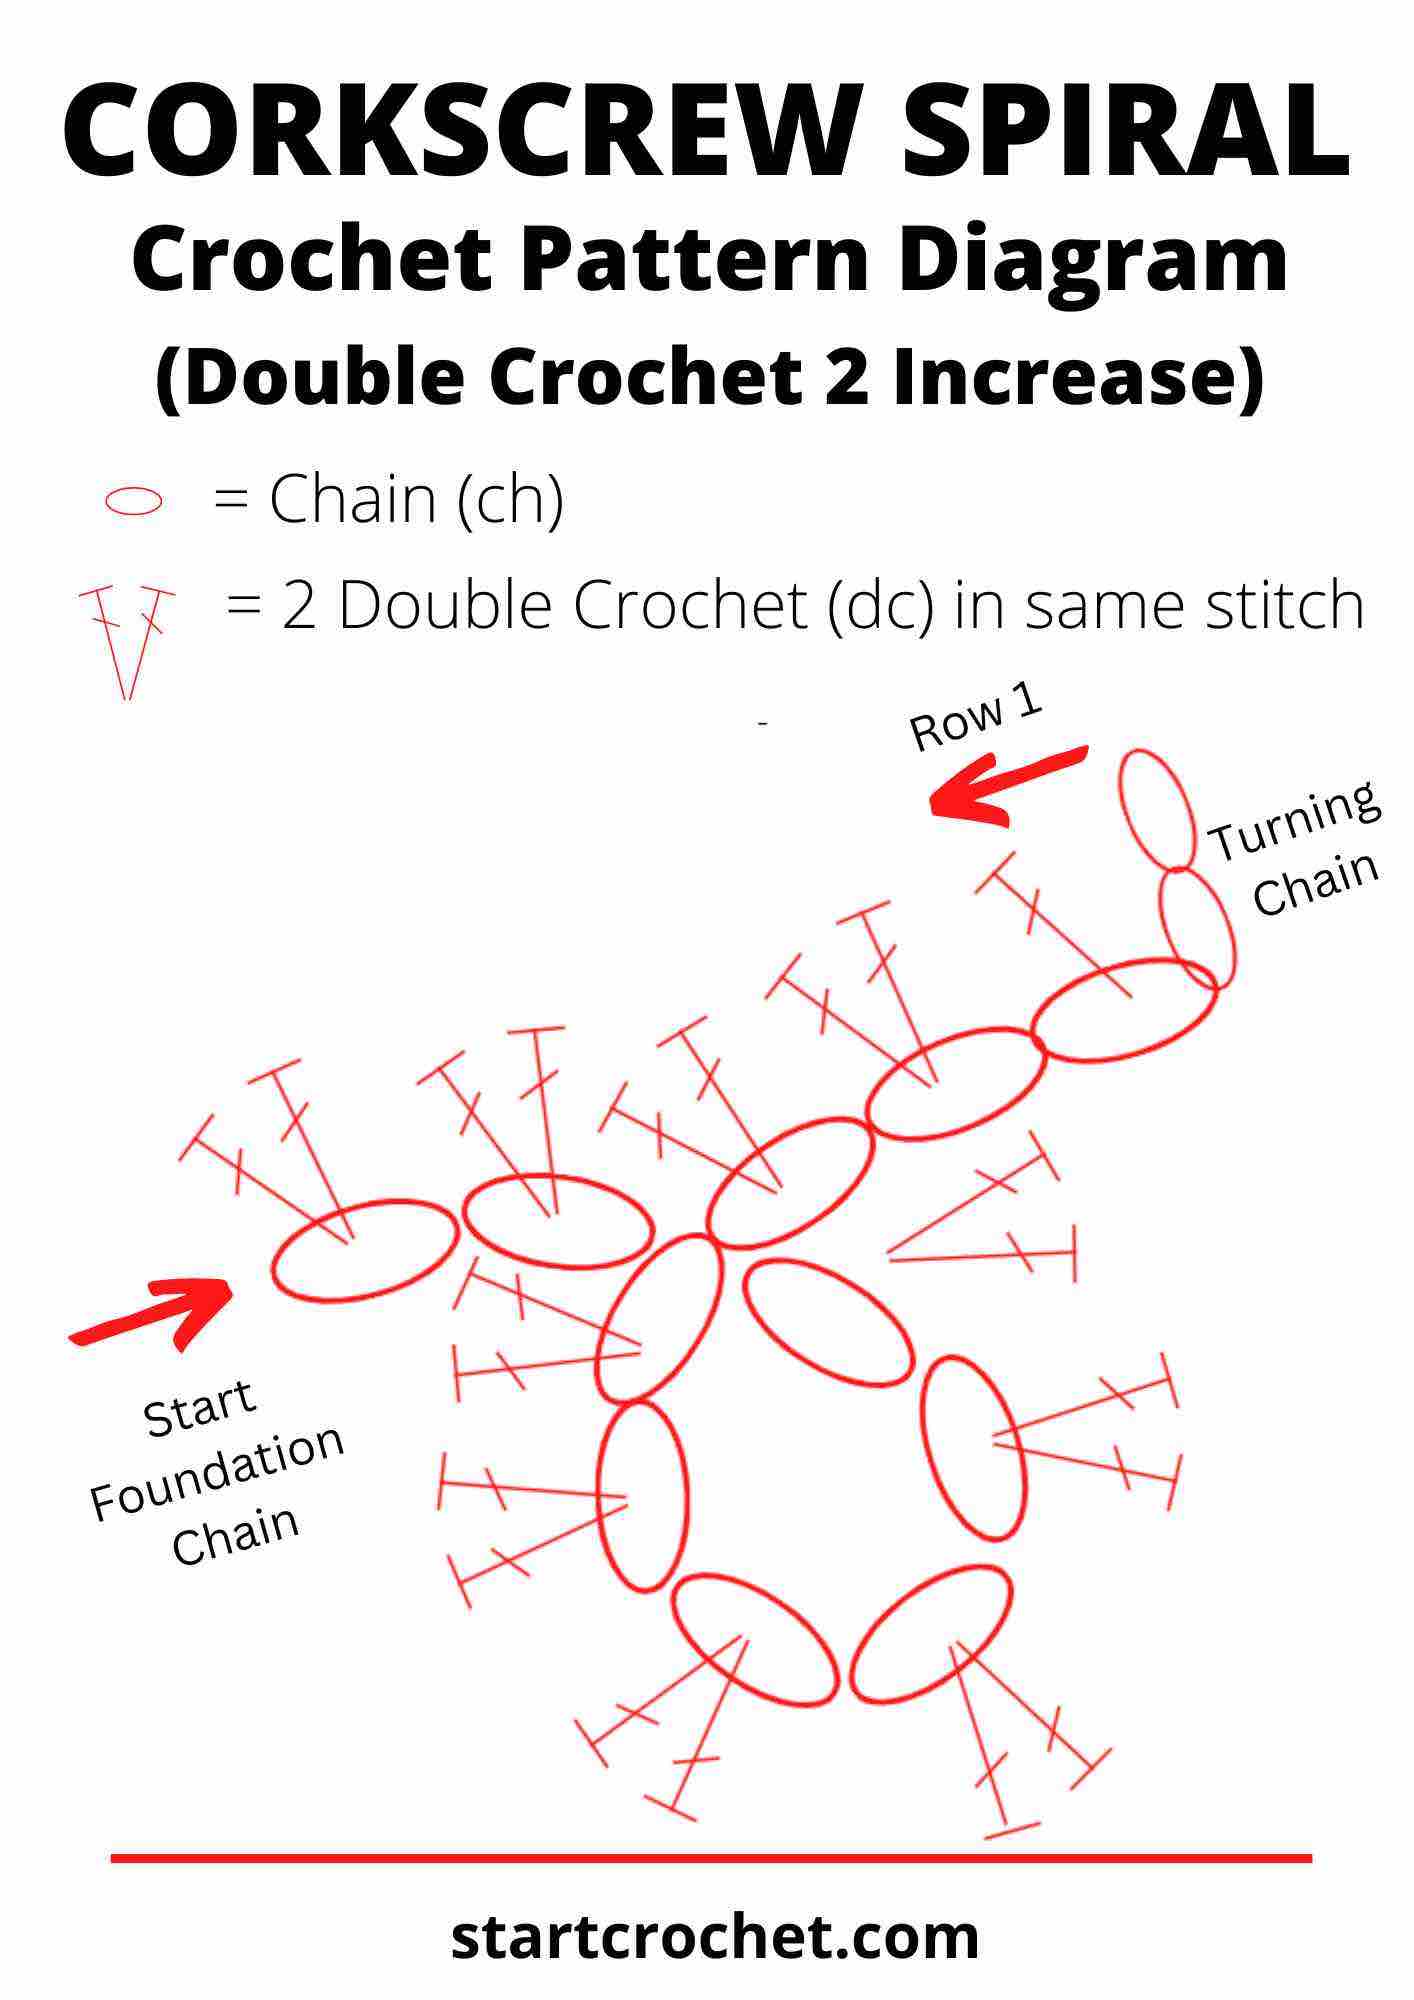
Corkscrew Spiral Pattern in Double Crochet with 2 dc stitches in each chain stitch.
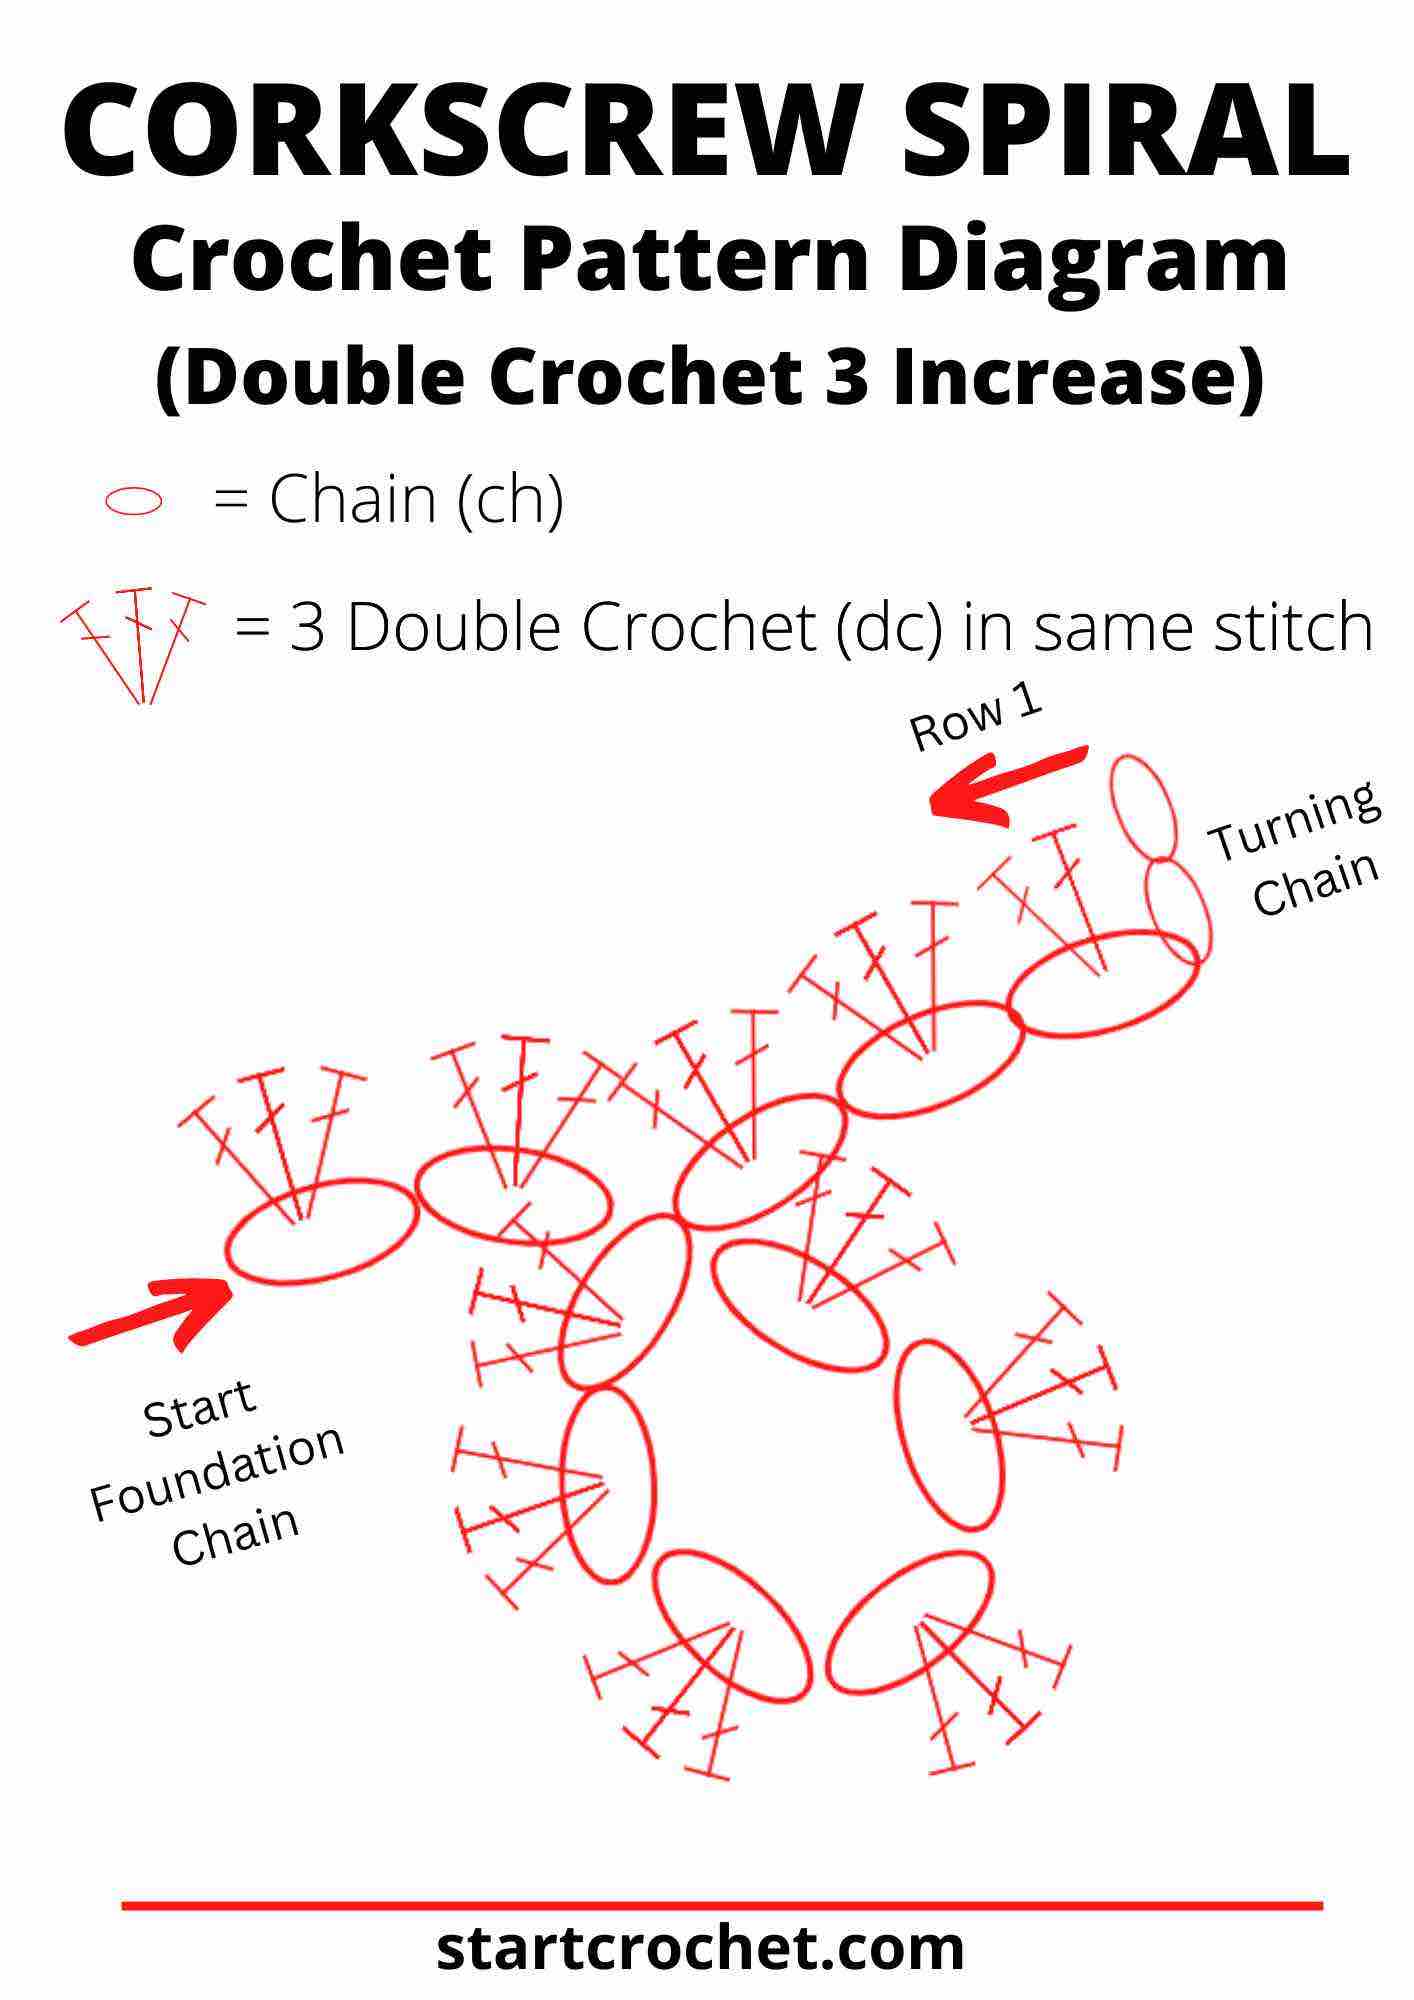
Corkscrew Spiral Pattern in Double Crochet with 3 dc stitches in each chain stitch.
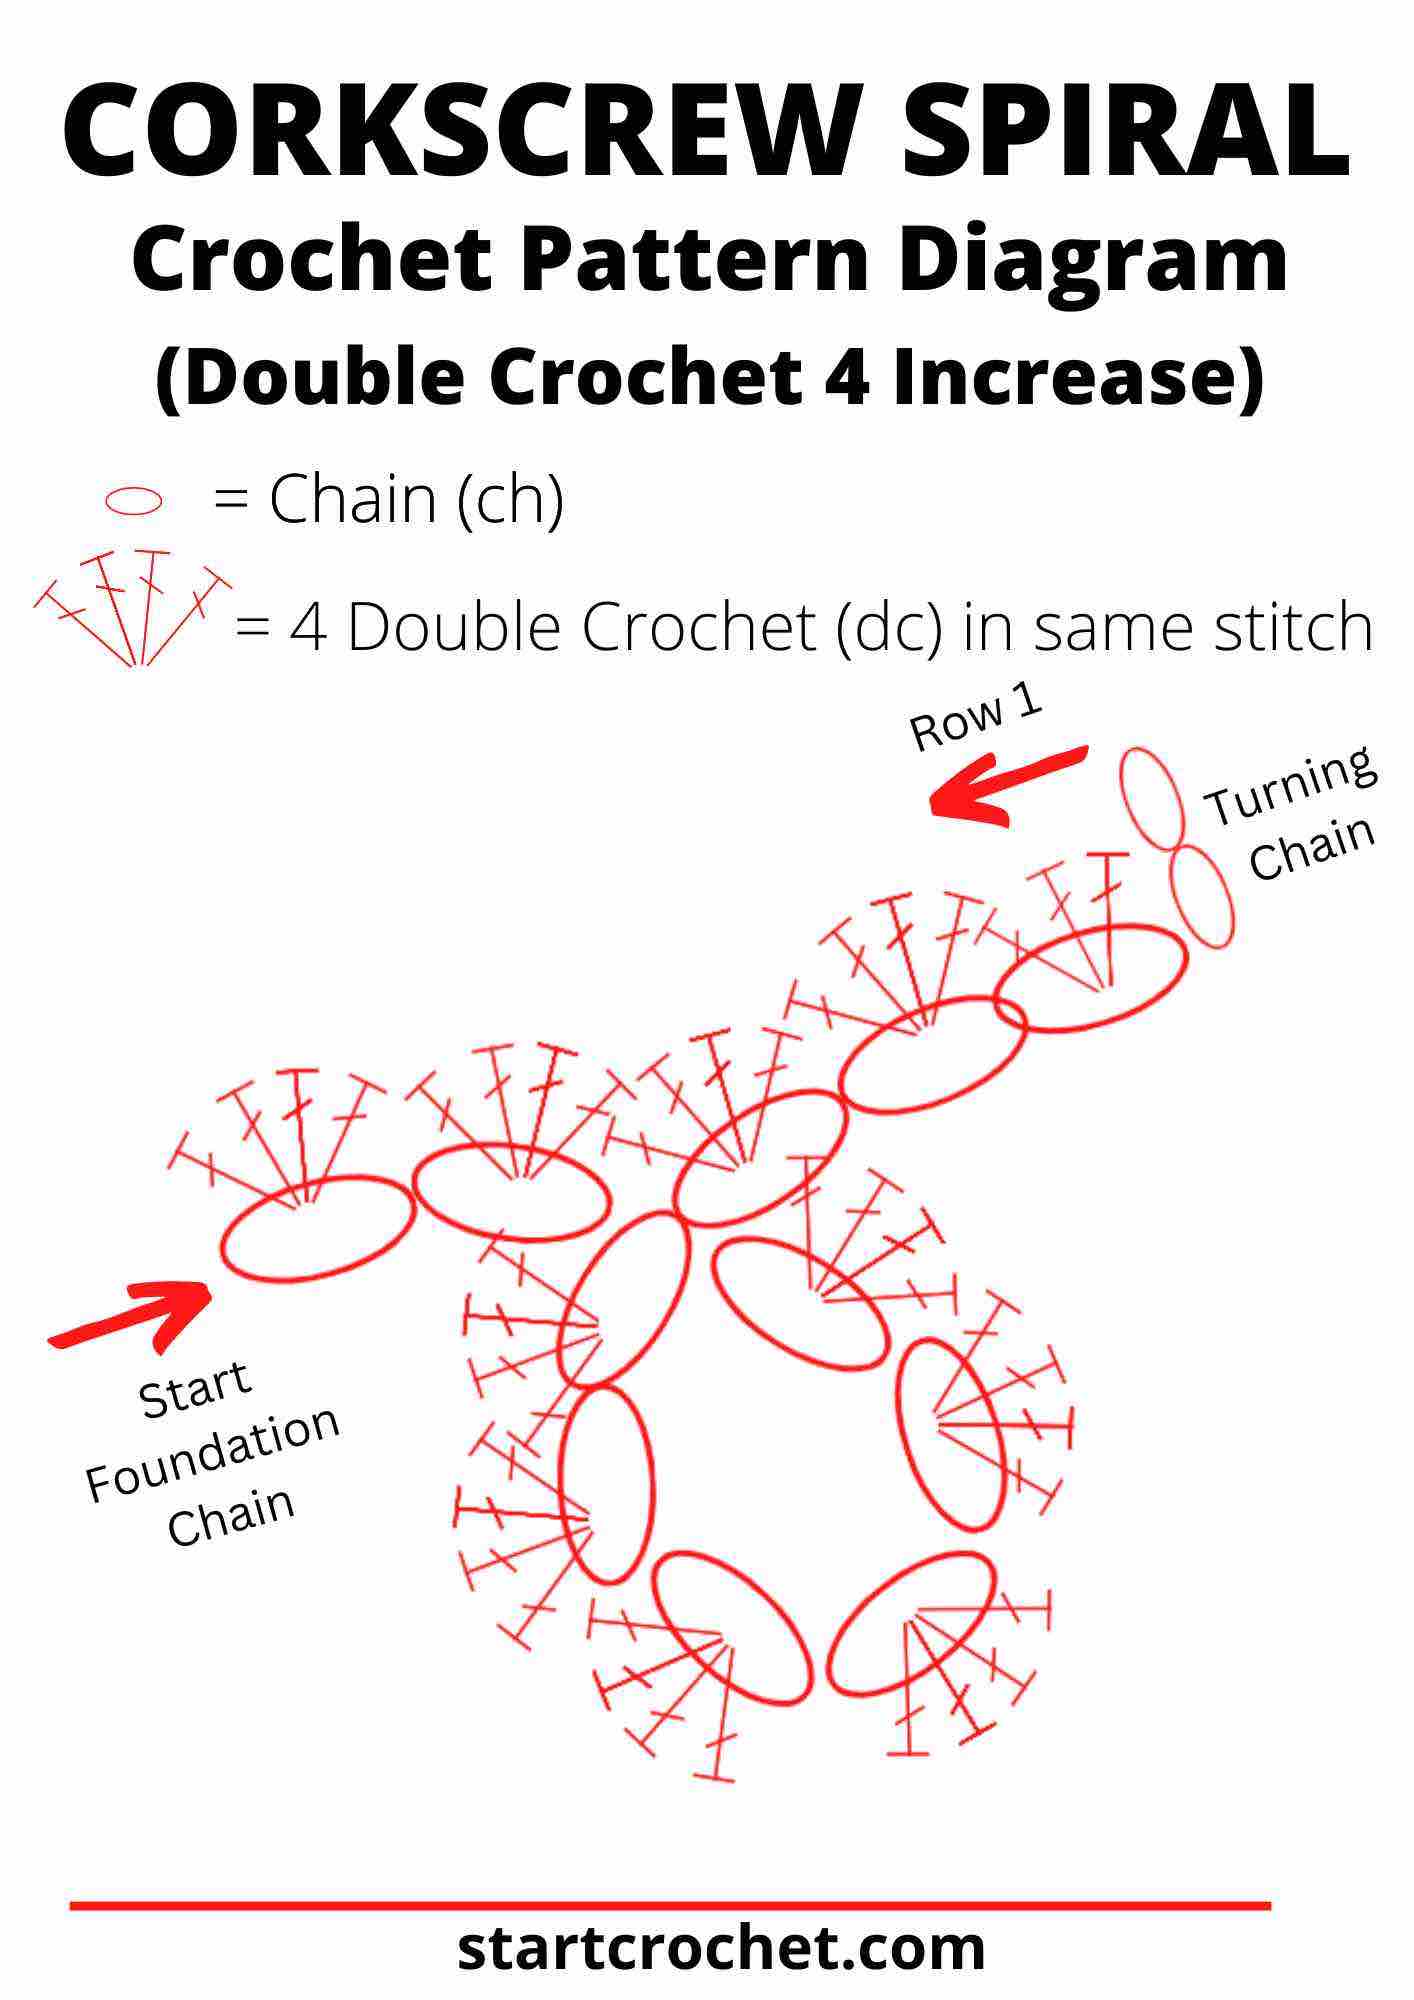
Corkscrew Spiral Pattern in Double Crochet with 4 dc stitches in each chain stitch.
Step 4: Repeat Step 3
- For each subsequent row, make the number of double crochet increases into each stitch of the chain. Continue this pattern until you reach the end of your chain.
Step 5: Finish the Corkscrew Spiral
- Once you've reached the length of your chain, finish off by cutting the yarn, leaving a 4" tail.
- Secure the tail by weaving it back and forth through the last few stitches or you could tie a knot to prevent unraveling (knots are not recommended though).
- Shape your spiral by gently twisting it around itself (like you'd be twirling our hair round your finger). This should make all your curls fall nicely into place. Hold the crocheted spiral at one end and twist it clockwise or counterclockwise. The more you twist, the tighter the corkscrew effect will be. Once you're happy with the twist, secure the end of the spiral by fastening off the yarn and weaving in the loose ends.
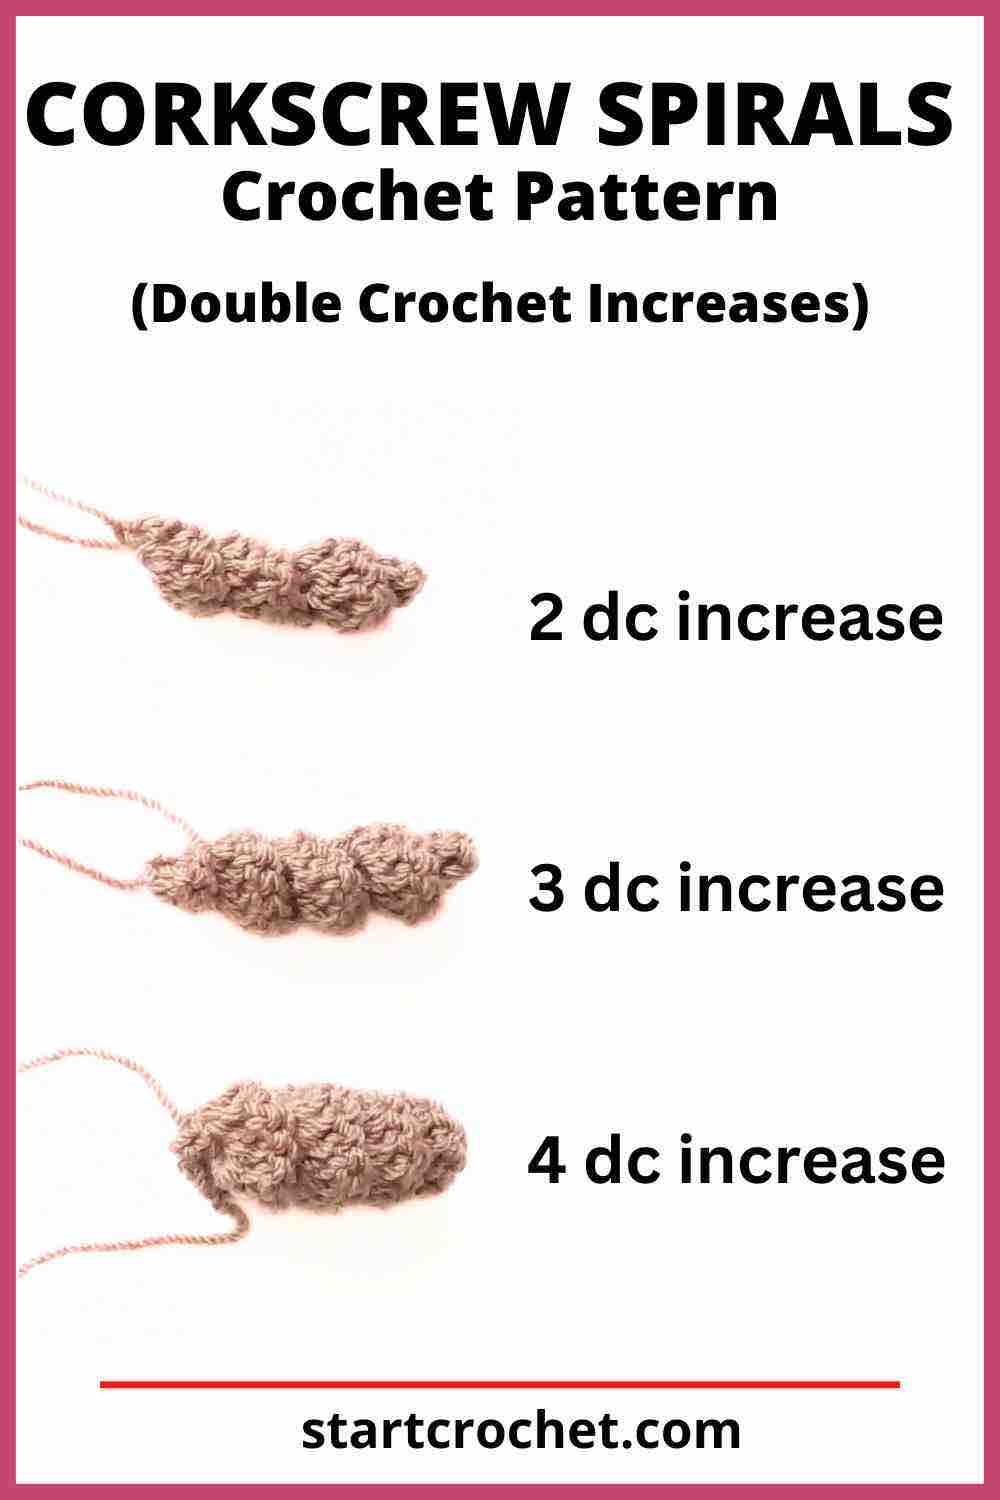
Here you can see the difference between adding 2, 3 or 4 dc into each chain stitch.
Tips and Tricks for Crocheting Corkscrew Spirals
Corkscrew spirals come in all shapes and sizes, so try these tips to get different looks:
- Practice the technique on scrap yarn before working on your final project to make sure you get the right width and tightness for your project.
- Use different yarn weights and hook sizes to create variations in the size and texture of your spirals.
- Experiment with different stitch counts to get different levels of tightness or looseness in your spirals. As I demonstrated above, adding 2, 3, or even 4 stitches into each chain stitch as you move along will create different effects. The more stitches you add, the more dense your curls will be.
- Remember that the corkscrew curl will be shorter than the foundation chain as it coils and twists.
- Combine multiple colors of yarn to create vibrant and eye-catching spirals.
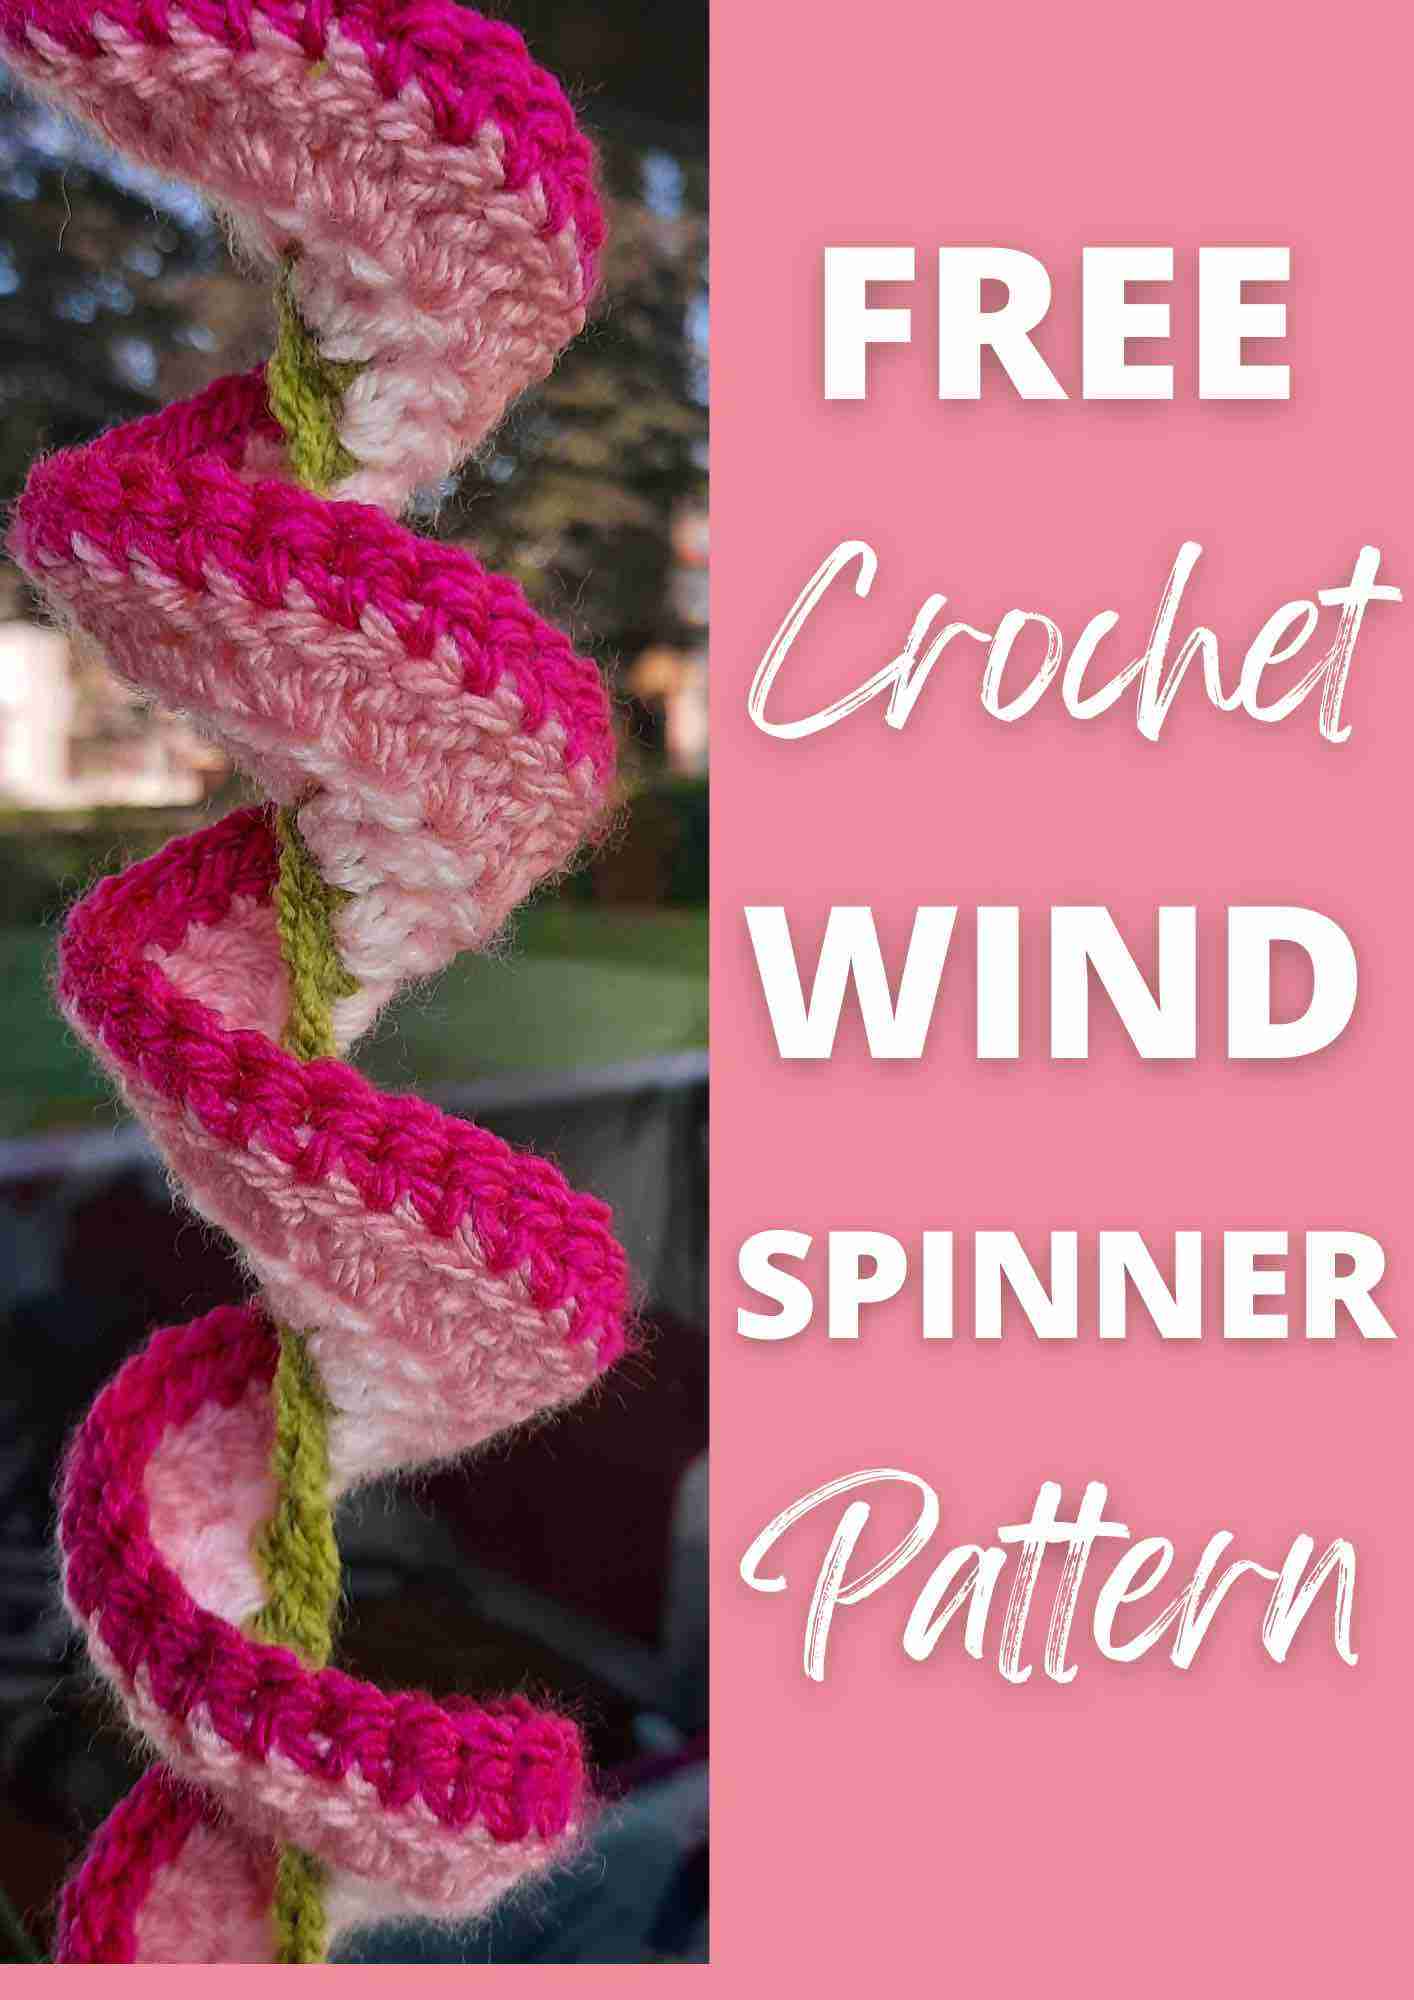
- Combine different stitches to create a unique look. I did this in my Springtime Wind Spinner.
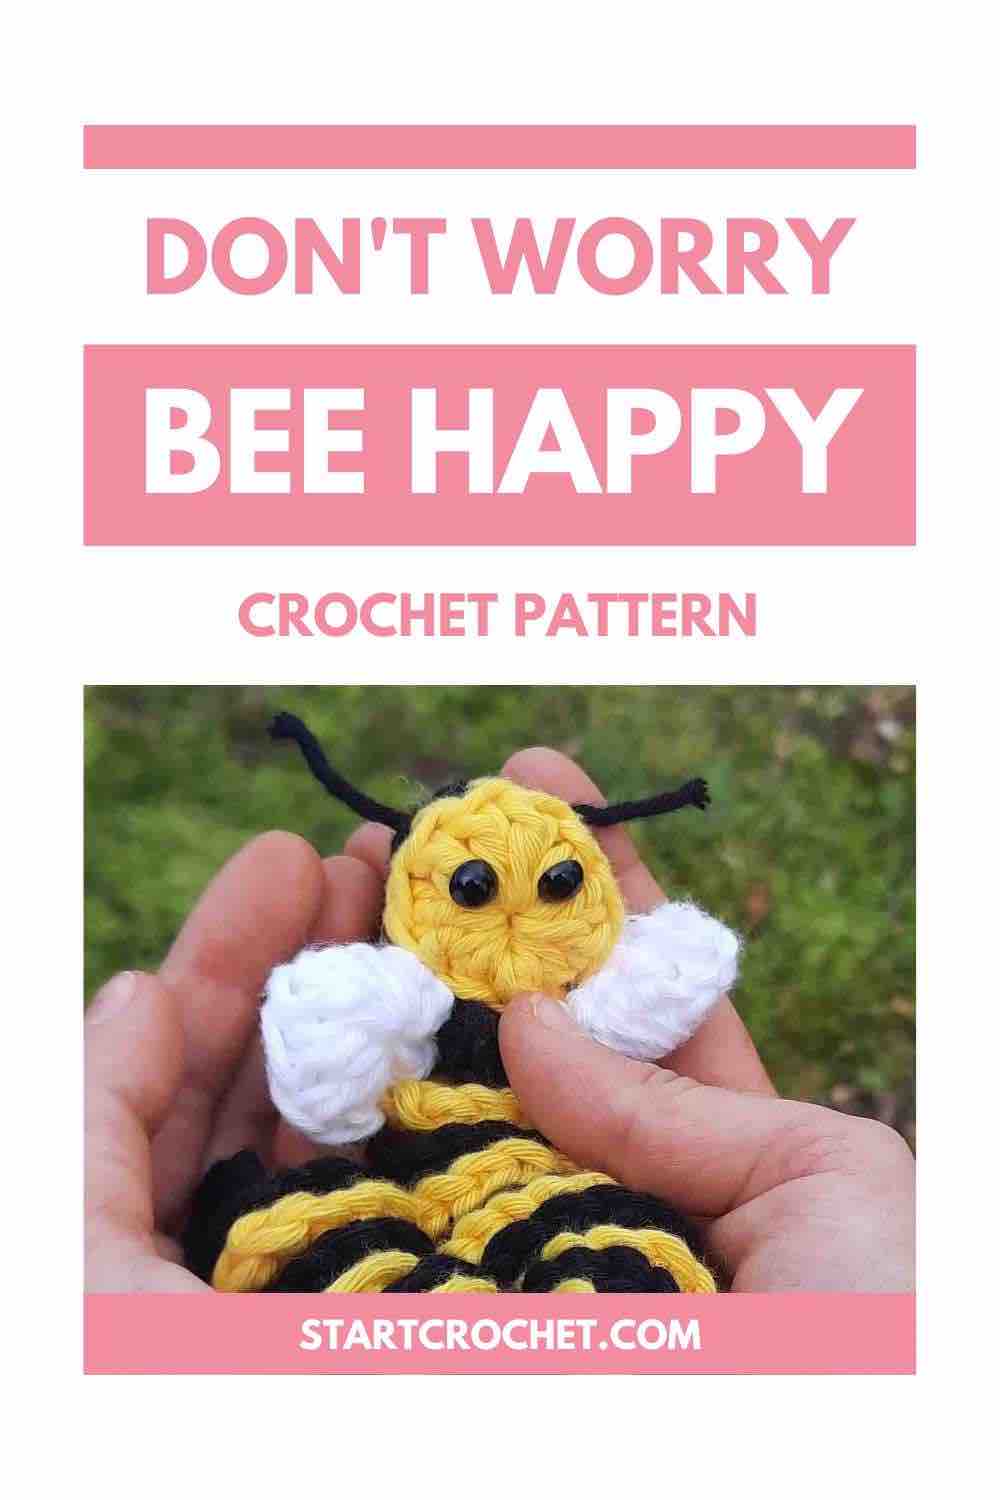
- Try curling 2 or 3 curls together to get a striped curly look. I did this with my Bee Worry Worm and I've gotten so many complements for this technique 🙂
- Try this technique in the round like I did with this scrunchie:
Frequently Asked Questions About How To Crochet Corkscrew Spirals & For What To Use Them:
I'll answer some of the questions people ask most about crocheting 3D spirals:
What are crochet corkscrew spirals?
Crochet corkscrew spirals are unique and whimsical decorative elements created through crocheting techniques.
With simple & repetitive stitches, you follow a specific number of increases that will coil the yarn to form spiral shapes. This adds an interesting and charming touch to your crochet projects.
You can also use this techniqe in stand-alone projects like worry worms and wind-spinners, for example.
How do I make crochet corkscrew spirals?
To make crochet corkscrew spirals, you'll need to start with a foundation chain and then crochet along it. It will naturally turn into a spiral. Here's a basic step-by-step process:
- Make a foundation chain of any length, but a little longer than you want your final spiral to be (because it shrinks as it twists).
- Crochet a constant number of increased stitches along the foundation chain, which will gradually create a continuous spiral.
- Keep crocheting in this pattern until you get the size and shape you want for your spiral.
What materials do I need to crochet corkscrew spirals?
To crochet corkscrew spirals, you'll need these materials:
- Yarn: Choose any yarn you like, preferably one that is suitable for the project you have in mind. Different yarn weights and textures can create varying effects. Bulkier yarn will create more dense & tight spirals. Thinner yarns will create more open and floppy spirals.
- Crochet Hook: Select an appropriate crochet hook size based on the yarn you're using. The appropriate hook size should be written on your yarn label.
- Scissors: A pair of scissors will be handy for cutting the yarn at the end of your project.
- Darning Needle: To weave in your ends.
What can I make with crochet corkscrew spirals?
You can use crochet corkscrew spirals in a wide range of crochet projects to add decorative elements or unique design features. Here are a few ideas:
- Embellishments: Attach the spirals to keychains, bags or other accessories to give them a whimsical touch.
- Home Decor: Incorporate spirals into wall hangings, create curtain tiebacks, embellish lampshades, or attach them to throw pillows for a touch of texture and visual interest.
- Jewelry and Accessories: Incorporate crochet corkscrew spirals into your jewelry-making projects. Create earrings, charms, pendants, or bracelets with these charming spirals to add a touch of handmade elegance to your accessories collection. You can check out my Luxurious Velvet Scrunchie that can be worn on your wrist.
- Hair Accessories: Turn your corkscrew spirals into charming hair accessories. Use them to spruce up headbands, hair clips, or bobby pins. They're perfect for adding a playful twist to your hairstyle or for creating a statement piece for special occasions.
- Amigurumi: Add corkscrew spirals as details on amigurumi toys or dolls to bring them to life with personality. You could make an amigurumi doll hair accents, curly tails or even fun embellishments for cute creatures like fantasy creatures, jellyfish or octopuses.
- Gift Wrapping Embellishments: Take your gift wrapping to the next level by adding crochet corkscrew spirals as decorative elements. Attach them to gift tags, wrap them around the ribbons, or create cute little gift toppers.
- Party Decorations: Make your next celebration more festive by incorporating crochet corkscrew spirals into your party decorations. Create garlands or hanging ornaments using these spirals to bring a playful and handmade feel to your event.
Are there any specific crochet techniques required for making corkscrew spirals?
Creating crochet corkscrew spirals doesn't require any complex or specialized techniques. It is helpful though to have a basic understanding of crochet stitches, such as how to make a slip knot, chain, single crochet, half double crochet, double crochet, and working in the round. Familiarity with these techniques will make it easier for you to follow patterns and instructions for creating the spirals.
Are there different variations of the corkscrew spiral crochet pattern?
Yes, there are different variations of the corkscrew spiral crochet pattern that you can explore. Here are some examples:
- Corkscrew Curls: Instead of creating a flat spiral, you can make curls by crocheting a foundation chain and then adding a fixed number of increased stitches to each chain to create a corkscrew effect.
- Mixed Stitch Spirals: Experiment with different crochet stitches, such as half double crochet or treble crochet, to create unique spiral patterns. You can have a look at this easy crochet wind spinner that combines several stitches together.
- Colorful Spirals: Play with different yarn colors and change them as you crochet to create vibrant and pretty corkscrew spirals.
- Textured Spirals: Try using different types of yarns with different textures in one spiral and see what effect that will have.
Are there any specific crochet hooks or yarn weights recommended for corkscrew spiral patterns?
There are no specific requirements for crochet hooks or yarn weights when working with corkscrew spiral patterns. The choice of hook and yarn depends on what kind of project you're wanting to make. Thinner yarn and smaller hooks will create tighter and more intricate spirals, while thicker yarn and larger hooks will result in larger, more bulky spirals.
Are there any tips for achieving the perfect crochet corkscrew spirals?
Crocheting corkscrew spirals is quite easy and makes for a perfect beginner project. I've had some people mention that their spirals aren't curling properly, so here's some advice to make sure you get the perfect spirals:
- Get Your Twist On: First off, yarn choice is key. Go for stretchy stuff like acrylic or wool blends. They'll give your spirals that perfect bounce and shape. Now, here's the secret sauce: if your corkscrew isn't twirling like a boss, grab a crochet hook, pen or pencil (or just use your finger), and wrap your spiral around it. Voila! Instant twisty goodness!
- Hook it Up: Match your yarn weight with the recommended crochet hook size. It's like finding the perfect dance partner for your yarn. This way, you'll get those awesome spirals with just the right amount of oomph!
- Double Trouble: Instead of using three single crochet stitches per chain, try using three double crochet stitches like I showed you above. This little tweak can give your corkscrew a chunkier and more distinctive look if that's what you're looking for.
- Play with Colors: Who says corkscrews have to be boring? Experiment with different yarn colors to create vibrant and eye-catching spirals. Go wild and let your creativity shine!
- Practice Makes Perfect: Don't worry if your first attempts don't turn out exactly as you planned. Crocheting corkscrew spirals takes a bit of practice. Embrace the learning process, keep going, and soon you'll be making those spirals like a crochet rockstar!
Conclusion
Through this little experiment, I discovered that crocheting corkscrew spirals opens up a world of creative possibilities. With these simple, beginner-friendly stitches, you can create really awesome designs that will add a touch of charm to your creations.
You can experiment with this technique some more using different:
- Yarn types
- Yarn weights
- Number of Stitches
- Type of Stitches
- In Rows and in the Round
and you'll get different outcomes for each.
All you need to remember is this formula for hyperbolic crochet:
x = n + 1 (where n is any number you choose)
You can use this formula to increase your stitches, but you can also try decreasing your stitches after a few rows and see what organic shape you'll come up with.
Quite interesting, huh?
So, gather your crochet tools, choose your favorite yarn, and get ready to spin some yarn magic with those fabulous corkscrew spirals.
I hope you enjoyed this Crochet Corkscrew Spiral tutorial.
Let me know if you have any questions or comments and I'd love to see what you come up with.
Happy hooking, my crafty friends!


Thank you for your little gift patterns. What a lovely way to brighten someone’s day.
Thank you so much for your sweet comment! Yes, I think these little crochet gifts left out & about for people to find are just really awesome! Have a lovely day 🙂