Granny Squares Crochet Pattern:
Free Tutorial For Easy Granny Squares
Crochet granny squares are perfect little projects for beginners because they are super easy to crochet, they take only a few minutes per square and you can use small amounts of just about any yarn you have lying about.
Crochet Granny Squares make for absolutely great stash busting! And we all know we've got just a tad too much leftover yarn, don't we?!

I'm sure you've seen Granny Squares used in fashion items lately. Even Target has Granny Square Hats in its collection!
Granny Squares are real trendy right now, but they've actually been around since the 1800s! You'll find these classic crochet squares in both vintage and modern crochet patterns.
Crochet Granny Squares have become so popular, there's even a dedicated hashtag for Granny Square Day over on Instagram.
And every year on August 15th, it's International Granny Square Day, so you can join the fun by posting one of your Granny Square Projects and use hashtag #grannysquareday202x (add the current year).
Crochet granny squares have a very simple composition, made up of clusters of double crochet (dc) stitches worked into chain spaces.
You can crochet them in one solid color or include several complimentary color variations.

Once you've made a few Granny Squares, all you gotta do is join these lovely granny squares to create just about anything you can imagine: bucket hats, tops, sweaters, cardigans, ponchos, baby blankets, large blankets, bags, dresses, pants, shorts, pillow covers, mason jar cozies, you name it!

The great thing about Crochet Granny Squares is you can carry them with you whenever you're out and about.

Even if you're working on a large project like a crochet blanket, you don't have to carry the whole project along with you. Just the Granny Squares you're working on and then join them all together at home.
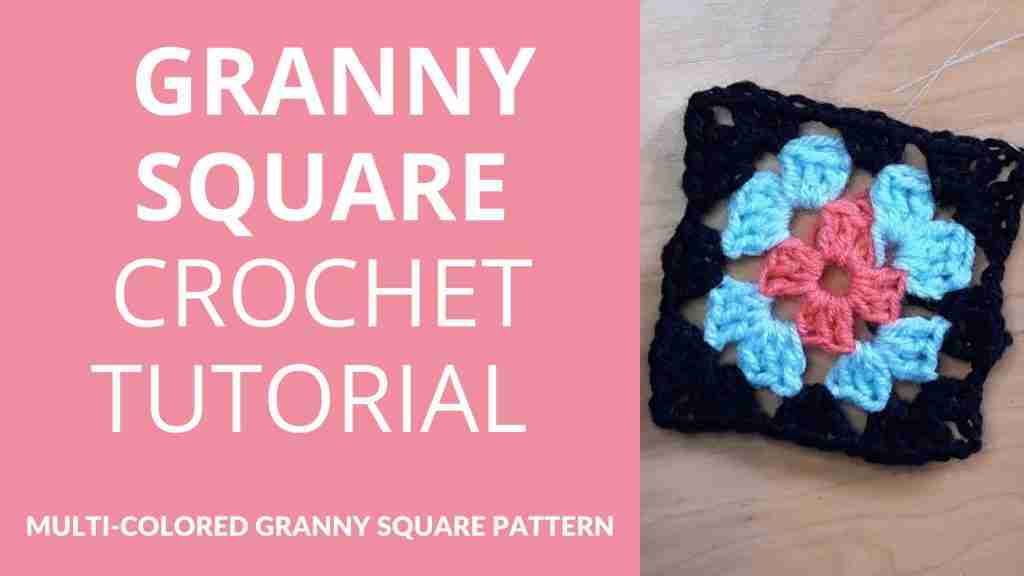
Crochet granny squares come in a variety of different designs, shapes and sizes, but for this tutorial, I will focus on the classic granny square using 3 different colors for 3 rounds. You can follow the same pattern to make larger Granny Squares.
This classic Granny Square can be crocheted in one solid color (as shown in this blog post for Easy Crochet Granny Squares, or you can change colors for each round, as I will show you here.
Like this pattern, but not ready to work it yet? Save it to Pinterest!

I've prepared a crochet granny square digram for you to make it easier to visualize how exactly the stitches are placed. You may print it out and keep it in your crochet binder for future reference.
You will also find a list of frequently asked questions at the end of this tutorial which also shows you how to join granny squares to complete your project. If you have any questions that I haven't answered there, please drop me a comment below.
Disclaimer: This post contains affiliate links, which means I receive a small commission, at no extra cost to you, if you make a purchase using the Start Crochet links. Please see my disclosure for more details.

Crochet Granny Square For Beginners: Tutorial
What You’ll Learn
- How to crochet a Granny Square in 3 colours (Classic Style)
- Three ways to join you Granny Squares so you can make your projects come to life.
- Some project ideas for your Granny Squares
- Answers to Frequently Asked Questions about crochet Granny Squares
Materials Needed
- Some classic worsted weight yarn (3 colors of your choice). Any yarn would do really, just make sure it's not hairy or fuzzy.
- Crochet hook that fits your yarn. Generally I use between a size G/4mm to H/5mm hook.
- A tapestry needle
- A pair of scissors
Abbreviations
- ch = chain
- dc = double crochet
- sl st = slip stitch
For details on how to work these stitches, have a look at Annie's Catalogue Tutorials.
Skill Level
Beginner
Note
I use US crochet terms. Here's a US/UK Conversion Chart
US vs. UK Crochet Terms & Symbols
Free Printable

Your info is 100% secure and will never be shared.
Gauge
Gauge: A Granny Square of 3 rounds measures about 10cm x 10cm (4 inches x 4 inches)•
Note: Gauge is not really that crucial for most granny square projects unless you are making a garment. Just try experimenting with different hook sizes to get a gauge you are happy with for the project you are working on. But if you're following a pattern that states a specific gauge, then you have to make sure you're getting the correct size, of course.
Crochet
Granny Square Diagram / Chart
Free Printable

Instructions For Classic Crochet Granny Square (3 Colors )
There are several ways to crochet a classic Granny Square, but what I'll show you here is the simplest and most straight forward in my opinion. Here we go:
- Start off by tying a slip knot, then Ch 4. You could also try the Magic Circle for a tight & closed center if you wish.
- Join to the first stitch with a slip stitch to form a circle.
Round 1: (Blue)
- Ch 3 (counts as first double crochet).
- 2 dc into center of your circle, ch 2, (3 dc into center of circle, ch 2) repeat brackets 2 more times.
- Join with a sl st to the top of your first ch 3 at beginning of this round. Leave a 4" tail, cut your yarn. Pull through the loop tightly to secure.
You should have 4 clusters of 3 dc at this point and 4 corners (the ch 2 after each cluster creates a corner).
Round 2: (Pink)
- With your Pink yarn, make a slip knot.
- Put your hook though the ch1 space to the right of your Blue yarn tail and hook on your Pink slip knot from the back.
- Optional: Try to hold your blue and pink yarn tails as you crochet over them with your Pink working yarn now so you don't have to weave in these ends later.
- Ch 3 (counts as the first dc, 2 dc into the same corner space, ch 2, 3 dc into the same corner space, ch 1. (This is a corner cluster).
- [Skip to the next corner space (big hole) and work 3 dc, ch 2, 3 dc, ch 1].
- Repeat the brackets above [ ] 2 more times (one in each corner space)
- In the final corner, join with sl st to the top of ch 3 (remember that chain 3 counts as a dc stitch)
- Leave a 4" tail, cut your yarn. Pull through the loop tightly to secure.
Round 3: (Black)
- With your Black yarn, make a slip knot.
- Put your hook though the ch1 space to the right of your Pink yarn tail and hook on your black slip knot from the back of your Granny Square.
- Optional: Try to hold your pink and black yarn tails as you crochet over them with your black working yarn now so you don't have to weave them in later.
- Ch 3, 2 dc into the same space, ch 1,
- [Skip to corner space in corner space work 3 dc, ch 2, 3 dc, ch 1
- Skip to next ch 1 space and work 3 dc, ch 1]
- Repeat [ ] brackets 3 times
- Work your final corner, 3 dc, ch 2, 3 dc, ch 1 and join with a sl st to the top of ch 3.
- Leave a 4" tail, cut your yarn. Pull through the loop tightly to secure.
- When you're done with your Granny Square, take a tapestry needle and weave in your ends for a clean finished look. If you've already crocheted over them as you worked your rounds, then just snip off the excess with your scissors and weave in your last tail only.
- You might also want to create a border along the edges of your Granny Square. You could experiment with different colours and different stitches. Easiest could be the sc (single crochet stitch) for a neat border.
If you don't want stop after 3 rounds, you can continue more rounds until you have a large Granny Square which you could turn into a sweater, cardigan, pillow cover or blanket.

Frequently Asked Questions:
I'll answer some of the questions people ask most about crocheting Granny Squares like:
What is a Granny Square in crochet?
A Granny Square is a motif in crochet whereby you create one or more squares and then join them together to form a blanket, cardigan, bag, hat or any other project that can be created using crochet Granny Squares.
These Granny Squares have a simple composition, made up of clusters of double crochet (dc) stitches worked into chain spaces.
They are worked from the center outwards, in rounds that increase in size as the project progresses.
Where did the Granny Square come from?
The crochet Granny Square was first mentioned in The Art of Crocheting, published by the Butterick Publishing Company in 1891 and the first written pattern for similar crochet squares can be found in Weldon's Practical Needlework, published by Weldon & Co. in 1897. These were mainly used for cot quilts:
"A lovely quilt for an infant's cot or bassinette is made by crocheting a number of mosaic squares, and joining them together until the required size is attained, and then edging the whole with the accompanying wide handsome border" Weldon's Practical Needlework, p. 3
"These squares are commenced in the centre, and you work onwards, round and round, increasing at every corner, until the pattern is complete. The work is, for the most part, executed in double crochet, but has some portion worked in treble..." Weldon's Practical Needlework, Square For A Quilt, p. 7
How do you crochet a Granny Square?
- The basic or classic Granny Square is worked from the center out in joined rounds. In each round you repeat a pattern of granny clusters and chains.
- Granny Clusters are sets of 3 double crochet (dc) stitches worked into the same chain space of the previous round.
- Each Granny cluster is separated by chain spaces: either a ch 1 space along the sides of your Granny Square, or ch 2 spaces at the four corners of your Granny Square.
- Each corner of your Granny Square would have 2 Granny Clusters separated by a ch 2.
To crochet a Granny Square you will need:
- Some worsted weight yarn (leftover yarn will do), corresponding crochet hook, a yarn needle, & scissors.
- Crochet Granny Squares are worked in rounds into a ch 4 circle or a Magic Circle/Ring
- Granny Squares are worked in clusters of 3 dc, ch 2, 3 dc in corner spaces and 3 dc, ch 1, in ch 1 spaces from previous rounds (sides of Granny Square).
- Normally, Granny Squares are crocheted in 3 to 4 rounds, but you can continue for as many rounds as you like to get the size appropriate for the project you are working on.
NB Granny Squares can come in different shapes too! Check out this b Hexagon you can make into a lovely cowl!

And how about a Granny Triangle? Here's a tutorial for how to crochet A Granny Triangle and then you could turn these triangles into Granny Slippers 🙂


Why Does My Crochet Granny Square Look Crooked?
Your crochet Granny Square might look crooked if you've missed a dc (double crochet) cluster somewhere (in a corner perhaps?) or you crocheted into the wrong ch space.
Be sure you check where exactly the chain space is that you're supposed to be inserting your next cluster of dc stitches into. I tend to hold that ch space open with my thumb and middle finger to make sure I'm inserting my hook into the correct space.
Ensure that your tension is consistent throughout your Granny Square project.
If all your stitches are correct and your tension is even, then you can try blocking your Granny Square to stretch it to the desired shape.
How many granny squares do you need for a baby blanket?
- Generally speaking, for a 42" square baby blanket, you'll need 7 * 7 Granny Squares = 49 Granny Squares. This depends on your tension though and type of yarn used, so you might have to adapt.
- If you want to calculate the exact size for your blanket, you may want to use this Calculator from the Crochet Crowd that will show you exactly how many Granny Squares you'll need.
How many granny squares do you need to make a bucket hat?
The number of granny squares required for a hat may be different depending on:
- the size of your hat (baby, child or adult)
- the size of your Granny Squares (number of rounds, yarn & hook size)
- the placement of your Granny Squares on your hat.
There are lots of ways you can crochet a bucket hat using granny squares. Some patterns call for 5 granny squares and include one granny square for the top of the hat, some use more granny squares for the brim, or smaller flower/daisy squares all around.
For this crochet Granny Square Bucket Hat, I used 5 Granny Squares for the sides of the hat, a flat circle for the top, and rows of increases for the brim (either straight or ruffled/wavy).
How to join crochet Granny Squares?
There are several ways you could join your crochet Granny Squares and each has its unique look and texture. Some joins are seamless, flat or all together invisible, while others are more pronounced and give a nice texture to your finished project. Depending on what you're looking for you can try these methods here:
- Using a darning/yarn needle: whip stitch, seamless invisible join,
- Using your crochet hook: slip stitch (sl st), single crochet (sc), mesh stitch, dc2tog, or join as you go (JAYGO) including the tight braid join.
Have a look at Anastasia's Video Tutorial to learn the different methods of joining your Granny Squares:
How long does it take to crochet a Granny Square?
It normally takes me around 7 minutes to crochet a single colored 4-round Granny Square. For a multi-colored one, I'd say about 10 minutes.
This would be for the simple classic Granny Square pattern I showed you here. More complex Granny Square patterns would naturally take a little longer.
Are there crochet Granny Squares with flowers?
Yes! There are some beautiful Granny Squares with flower patterns. Here are a few examples:
- the Daisy Granny Square,
- Sunburst Granny Square,
- the African Flower Granny Square and
- the Crochet Rose Granny Square.
There are really all kinds of flowers you could incorporate into your Granny Squares that would make your project look super interesting or even 3-dimentional.

The Last Thing You Need To Know About Crochet Granny Squares
Can you see how easy it is to crochet Granny Squares? I hope you were able to follow along the pattern and learn how to crochet multi-colored Granny Squares and how to join them for a Granny Square crochet project of your choice.
I hope you enjoyed this Crochet Granny Square tutorial. All you need to do now is practice and you'll get the hang of it pretty quick!
Let me know if you have any questions and...
Happy crocheting!
Let's Keep in Touch :)
You May Also Like

About the Author
May
Follow me on socials here: