
Spiral Seashells Crochet Pattern
With Fibonacci Sequence
I'm obsessed with number sequences these days and figured I'd dig around a little bit into the famous Fibonacci Sequence to see how it could relate to crochet and what I could design using these numbers.
If you haven't heard of the Fibonacci Sequence before, a quick Google search will give you lots of information, but all you need to know for the purposes of this Spiral Seashell Pattern is that we are following the number sequence discovered by the Italian Mathematician Fibonacci. He was a "medieval Italian mathematician who wrote Liber abaci in 1202; “Book of the Abacus”, the first European work on Indian and Arabian mathematics, which introduced Hindu-Arabic numerals to Europe. His name is mainly known because of the Fibonacci sequence." (Encyclopedia Britannica) although many sources attribute this finding to earlier Indian mathematicians.
If you're not big on maths, don't worry! This is really quite simple.
The idea behind this Fibonacci Sequence is just adding 2 numbers together to get the next.
It starts like this:
1,1,2,3,5,8,13,21,…
So you add 1 + 1 to get 2, then 1 + 2 to get 3, then 2 + 3 to get 5, and so on.
")
The Fibonacci Sequence Explained © Start Crochet
What makes this sequence really special is how it shows up in nature, especially in spirals like seashells, pinecones, and even flowers. As the numbers grow, they create a natural-looking curve that feels balanced and organic as opposed to perfectly circular.
I wanted to apply this idea to crochet, so I decided to use this sequence to guide my stitches. To make this shell, I increased following Fibonacci numbers. This created a spiral that expanded gradually, mimicking the way a real seashell grows.
In this spiral seashell pattern, you'll notice the shape doesn’t just get bigger. It is also not flat. It grows in a way that feels more fluid and natural. It turned out to be a beautiful, slightly curved spiral that looks much closer to something you’d find on the beach.

How the Fibonacci Sequence works (step by step)
- Keep adding the last two numbers to get the next number
So here is how we get the Numbers we want to work with for this pattern:
- 0, 1 → starting values
- 0 + 1 = 1
- 1 + 1 = 2
- 1 + 2 = 3
- 2 + 3 = 5
- 3 + 5 = 8 - I stopped here for this pattern, but if you were to continue, these would be the numbers.
- 5 + 8 = 13
- 8 + 13 = 21
- 13 + 21 = 34
- 21 + 34 = 55
- 34 + 55 = 89
- 55 + 89 = 144 and so on...
The rule (in simple terms)
Each number is:
previous number + the one before that
Mathematically, this is often written as:
F(n) = F(n−1) + F(n−2)
Why is the Fibonacci Sequence Interesting?
When you follow this sequence of numbers, you'll get a specific spiral shape (as shown in the diagram below). This is the Fibonacci Spiral, which is made up of squares that expand using this same sequence of numbers. When you draw a curve diagonally into each square clockwise, you get this beautiful Fibonacci Spiral which you'll notice in many natural creations.
")
The Fibonacci Spiral
You'll start noticing the Fibonacci sequence showing up in surprising places:
- patterns in flowers, pinecones, and pineapples
- spirals in seashells
- art and design proportions
- the shape of the universe!
")
The Fibonacci Spiral in Nature © Start Crochet
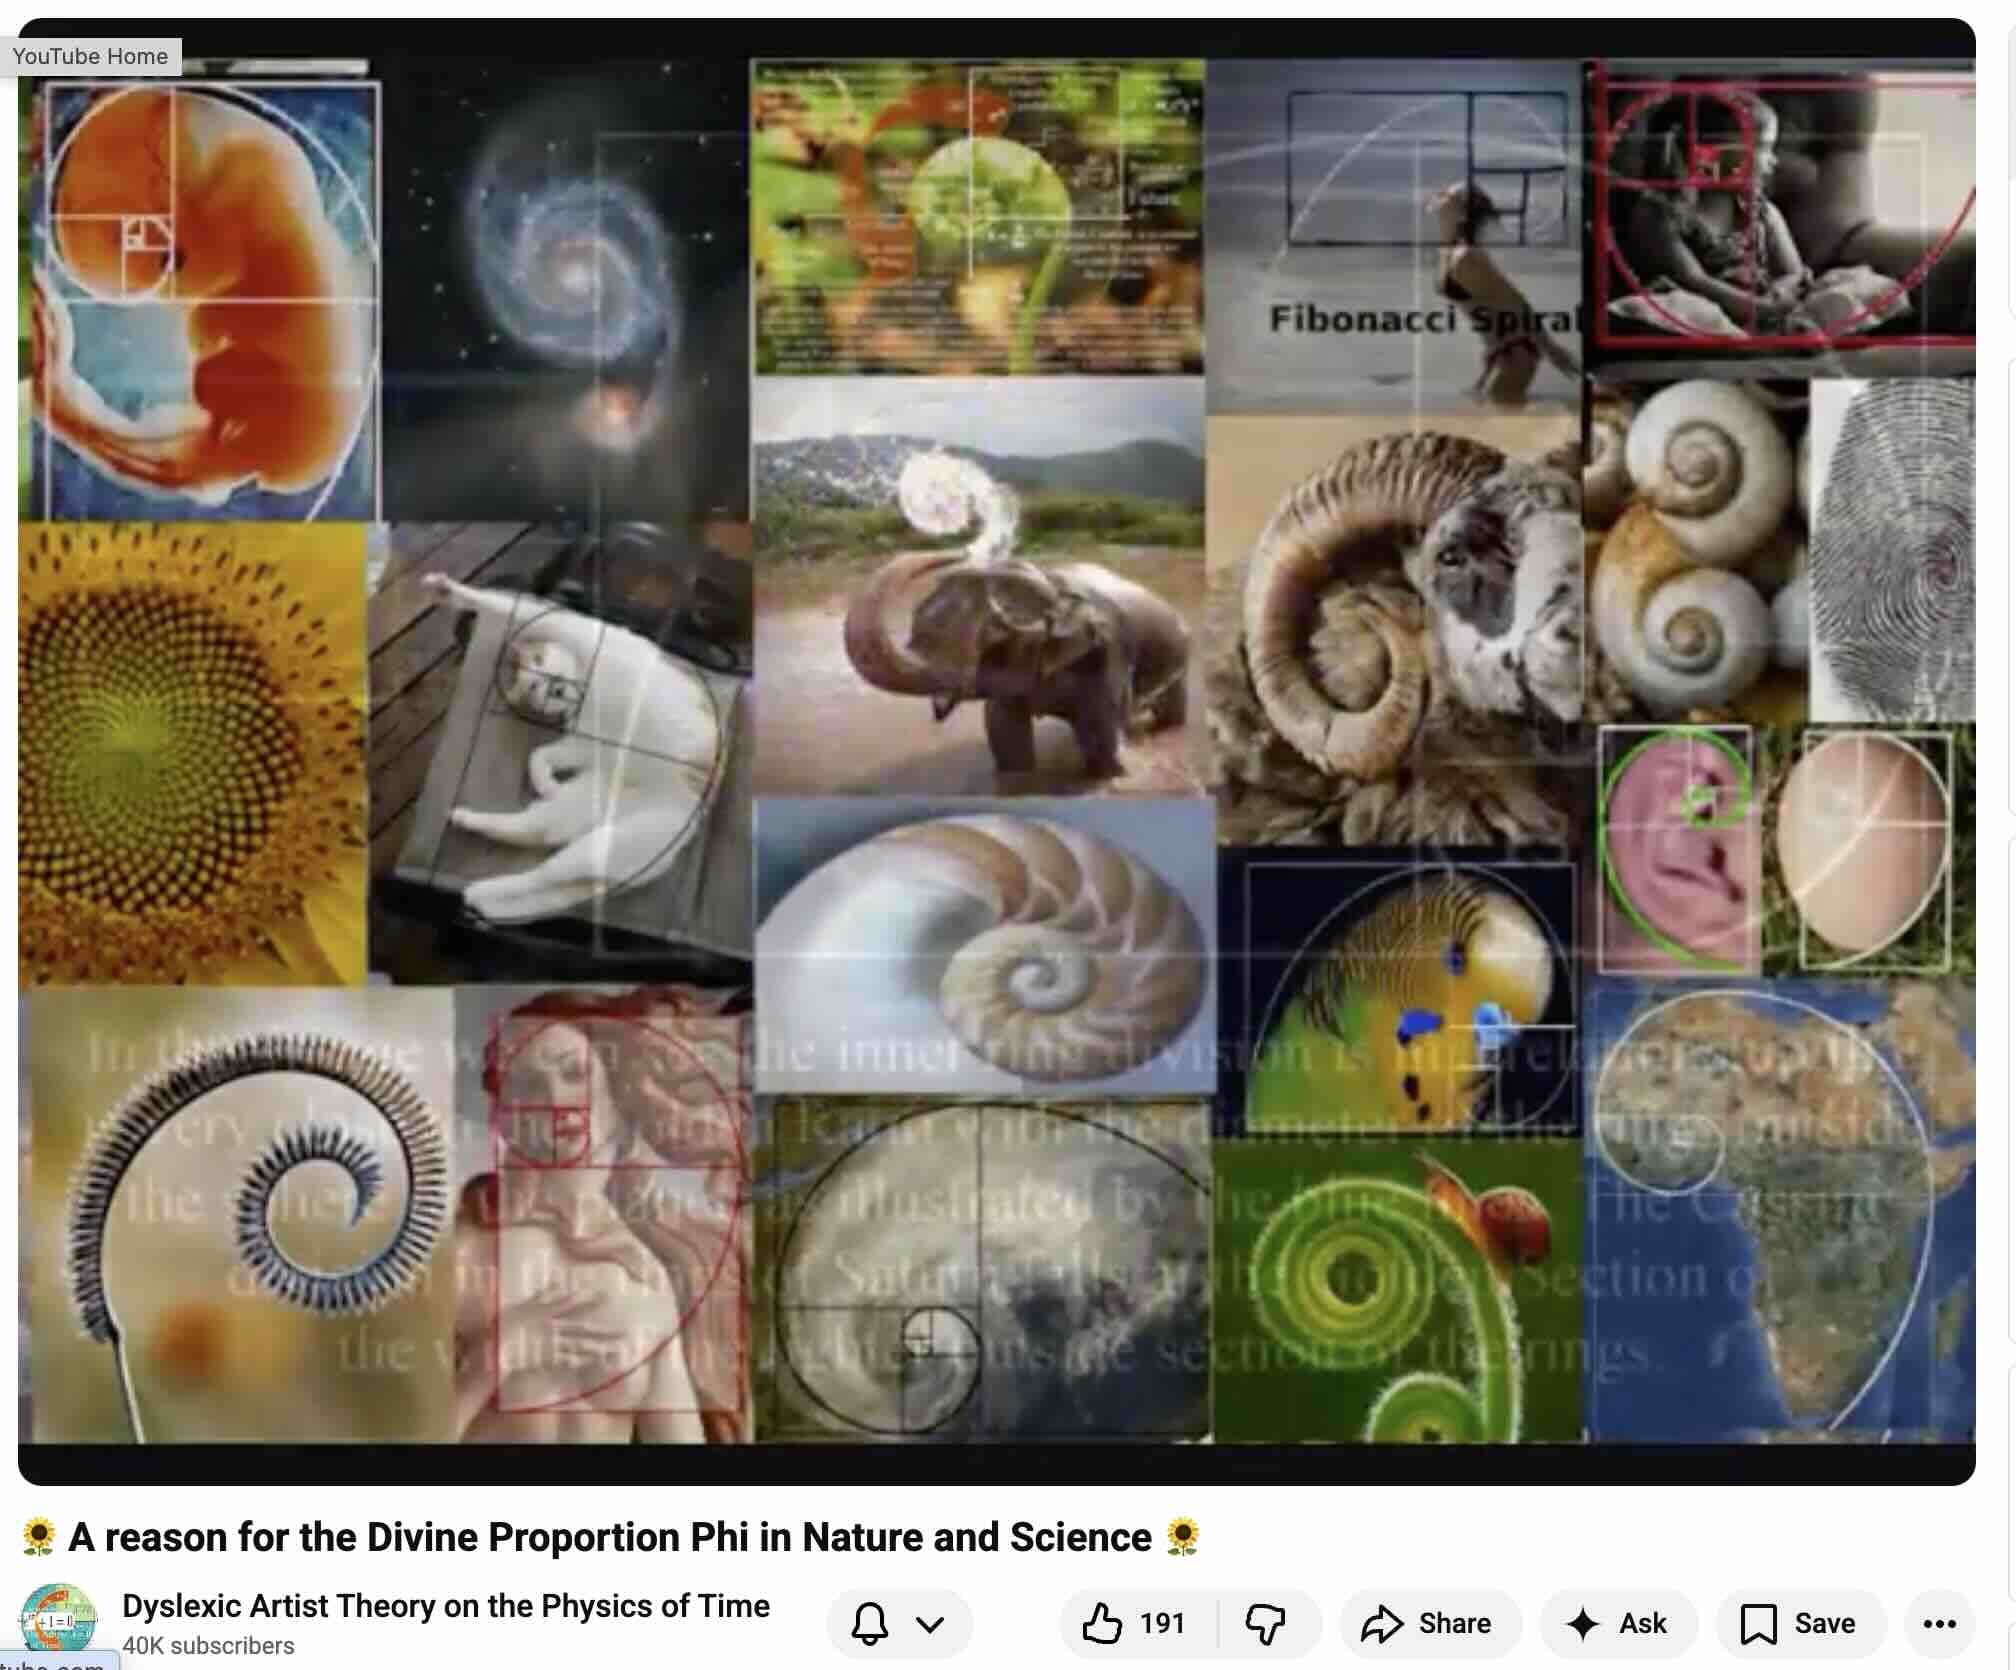
If you'd like to get more detailed information on the Fibonacci Spiral, with ind-depth mathematical explanation, here's a really interesting video by "Dyslexic Artist Theory on the Physics of Time".
Click to play
For the purposes of the seashells we're creating today, things will be much simpler than in this detailed video explanation. We're just going to stitch some simple crochet stitches into a spiral. I'll show you exactly what you need to do. Scroll down for the instructions.

These shells do not lay flat. Just like a real shell, they lay at an angle to the flat surface they're on.
This pattern is available in an Ad-Free PDF Format in my shop, Ravelry & Etsy.
Disclaimer: This post contains affiliate links, which means I receive a small commission, at no extra cost to you, if you make a purchase using the Start Crochet links. Please see my disclosure for more details.

Materials Needed
- DK cotton yarn in 2 contrasting colors
- Size 2.5 mm crochet hook
- Yarn needle
- Scissors
Like this pattern, but not ready to work it yet? Save it to Pinterest!
")
Abbreviations Used in Pattern
- MC = magic circle
- sc = single crochet
- hdc = half double crochet
- dc = double crochet
- tr = treble crochet (same as triple crochet (UK) = worked same as dc, but with 2 yarn overs to start
- inc = increase = 2 sts into the same stitch
- st = stitch
- sts = stitches
- sl st = slip stitch
- fo = fasten off
Skill Level
Beginner

Measurements/Size
Approximate finished size: 4 cm (1.5 ")
Yardage
Approximately 10 to 12 m (11 - 13 yards)
Gauge
Not important for this project.
Notes
- This spiral is worked in continuous rounds.
- Please note that I use US crochet terms.
US vs. UK Crochet Terms & Symbols
Free Printable

Your info is 100% secure and will never be shared.
Spiral Seashell Crochet Pattern (PDF Printable)
Would you rather have an Ad-Free PDF version of this pattern to print out? Click below to access this downloadable document for a small fee. You'll have the text-only version of the pattern in a couple of pages + all progress photo instructions separately.
")
")
Spiral Seashell Crochet Pattern Instructions
Shell
R1: Start with a Magic Circle (MC). Into this MC, work 2 sc, 2 hdc, and 3 dc stitches. (7 sts total)
Note: If you don't know how to work a Magic Circle, then ch 4, sl st to join and form a circle. Then work 2 sc, 2 hdc, and 3 dc into that circle.
Pull your magic circle closed (not too tight). Do not join. Continue to next instructions.

Start with a Magic Circle or 4 chains joined into a ring
")
2 sc, 2 hdc, and 3 dc into the circle
")
Pull circle closed
Work a dc increase into the next 5 sts. (10 sts)
")
5 dc increases
Work a treble crochet increase into the next 8 sts. (16 sts)
")
8 tr increases
Leave 4" tail to weave in, cut your yarn and fasten off.
Weave in your ends neatly at the back of your shell. Make sure not to pull too hard on the final stitch so as not to deform your shell.
")
Weave in ends
Cut excess yarn tails.
Note: Your shell will be curved, just like a real shell. It should not lay flat.
")
Curvature of shell
Contour
For the contour, we will use the slip stitch surface crochet technique.
Using a contrasting color of yarn, tie a slip knot. Remove slip knot from hook.
")
Slip knot in contrasting colored yarn
Make sure the front side of your shell is facing upwards, then insert your hook into the center from the front of your shell. Catch the slip knot and pull it through.
")
Insert hook from right side of shell and catch slip knot from the back
")
Pull up slip knot through center of shell
Insert your hook into the first stitch you worked, pull up a loop from behind the shell. Slip stitch.
Note: It might be a little difficult to find the very first stitch of your rounds. Rotate the shell so that the last stitch is facing north. It will be the shortest stitch (sc) you can see nearest the center of your shell.
")
Insert hook into the first stitch of the shell and yarn over from the back of the shell.
Continue to slip stitch loosely into the following stitches one after the next all around the shell. First, you will be slip stitching inside the shell, then at some point, you will be stitching on the contour of the shell (into the regular "v"s on the tops of your stitches. Continue till you reach the very last stitch.
")
Slip stitch loosely into every following stitch of the shell
Leave 4" tail, cut your yarn and fasten off.
Weave in your ends neatly on the back of your shell.
")
Weave in your yarn tails at the back of the shell
")
Final shell
And that's all there is to it!
Now you can make several of these seashells to use as decorations or to add to your projects. What will you be using them for?
Thanks for stopping by and let me know if you have any questions in the comments section below.


Happy hooking!
May
Related Posts
Want to see even more Mathematical Crochet patterns? Have a look at these:


Are you just learning how to crochet? Have a look at these awesome crochet kits, perfect for beginners! I wrote a complete hands-on review on The Woobles Kits for you 🙂

Have you started several crochet projects and are worried you won't remember your hook size, the yarn you used or which pattern you were following? Download this Free Crochet Project Tracker and keep it in your projects folder.
Crochet Project Tracker
Free Printable
Keep track of your crochet projects with these printable sheets.
Your info is 100% secure and will never be shared.
Disclaimer: Information in this crochet pattern is given for reference only. Even though I do my best to ensure all patterns have no mistakes, occasional errors may slip through.
No liability is accepted for variations in finished projects. Please get in touch with me at admin@startcrochet.com if you think there might be a mistake in the pattern or if you are unsure about how to interpret the instructions.
I’d love to see your finished item, so please tag me using @startcrochet.
Please follow my accounts to see what else I’m up to and to keep in touch:
YouTube: https://www.youtube.com/@StartCrochet
Facebook https://www.facebook.com/startcrochet
Pinterest: https://www.pinterest.com/startcrochet
Instagram https://www.instagram.com/startcrochet
Ravelry https://www.ravelry.com/people/StartCrochet
Etsy: https://startcrochetdesigns.etsy.com
LoveCrafts: https://www.lovecrafts.com/en-gb/user/Start-Crochet/5fccc556-8c97-4521-bcf0-0aadf9853faf
You may sell any finished products that you make from this pattern. However, when selling online, please include a link back to my blog startcrochet.com or tag me on social media with @startcrochet or with hashtag #startcrochet
Thank you!
© All rights for this crochet pattern design and photos are copyright and reserved to Start Crochet (May Shehab © 2025) . Copies and/or reproduction, translating, reselling or creating video tutorials of this pattern is a violation of the law.
Let's Keep in Touch :)
You May Also Like

About the Author
May
Follow me on socials here:
Bonjour May, Quel article fascinant! Je ne sais pas écrire l’anglais proprement, mais je suis bilingue (mais francophone au départ). Votre modèle de seashell est super joli et quand je pense au processus mental que vous avez mis dans ce projet, pour moi c’est tout simplement fantastique. Merci de nous offrir le motif.
Vous avez fait ma journée! Et en parlant de journée je vous en souhaite une excellente…. Amicalement Lucie-France
P.S. J’ai mis cet onglet comme page d’accueil parce que je veux regarder le vidéo que vous nous présenté après le travail.
Oh thank you so much for your kind words Lucie-France! YOU are the one who made my day today! I am so happy to hear you liked my Fibonacci Seashells 🙂 I will be experimenting more with mathematical number sequences and patterns in my crochet designs in the coming months. Thanks again and have a wonderful day 🙂
May xx