
Easy Simple Pumpkin
Crochet Pattern
Fall is here, and you know what that means—time to break out those autumn-colored yarns and get hooking! If you're anything like me, you’re ready to fill your home with all things pumpkin, from your front porch to your crochet basket.
But who says decorating for fall has to be complicated? Whether you want a plain orange pumpkin or a colorful one, this super easy pumpkin crochet pattern is the perfect project to add a touch of handmade charm to your autumn décor.
In just a few simple steps, you can whip up a cozy little pumpkin that’s perfect for sprucing up your mantel, creating a festive centerpiece, or even gifting to a fellow fall-lover. So grab your favorite yarn, settle in with a cup of pumpkin spice something, and let's stitch up some autumn magic together!

Disclaimer: This post contains affiliate links, which means I receive a small commission, at no extra cost to you, if you make a purchase using the Start Crochet links. Please see my disclosure for more details.
What You’ll Learn
- How to work the hdc stitch
- How to work the hdcblo stitch
- How to keep your edges straight in a rectangular crochet piece
- How to turn a rectangular crochet piece into a pumpkin shape.
Materials Needed
- DK or 4ply yarn (acrylic or cotton) in orange and green or if you'd like a colorful pumpkin, use some variegated yarn. For this project, I used Loops & Thread, 100% Cotton in Vintage Floral Ombre. You can find this yarn at Walmart or Michael's.
- Crochet hook that fits your yarn. For this project I used a 4 mm hook.
- A tapestry needle
- A pair of scissors
- A stitch marker or contrasting piece of yarn.
- Some fiberfill stuffing.
Like this pattern, but not ready to work it yet? Save it to Pinterest!

Abbreviations
- ch = chain
- hdc = half double crochet
- hdcblo = half double crochet back loop only
- st = stitch
- sts = stitches
- fo = fasten off
Skill Level
Beginner
Gauge
Gauge = 16 dc and 6 rows with a 4 mm crochet hook = 4" (10 cm).
Gauge is not really that crucial for this project. Just try experimenting with different hook sizes & different weight yarns to get a gauge you are happy with for the project you are working on.
Like this pattern but not ready to work it yet? Save it to Pinterest!

Size
This Pumpkin measures about 9 inches (23 cm) in circumference.
Yardage
Approx. 40 meters (43.7 yards)
Love Pumpkins?
Here's a special offer for you with a variety of beginner-friendly pumpkin patterns (5 in 1 bundle)

Notes
- You can make the pattern larger or smaller by changing the type of yarn and/or hook size.
- Numbers at the end of each row (in brackets) indicate the number of final stitches in that row.
- Please note that I use US crochet terms. Here's a US/UK Conversion Chart.
US vs. UK Crochet Terms & Symbols
Free Printable

Your info is 100% secure and will never be shared.
Easy Mini Pumpkin Video Tutorial on YouTube
US vs. UK Crochet Terms & Symbols
Free Printable
Your info is 100% secure and will never be shared.
Crochet Pumpkin Pattern (PDF Printable)
Would you rather have a PDF version of this pattern to print out? Click below to access this downloadable document for a small fee. You'll have the text-only version of the pattern in a couple of pages + all progress photo instructions separately.
Quick& Easy Pumpkin
Crochet Pattern PDF

Crochet Halloween Gift Tags (PDF Printable)
If you're crocheting this Pumpkin to give away as a gift or to sell at a craft market, here are some PDF printable gift tags for you 🙂

Crochet Pumpkin Pattern Instructions
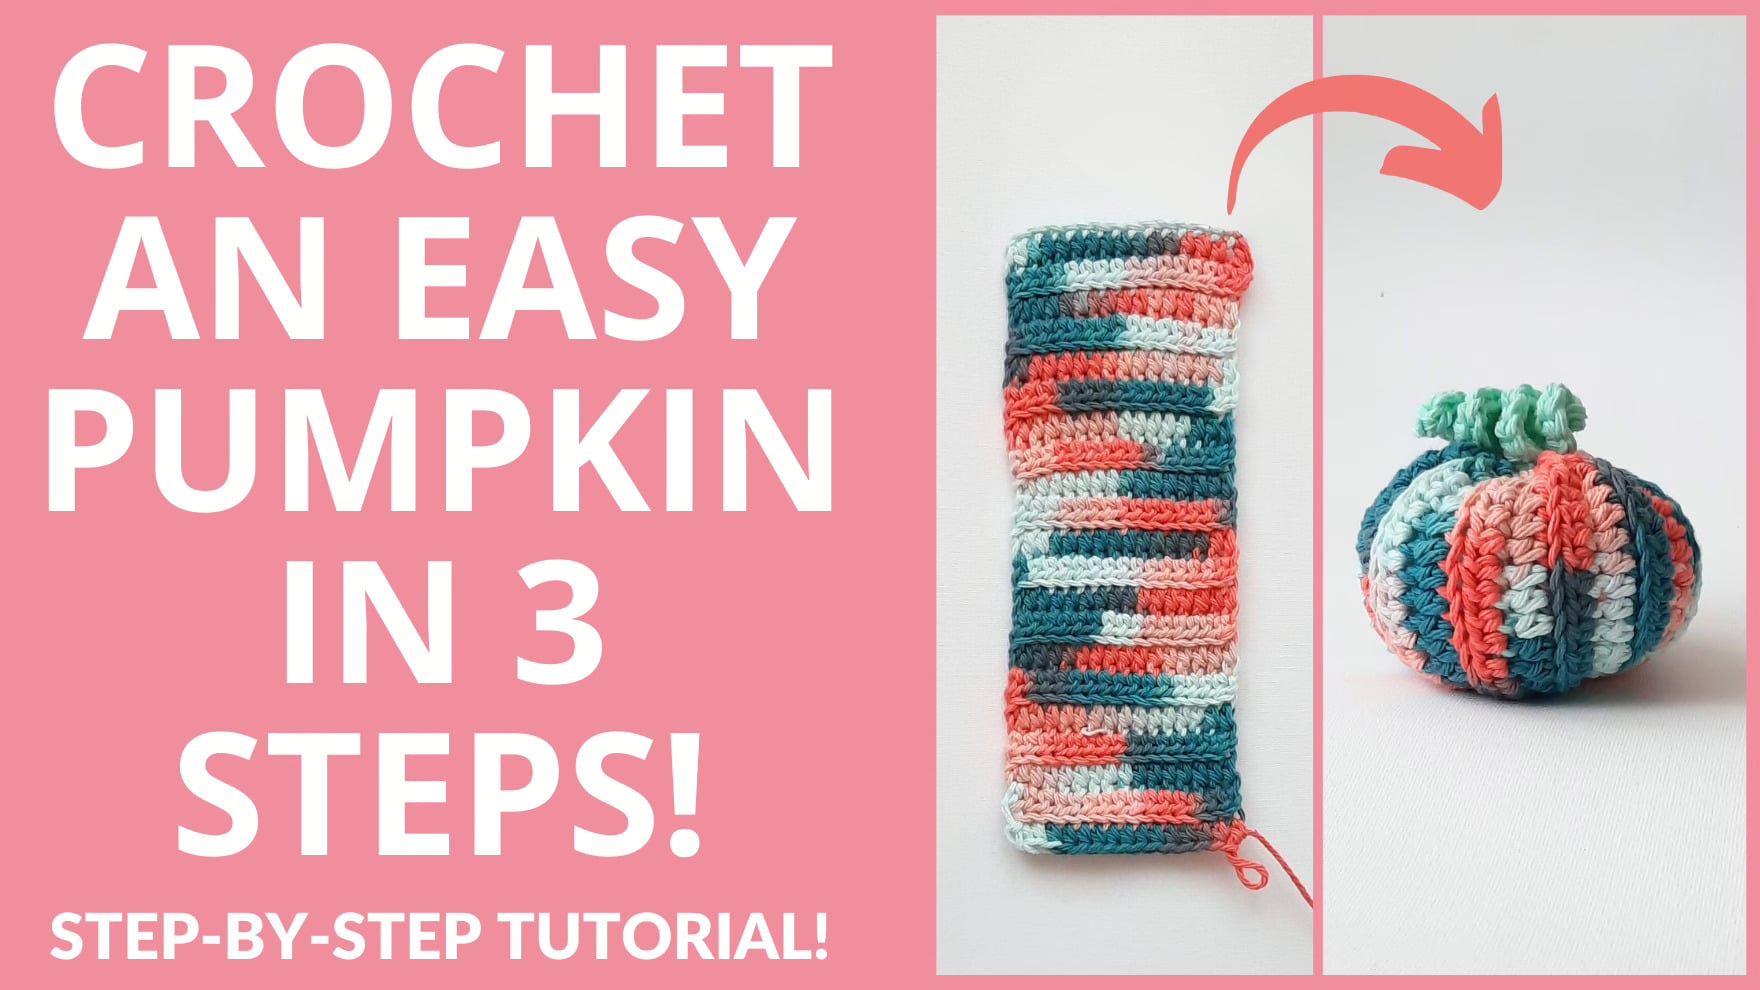
This pumpkin pattern is so easy, you'll be totally surprised when I tell you that all you need to do is crochet a rectangle and you can shape it into a pumpkin! Let me show you the exact steps. I will use the plain orange yarn for this tutorial.

Pumpkin
Row 1: With orange, chain 15 (15).

Row 2: hdc into the second chain from your hook, hdc into each stitch along (14). Ch1, turn.


Rows 3-21: [hdc into the back loop only (hdcblo) of each stitch along. Ch1, turn.] (14).
Note: If you’re a beginner, it would be best to place a stitch marker into the last stitch of each row to make sure you don’t miss it in the following row.


Leave about an arm’s length of yarn, cut, and fasten off.


Thread a darning needle with the long yarn tail and start using the running stitch on the top of your pumpkin. (insert needle up through the fabric and then back down again in a straight line along the top edge of the pumpkin).


Once you reach the end of the top row, pull your yarn tightly to gather the top of the pumpkin (don’t pull too hard so that your yarn doesn’t snap!)

Once you’ve gathered the top of your pumpkin, we want to sew the sides closed.
Line up the two sides of your pumpkin.
Insert your needle in the first stitch of one side of your pumpkin (the top of Row 21) and into the top of the other side (your first starting chain). Pull your yarn through to connect the two sides.

Continue to connect both sides of your pumpkin using the running stitch.

Once you reach the end and have connected both sides, fill your pumpkin with some stuffing.

Continue to use the running stitch to close off the bottom of your pumpkin.

When you’re done with the running stitch to the end of the row, pull it closed slightly and check whether you have too much or too little stuffing. This is when you can adjust before you close off your pumpkin. I added some stuffing to make it look fuller.

Pull the bottom of your pumpkin closed tightly and stitch the opening completely closed with your needle.

Insert your needle through the center of your pumpkin from the bottom to the top (through the stuffing) and pull the yarn through. This will flatten the pumpkin slightly to give it its distinctive pumpkin shape.

If you have a little opening on the top of your pumpkin, you can stitch it closed now.

Leaves
R1: With green yarn, ch 15 (15).

R2: 2 sc into the second ch from your hook. 3 sc into each stitch along your chain (42).


Leave a 4” tail, cut your yarn and fasten off.
Tie the two ends together and secure with a double knot.
Cut off excess and twirl your leaves nicely so that the curls are all equal.
Attaching the Leaves
With the 2 remaining yarn strands on your pumpkin, tie a knot around the middle of the leaves to create 2 twirls. Cut off excess.

How about attaching some fun eyes to your Pumpkin? You can find these on Temu. Click the link https://temu.to/m/u3ls4x2kv19 to get $100 coupon bundle or ️ Search acj021775 on the Temu App to get 30% off discount!!

I hope you enjoyed this Crochet Pumpkin tutorial. All you need to do now is get started and you'll get the hang of it pretty quick! Try some more color combinations to create some variety 🙂 Here an idea of what else you could use your pumpkin for: A Pumpkin Wind Spinner perfect for Halloween home decor.
")
Let me know if you have any questions and...
Happy crocheting!
Want to Simplify Your Crochet Experience?
I've designed many printables you can download for FREE that'll help you with your crocheting. You'll find simple sizing templates, project trackers, free gift tags, crochet terms explained and much more. Head on over to the Start Crochet's Printables Page and download what you need.


TESTER RECOGNITION
A heartfelt THANK YOU to my pattern testers. I truly appreciate your time and effort in testing my pattern and value the feedback you provided:
Donna Litton Vasquez
Hanna Cuellar
Jennifer Lehr
Jennifer Mullin
Karen Mynatt
Kirstine Di
Kristy Sodaro
Madison Criddle
Tina Merrill
Disclaimer: Information in this crochet pattern is given for reference only. Even though I do my best to ensure all patterns have no mistakes, occasional errors may slip through.
No liability is accepted for variations in finished projects. Please get in touch with me at admin@startcrochet.com if you think there might be a mistake in the pattern or if you are unsure about how to interpret the instructions.
This free pattern is provided for personal use only. You may not copy, redistribute, or sell the pattern (in whole or in part) in any form. You are, however, welcome to sell finished items made from this pattern – credit to Start Crochet as the designer is always appreciated.
I’d love to see your finished item, so please tag me using @startcrochet.
Please follow my accounts to see what else I’m up to and to keep in touch:
YouTube: https://www.youtube.com/@StartCrochet
Facebook https://www.facebook.com/startcrochet
Instagram https://www.instagram.com/startcrochet
Pinterest https://www.pinterest.ch/startcrochet
Ravelry: https://www.ravelry.com/people/StartCrochet
LoveCrafts: https://www.lovecrafts.com/en-gb/user/Start-Crochet
Yarnsea https://yarnsea.com/collections/start-crochet
Thank you!
© All rights for this pattern are reserved to Start Crochet. Copies and/or reproduction, translation or reselling of this pattern is a violation of the law.
Let's Keep in Touch :)
You May Also Like

About the Author
May
Follow me on socials here: