Easy Granny Slippers
Crochet Pattern (FREE)
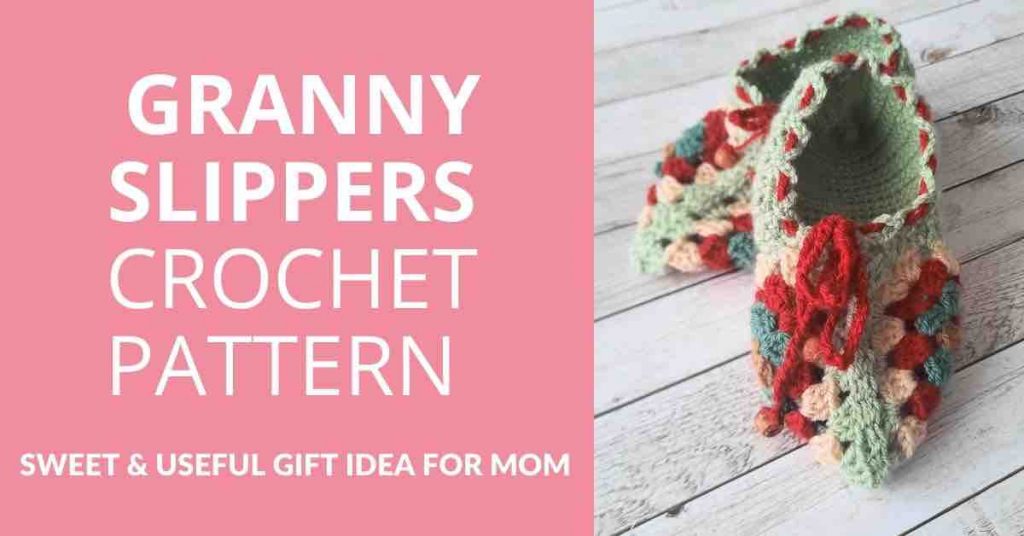
Looking for a fast & easy Granny Slippers crochet pattern so you can whip up a sweet & useful gift for Mom?
Flaunt your crochet skills with these fun granny slippers!
If you're a beginner crocheter, you'll find the step-by-step photo instructions helpful. You'll also find the Ad-free PDF printable version of the granny slippers crochet pattern that you can instantly download.
Bonus: I've designed some cute handmade with love gift tags that you're welcome to download for Free & add to your crochet granny slippers when you gift them.

Thank you for visiting my Blog!
Here's A Free Gift For You.
"Handmade WIth Love" Gift Tags (PDF Printable)
Click the button below to download them now.
If you have any questions, please get in touch in the comments below and I'll be happy to answer them for you.

Disclaimer: This post contains affiliate links, which means I receive a small commission, at no extra cost to you, if you make a purchase using the Start Crochet links. Please see my disclosure for more details.

Like this pattern but not ready to work it yet? Save it to Pinterest!

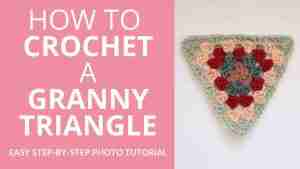
Granny Triangle Crochet Slippers
What You’ll Learn
- How to crochet a granny triangle using (dc) stitch
- How to change yarn color after granny rounds
- How to stitch granny triangles together
- How to shape slippers
- How to adjust slipper sizing
- How to ensure your crochet slippers are non-slip
Materials Needed
- 5 colors of some classic DK yarn (I used Paintbox Yarns for these Granny Triangles). Cotton, cotton blends or bamboo yarns would also work well.
- Crochet hook that fits your yarn. For these slippers, I used a US size 7 (4.5 mm) hook.
- A tapestry needle
- A pair of scissors
- Some beads (optional)
Abbreviations Used In Pattern
- mc = magic circle
- ch = chain
- sc = single crochet
- dc = double crochet
- sl st = slip stitch
- st = stitch
- sts = stitches
- sk = skip
- sp = space
- fo = fasten off
Skill Level
Advanced Beginner
Measurements
Measurement: A Granny Triangle of 5 rounds = 13 cm (5.1”)•
Slipper length: 23.6 cm (9.3 inches)
Gauge
Gauge: 16 stitches & 19 rows in sc = 10cm (4")
Yardage
I used about 140m (153 yards) of yarn for both slippers.
For both slippers, you will need around 140 m (153 yards) of yarn.
Notes
- Numbers at the end of each round in parentheses ( ) = total number of stitches for that round.
- Bolded text between brackets [ ... ] means pattern repeat.
- If you are new to reading crochet patterns, you might find these tips helpful.
You can adjust the sizing of these slippers by changing your hook size for the triangles. If you are making a child's size, you may decrease the number of rounds in the granny triangles. I made a pair of slippers for my 6 year-old with only 3-round granny triangles.
If you feel the holes in your Granny Triangles are too big, it would be best to go down a hook size so your toes are fully covered.
- For the length of the slippers, please refer to the provided downloadable for sizing.

Child Size Granny Slippers Crochet Pattern (3 Rounds in Granny Triangles)

Child Size Granny Slippers Crochet Pattern (3 Rounds in Granny Triangles)
US vs. UK Crochet Terms & Symbols
Free Printable

Prefer the PDF version?
If you'd like the ad-free, printable PDF pattern that you can download to your computer, ipad or cellphone and print at home for convenience, you may purchase it for a small fee from my shop
You will get:
- Text-only version for easy printing,
- Step-by-step photo tutorial.
You may also purchase this pattern from Ravelry if you prefer.
Granny Slippers
Crochet Pattern
 - Granny Slippers Crochet Pattern PDF")
Crochet Slippers Sizing Template
Free Printable
Size your crocheted slippers correctly with this sizing chart.

 - Start Crochet")
Granny Slippers Crochet Pattern Instructions
The instructions for these slippers are divided into 4 parts:
Part I: Front (Triangles over toes)
Part II: Stitching the granny triangles together
Part III: Back (sc over body / heel)
Part IV: Border
You will be repeating these instructions for the second slipper.
Instructions For Classic Crochet Granny Triangle (Multi Color )
Part I: Front (Triangles over Toes) - Crochet 4 Triangles
There are several ways to crochet a classic Granny Triangle, but I find this one the easiest and most straight forward. Here we go:
Foundation:
- Start off with color A, tie a slip knot, then Ch 4. You could also try the Magic Circle (mc) for a tight & closed center.
- Join to first ch stitch with a slip stitch to form a circle.

Magic Circle

Ch 4 & sl st
Round 1:
- Continuing with color A, ch 2 (counts as first double crochet)
- 2 dc into center of circle, ch 2, [3 dc into center of circle, ch 2] repeat brackets 1 more time

- Join with sl st to top of first ch 2 at beginning of this round.
- Leave a 4" tail, cut your yarn and fasten off.
- If you began with a mc, pull the tail to close the circle tight.
You should have 3 clusters of 3 dc at this point and 3 corners (the ch 2 after each cluster creates a corner).

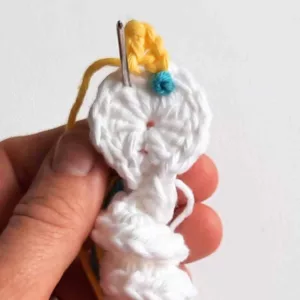
Round 2:
- Join color B with a sl st (in the gap/corner space to the right of the tail from Round 1)

- ch 2 (counts as first dc), 2 dc into same corner space, ch 2, 3 dc into same corner space, ch 1 (This is a corner cluster)

- [Skip to next corner space (big gap) and work 3 dc, ch 2, 3 dc, ch 1].

- Repeat brackets 1 more time

- Join with sl st to top of beginning ch 2 of this round.
- Leave a 4" tail, cut your yarn and fasten off.

You should have 2 clusters in each of the 3 corners now. Each cluster is 3 dc sts. That means a total of 18 dc sts in this round. Each corner of the triangle has 2 clusters separated by a ch 2.
Round 3:
- Join color C with a sl st , ch 2, 2 dc into same space, ch 1,

- Skip to next corner space [in corner space work 3 dc, ch 2, 3 dc, ch 1

- Skip to next ch 1 space and work 3 dc, ch 1]

- Repeat brackets 1 more time

- In final corner space, work 3 dc, ch 2, 3 dc, ch 1 and join with a sl st to top of beginning ch 2.

- Leave a 4" tail, cut your yarn and fasten off.
You should now have 2 clusters in each of the 3 corners and 1 separate cluster on each side.
Round 4:
- Join color D with a sl st , ch 2, 2 dc into same space, ch 1,

- Skip to next ch 1 space and work 3 dc, ch 1

- Skip to next corner space [in corner space work 3 dc, ch 2, 3 dc, ch 1

- Skip to next ch 1 space and work 3 dc, ch 1

- Skip to next ch 1 space and work 3 dc, ch 1]

- Repeat brackets 1 more time
- In final corner space, work 3 dc, ch 2, 3 dc, ch 1 and join with a sl st to top of ch 2.
- Leave a 4" tail, cut your yarn and fasten off.
You should now have 2 clusters in each of the 3 corners and 2 separate clusters on each side.
Round 5:
- Join color E with a sl st , ch 2, 2 dc into same space, ch 1,

- Skip to next ch 1 space and work 3 dc, ch 1
- Skip to next ch 1 space and work 3 dc, ch 1

- [Skip to corner space: in corner space work 3 dc, ch 2, 3 dc, ch 1

- Skip to next ch 1 space and work 3 dc, ch 1
- Skip to next ch 1 space and work 3 dc, ch 1
- Skip to next ch 1 space and work 3 dc, ch 1]
- Repeat brackets 1 more time
- In final corner space, work 3 dc, ch 2, 3 dc, ch 1 and join with a sl st to top of ch 2.
- Leave a 4" tail, cut your yarn and fasten off.

Repeat this pattern 3 more times till you have 4 Granny Triangles in total.
Part II: Stitch Granny Triangles Together
- Hold 2 Granny Triangles back to back and line up your stitches.

- Cut about 50 cm (20") length of same color yarn you used for your last round of your Granny Triangle.

- Thread your yarn in a tapestry needle.
- Attach the other end of your yarn to the inside corner of one of your Granny Triangles with a knot.

- Now begin to attach the 2 Granny Triangles together by making an "S" shape [Front to back, then back to front in the middle of the "v"s] along 2 sides of your Granny Triangles. Try to work as neatly as you can and don't miss any stitches.

- Once you're done with stitching together your 2 sides, simply pull out your tapestry needle and leave the yarn tail hanging for now.
- Place 2 stitch markers in the top middle of these 2 clusters (indicated in photo). [In the center of the second ch 2 cluster on the right half of the Granny Triangle, and same in the left half of the second Granny Triangle].

Part III: Body / Heel
Now grab your crochet hook again and attach the same color yarn (as your final round of Granny Triangles) to where you inserted your left stitch marker (while project is facing you). Use a slip stitch to attach.

Start working sc stitches all around the back end of your Granny Triangles till you reach your 2nd stitch marker, ch 1 & turn (30 sts)
Rows 2 - 18: sc into each st along, ch 1 & turn (30)
Notes:
- The number of rows will depend on the slipper size you're making. Check for sizing either by trying them on, or by referring to the Slipper Sizing Template.
- For your last row, you will not ch 2 & turn. After your 30th sc, leave a 10" tail, cut your yarn & fasten off.

Remember that the slipper might stretch a bit so rather not make them too big.

- Turn your Granny Triangles inside out and fold your slipper base back to back.


- Hold the 2 edges of the heel together (back to back) and using your Tapestry needle, start stitching the 2 sides together neatly using the whip stitch.

- Turn your slipper the right side out and check for fitting.
If your slipper feels too tight, then rip out your joining seam and add a row or 2 more until you reach the length you need.
If your slipper feels too large, then it's also best to rip out your joining seam and frog a row or two.
Haven't heard of "Frogging" yet? Check out these crochet slang terms 🙂

Part IV: Border
- Starting at the top of your heel (where you seemed the edges together), attach the same color yarn again with a slip stitch.

Round 1: sc all the way around into the sides of the rows. Put 1 sc into the side of each row and along the front top part of your slipper as well. This creates a neat base for your border.


Round 2: (ch 4, sk a st, sl st into next st). Repeat brackets around till you reach the beginning sl st. I had (22) arches around the top of my slipper. Your number may be different depending on what size slipper you're making,
Note: If you crochet your chains loosely, you can also only ch 3 instead of ch 4 so your arches are not too big.


- Grab a contrasting color of yarn, one that you've used in your Granny Triangle.
- Work a long row of chain stitches till you reach about 50 cm (20") in length. Let's call this your ribbon.
- Starting from the middle of the open front part of your slipper, insert your ribbon into one of the arches (from the outside inwards).

- Continue to alternate with inserting your ribbon through the arches once from the front and once from the back until you reach the last arch on the front of your slipper.

Adjust the length of your ribbon so that both sides are of equal length.

Tie a knot & bow.

With your tapestry needle, attach some beads or any other embellishment you'd like. Make sure your beads are secure, then cut off the excess yarn.

Turn your slippers inside out and weave in all your ends. Cut off excess and start with your next slipper.
How To Make Crochet Slippers Non-Slip
Test our your crochet slippers and see if you need to make them non-slip.
Here are a few suggestions of how you can fix slippery crochet slippers:
- Hot Glue (apply as dots on the soles)
- Sock-Stop (dots on soles)
- Silicone Caulk (lines across soles)
- Silicone Sealant (lines across soles)
- Plastic Dip (dots on soles)
- Puffy Fabric Paint (dots on soles)
- Non-Slip Rug Pad (cut into strips or circles)
- Shelf Liner (cut into strips or circles)
- Felt (cut into strips or circles)
- Anti-Skid Gripper Fabric (cut into strips or circles)
- Suede (cut into strips or circles)
- Non-Skid Rubber Treated Fabric (cut into strips or circles)
Voila!
You're done!
Congrats on your new slippers!! 🙂
Granny Slippers Crochet Pattern PDF Printable
If you feel you are proficient in reading crochet patterns and would like to have a PDF printable ad-free version of the Granny Slippers pattern, you can purchase it from my shop.

Note: This button link will be active once testing is over and edits are done.
Freebie
Have you started several crochet projects and are worried you won't remember your hook size, the yarn you used or which pattern you were following? Download this Free Crochet Project Tracker and keep it in your projects folder.
Crochet Project Tracker
Free Printable
Keep track of your crochet projects with these printable sheets.
Your info is 100% secure and will never be shared.
I hope you enjoyed this Granny Slippers crochet pattern. I hope you make a few of these to give as gifts and a pair for yourself as well, of course.
Let me know if you have any questions and...
Happy crocheting!
Disclaimer: Information in this crochet pattern is given for reference only. Even though I do my best to ensure all patterns have no mistakes, occasional errors may slip through.
No liability is accepted for variations in finished projects. Please get in touch with me at [email protected] if you think there might be a mistake in the pattern or if you are unsure about how to interpret the instructions.
I’d love to see your finished item, so please tag me using @startcrochet.
Please follow my accounts to see what else I’m up to and to keep in touch:
Facebook https://www.facebook.com/startcrochet
Instagram https://www.instagram.com/startcrochet
Pinterest https://www.pinterest.ch/startcrochet
Ravelry: https://www.ravelry.com/people/StartCrochet
LoveCrafts: https://www.lovecrafts.com/en-gb/user/Start-Crochet
Yarnsea https://yarnsea.com/collections/start-crochet
You may sell any finished products that you make from this pattern. However, when selling online, please include a link back to my blog startcrochet.com or tag me on social with handle @startcrochet
Thank you!
© All rights for this pattern are reserved to Start Crochet. Copies and/or reproduction, translation or reselling of this pattern is a violation of the law.


Would love the gift tags. Thank you
Hi Helen,
Thank you for getting in touch 🙂
Which gift tags would you like? There are several in my shop to choose from and I’ll be releasing some Valentine’s gift tags tomorrow as well. Here’s the link to all the tags & labels in my shop: https://startcrochet.com/product-category/tags-labels/
Happy crocheting!